Während des Testzeitraums steht Timebutler mit allen Features und uneingeschränkt für Sie zur Verfügung. Timebutler wird Sie rechtzeitig vor Ablauf des Testzeitraums benachrichtigen.
Wenn Sie Timebutler nicht weiter verwenden möchten, müssen Sie nichts weiter tun: der Testzeitraum endet automatisch und Sie müssen nicht kündigen.
Wenn Sie sich für Timebutler entscheiden, dann können Sie bequem online eine Nutzungsverlängerung bestellen. Ihre Kollegen bemerken dabei nicht, dass Sie im Hintergrund eine Nutzungsverlängerung bestellt haben.
Sie sollten also schon während des Testzeitraums Echtdaten eintragen, keine Beispieldaten, damit Sie nicht zum Ende des Testzeitraums die Beispieldaten löschen und die korrekten Daten eintragen müssen. Mit der Verlängerung des Nutzungszeitraums bleiben natürlich alle Nutzerkonten, Einträge, Einstellungen und sonstige Daten erhalten und Sie arbeiten nahtlos mit Ihren bisherigen Nutzerkonten weiter.
Genehmigte Urlaubsanträge können nachträglich nicht geändert werden, damit Anträge nicht nachträglich manipuliert werden können und aus Gründen der Revisionssicherheit.
Um einen genehmigten Urlaubsantrag zu ändern, ist es also erforderlich, den Urlaubsantrag zu löschen und einen neuen Urlaubsantrag einzugeben.
Mitarbeiter-Nutzer können den Urlaubsantrag nicht selbständig löschen. Stattdessen wird eine Storno-Anfrage-Email an den Vorgesetzten verschickt. Der Vorgesetzte kann den Storno-Antrag genehmigen und dann wird der Urlaubsantrag gelöscht und der Mitarbeiter per Email informiert. Der Mitarbeiter kann nun den neuen Urlaubsantrag eingeben.
Vorgesetzte und Admins können Urlaubsanträge löschen und anschließend einen neuen Urlaubsantrag eingeben.
Für Admins gibt es eine Komfortfunktion:
Wenn beispielsweise ein Mitarbeiter einen 2-wöchigen Urlaub eingetragen hat und in der letzten Woche erkrankt, dann gibt der Admin nur den 1-wöchigen Krankheitseintrag ein. Timebutler erkennt, dass sich der Krankheitseintrag mit dem Urlaubsantrag überschneidet und bietet an, den bestehenden Urlaubsantrag automatisch zu kürzen.
Admins geben also lediglich den neuen Eintrag ein und bestehende Einträge werden automatisch gekürzt, in zwei Teile aufgeteilt oder gelöscht, je nachdem in welcher Art der neue Eintrag den bestehenden Eintrag überdeckt.
Sie können mit Timebutler auch die Abwesenheiten und den Urlaub von Mitarbeitern verwalten, die in Teilzeit arbeiten. Dabei beachten Sie bitte folgende Informationen:
Viele Unternehmen rechnen den Urlaubsanspruch auf Basis der Arbeitszeit um und gewähren anteilsmäßig weniger Urlaub. Wenn ein Vollzeitmitarbeiter beispielsweise im Jahr Anspruch auf 30 Tage Urlaub hat, dann gewähren viele Unternehmen ihren Teilzeitmitarbeitern mit 50% der Arbeitszeit nur 50% des Urlaubsanspruchs, also 15 Tage. Diese Umrechnung ist aber nicht notwendig und laut dem deutschen Bundesurlaubsgesetz auch falsch.
Stattdessen gilt folgender Grundsatz:Ein Teilzeitmitarbeiter hat grundsätzlich den gleichen Urlaubsanspruch wie ein Vollzeitmitarbeiter und zur Berechnung eines anteiligen Urlaubsanspruchs ist lediglich die Anzahl der Wochenarbeitstage relevant. Die tägliche Arbeitszeit je Wochentag darf dabei nicht berücksichtigt werden, auch nicht wenn diese unregelmäßig ist.
Dazu folgende Beispiele (Annahme: ein Vollzeitmitarbeiter hat Anspruch auf 30 Urlaubstage im Jahr bei einer 5-Tage-Woche zu je 8 Stunden von Montag bis Freitag):
Fall 1) Teilzeitmitarbeiter mit 5-Tagewoche und regelmäßiger Arbeitszeit
Dieser Teilzeitmitarbeiter erhält genau wie der Vollzeitmitarbeiter ebenfalls 30 Urlaubstage im Jahr. Zwar arbeitet er nur 50% der Zeit eines Vollzeitmitarbeiters, aber mit einem Urlaubstag erhält der Teilzeitmitarbeiter auch nur halb so viel freie Zeit, so dass bei gleicher Anzahl Urlaubstage dem Teilzeitmitarbeiter gegenüber dem Vollzeitmitarbeiter kein Vorteil entsteht.Fall 2) Teilzeitmitarbeiter mit 3-Tagewoche und regelmäßiger Arbeitszeit
Dieser Teilzeitmitarbeiter erhält 3/5 des Anspruchs eines Vollzeitmitarbeiters, da er an 3 von 5 Arbeitstage in der Woche arbeitet. Er erhält also 3 / 5 x 30 = 18 Urlaubstage. Auch in diesem Fall ist es nicht relevant, ob er an jedem der drei Tage jeweils 4 Stunden arbeitet oder 6 Stunden oder eine andere Stundenzahl. Er erhält in jedem Fall 18 Urlaubstage.Fall 3) Teilzeitmitarbeiter mit unregelmäßiger Stundenzahl an verschiedenen Wochentagen
Wenn ein Teilzeitmitarbeiter an verschiedenen Wochentagen eine verschiedene Anzahl an Stunden arbeitet (beispielsweise Montags 8 h, Dienstags 4 h und Freitags 6 h) ist für die Berechnung des Urlaubsanspruchs nicht relevant. Auch in diesem Fall gilt das gleiche wie oben bei Fall 2: die Anzahl Wochentage, an denen der Mitarbeiter arbeitet sind die Berechnungsgrundlage für den Urlaubsanspruch, unabhängig von der Anzahl Stunden je Wochentag.
Wenn der Teilzeitmitarbeiter beispielsweise Montags 8 h arbeitet, Dienstags 4 h und Freitags 6 h, dann erhält dieser Teilzeitmitarbeiter dennoch 3 / 5 x 30 = 18 Urlaubstage, die er nach Ermessen und in Abstimmung mit dem Arbeitgeber beantragen und wahrnehmen kann. Für die Berechnung ist also nur relevant, dass er an 3 der 5 Wochenarbeitstage arbeitet - unabhängig davon, wie viele Stunden er an jedem einzelnen Tag arbeitet.
Urlaubsanspruch für Teilzeit-Mitarbeiter berechnen
Hinweis:Die Berechnung erfolgt gemäß deutschem Bundesurlaubsgesetz, jedoch ohne Gewähr. Aufgrund von Tarifverträgen, Vereinbarungen im Arbeitsvertrag und anderen Vorgaben können abweichende Vorgaben gelten.
Abwesenheit eintragen
Es gibt mehrere Möglichkeiten, einen neuen Abwesenheitseintrag einzugeben:
Abwesenheit über den Kalender eintragen
Mitarbeiter-Nutzer melden sich am Timebutler an und klicken links auf "
Abwesenheiten > Kalenderansicht". Klicken Sie dann auf den ersten Tag, an dem der Abwesenheitseintrag starten soll und dann auf den Tag, an dem der Abwesenheitseintrag enden soll. Es erscheint ein kleines Auswahlfenster. Klicken Sie darin auf "
Andere Abwesenheit". Sie gelangen zu dem Eingabeformular, in dem Sie den Abwesenheitseintrag bearbeiten und speichern können.
Vorgesetzte und Admins melden sich am Timebutler an und klicken links oben auf "
Mitarbeiter > Abwesenheiten > Kalenderansicht". Klicken Sie dann in der Zeile des gewünschten Mitarbeiters auf den ersten Tag, an dem der Abwesenheitseintrag starten soll und dann auf den Tag, an dem der Abwesenheitseintrag enden soll. Es erscheint ein kleines Auswahlfenster. Klicken Sie darin auf "
Andere Abwesenheit". Sie gelangen zu dem Eingabeformular, in dem Sie den Abwesenheitseintrag bearbeiten und speichern können.
Abwesenheit über das Eingabeformular eingeben
Mitarbeiter-Nutzer melden sich am Timebutler an und klicken links auf "
Abwesenheiten > Abwesenheit eintragen". Sie gelangen zu dem Eingabeformular für den Abwesenheitseintrag.
Vorgesetzte und Admins melden sich am Timebutler an und klicken links oben auf "
Mitarbeiter > Abwesenheiten > Abwesenheit eintragen". Sie gelangen zu dem Eingabeformular für den Abwesenheitseintrag.
Weitere Optionen
Abwesenheitseinträge können auch als
Serieneintrag eingegeben werden, beispielsweis wenn Sie in den nächsten zwei Monaten jeden Dienstag und Donnerstag Homeoffice planen.
Für Admins steht die Möglichkeit bereit, einen Abwesenheitseintrag für alle oder eine Vielzahl an Mitarbeitern als
Massenantrag einzugeben.
Es gibt auch die Möglichkeit,
Abwesenheiten per Massenimport zu importieren. Das ist insbesondere zu Beginn beim Umstieg auf Timebutler von Vorteil.
Screenshot: Abwesenheit über den Kalender eintragen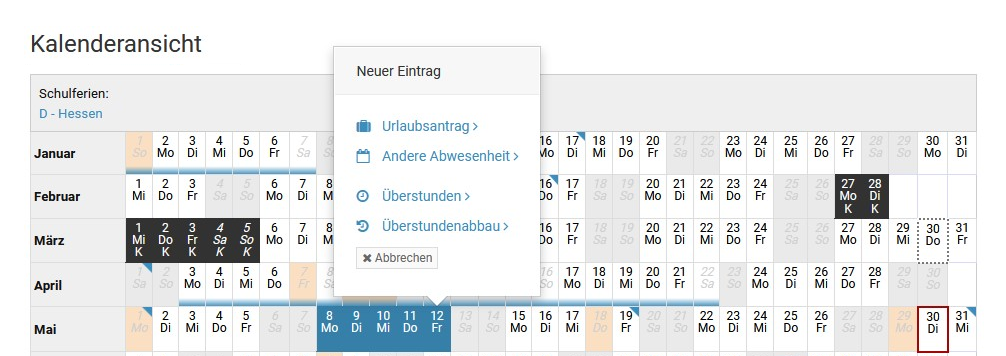
Screenshot: Abwesenheit über das Eingabeformular eingeben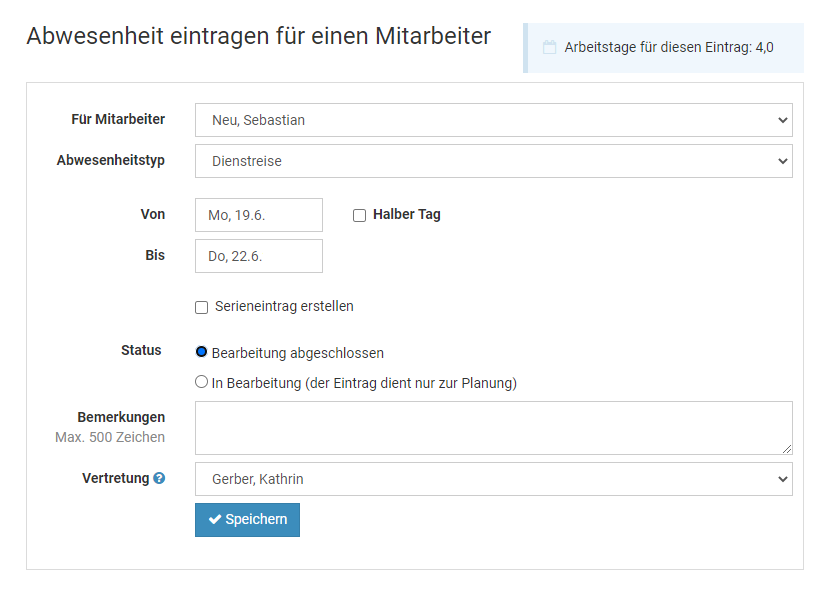
Screenshot: Massenimport von Abwesenheitseinträgen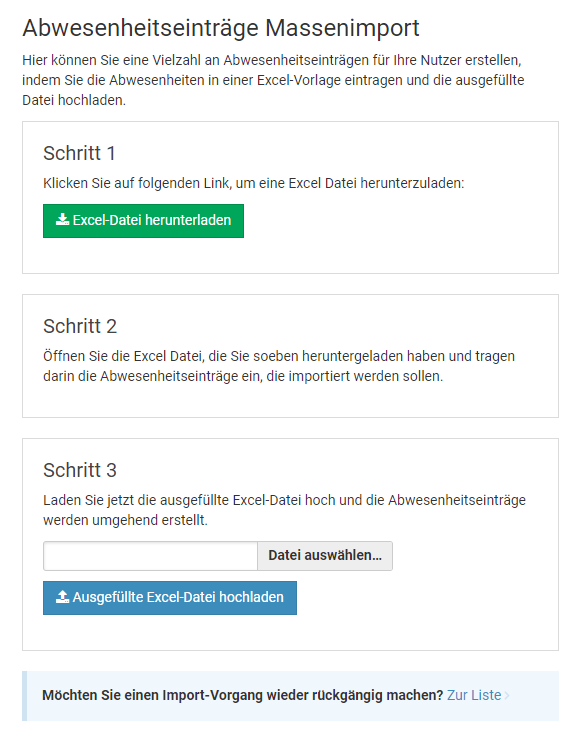
Abwesenheit bearbeiten
Für das Bearbeiten von Abwesenheitseinträgen gilt das gleiche wie beim Bearbeiten von Urlaubsanträgen:
Abwesenheitseinträge im Status "
Genehmigt" oder "
Bearbeitung abgeschlossen" können nachträglich nicht geändert werden. Das dient der Revisionssicherheit und auch damit Anträge nicht nachträglich manipuliert werden können:
Wenn das möglich wäre, dann könnte ein Mitarbeiter beispielsweise über seinen letzten 3-wöchigen Sommerurlaub einen Homeoffice-Eintrag legen, so dass der Urlaubsantrag gelöscht wird. Anschließend löscht er den Homeoffice-Eintrag und damit hat er seinen Urlaub unbemerkt rückgängig gemacht.
Einträge im Status "
In Bearbeitung" können hingegen jederzeit geändert werden.
Um einen genehmigten Urlaubsantrag zu ändern ist es also erforderlich, den Abwesenheitseintrag zu löschen und einen neuen Abwesenheitseintrag einzugeben.
Mitarbeiter-Nutzer können den Abwesenheitseintrag nicht selbständig
löschen. Stattdessen wird eine Storno-Anfrage-Email an den Vorgesetzten verschickt. Der Vorgesetzte kann den Storno-Antrag genehmigen und dann wird der Abwesenheitseintrag gelöscht und der Mitarbeiter informiert. Der Mitarbeiter kann nun den neuen Abwesenheitseintrag eingeben.
Vorgesetzte und Admins können Abwesenheitseinträge löschen und anschließend einen neuen Abwesenheitseintrag eingeben.
Für Admins gibt es eine Komfortfunktion:Wenn beispielsweise ein Mitarbeiter einen 2-wöchigen Urlaub eingetragen hat und in der letzten Woche erkrankt, dann gibt der Admin nur de 1-wöchigen Krankheitseintrag ein. Timebutler erkennt, dass sich der Krankheitseintrag mit dem Urlaubsantrag überschneidet und bietet an, den bestehenden Urlaubsantrag automatisch zu kürzen.
Admins tragen also lediglich den neuen Eintrag ein und bestehende Einträge werden automatisch gekürzt, in zwei Teile aufgeteilt oder gelöscht, je nachdem in welcher Art der neue Eintrag den bestehenden Eintrag überdeckt.
Bearbeiten und Löschen von Abwesenheitseinträgen erlauben
Ein Admin kann für jeden Abwesenheitstyp (Schulung, Homeoffice, usw.) einstellen, wann der Nutzer diesen bearbeiten oder löschen darf. Der Admin kann also erlauben, dass der Mitarbeiter beispielsweise Homeoffice immer selbständig bearbeiten, ändern und löschen darf, ohne Storno-Antrag an den Vorgesetzten. Lesen Sie hier, wie Sie die
Bearbeitungs- und Löschrechte für Abwesenheiten ändern.
Abwesenheit löschen
Um einen bestehenden Abwesenheitseintrag zu löschen, gehen Sie wie folgt vor:
Abwesenheit löschen: Mitarbeiter-Nutzer
Mitarbeiter-Nutzer können den Abwesenheitseintrag nicht selbständig löschen. Stattdessen wird eine Storno-Anfrage-Email an den Vorgesetzten verschickt. Der Vorgesetzte kann den Storno-Antrag genehmigen und dann wird der Abwesenheitseintrag gelöscht und der Mitarbeiter per Email informiert.
Um die Storno-Anfrage zu erstellen, meldet sich der Mitarbeiter-Nutzer am Timebutler an und klickt links auf "
Abwesenheiten > Listenansicht", dann bei dem gewünschten Abwesenheitseintrag auf das rote Symbol mit dem Papierkorb. Alternativ kann der Mitarbeiter die Kalenderansicht per Klick links auf "
Abwesenheiten > Kalenderansicht" aufrufen, dann auf den gewünschten Abwesenheitseintrag im Kalender klicken und dann auf der Seite auf den roten Button "
Löschen".
Abwesenheit löschen: Vorgesetzte und Admins
Vorgesetzte und Admins melden sich am Timebutler an und klicken links oben auf "
Mitarbeiter > Abwesenheiten > Listenansicht", dann bei dem gewünschten Abwesenheitseintrag auf das rote Symbol mit dem Papierkorb. Die Ansicht kann per Klick auf den grünen "
Filter-Button" rechts oben auf der Seite gefiltert werden, um den gewünschten Eintrag schneller zu finden.
Alternativ kann der Vorgesetzte oder Admin die Kalenderansicht per Klick links oben auf "
Mitarbeiter > Abwesenheiten > Kalenderansicht" aufrufen, dann auf den gewünschten Abwesenheitseintrag im Kalender klicken und dann auf der Seite auf den roten Button "
Löschen".
Serieneinträge löschen
Lesen sie hier, wie Sie
Serieneinträge löschenBearbeiten und Löschen von Abwesenheitseinträgen erlauben
Ein Admin kann für jeden Abwesenheitstyp (Schulung, Homeoffice, usw.) einstellen, wann der Nutzer diesen bearbeiten oder löschen darf. Der Admin kann also erlauben, dass der Mitarbeiter beispielsweise Homeoffice immer selbständig bearbeiten, ändern und löschen darf, ohne Storno-Antrag an den Vorgesetzten. Der Admin kann dazu die
Bearbeitungs- und Löschrechte für Abwesenheiten ändern.
Löschen von Einträgen in der Zukunft erlauben
Ein Admin kann festlegen, dass jeder Nutzer eigene Einträge, die in der Zukunft liegen, ohne Storno-Antrag löschen darf. Dazu meldet sich der Admin am Timebutler an, klickt links unten auf "Einstellungen", dann darunter auf "Weitere..", anschließend rechts oben auf "Globale Einstellungen". Hier findet sich die Option "Eigene Einträge in der Zukunft löschen".
Screenshot: Abwesenheitseintrag löschen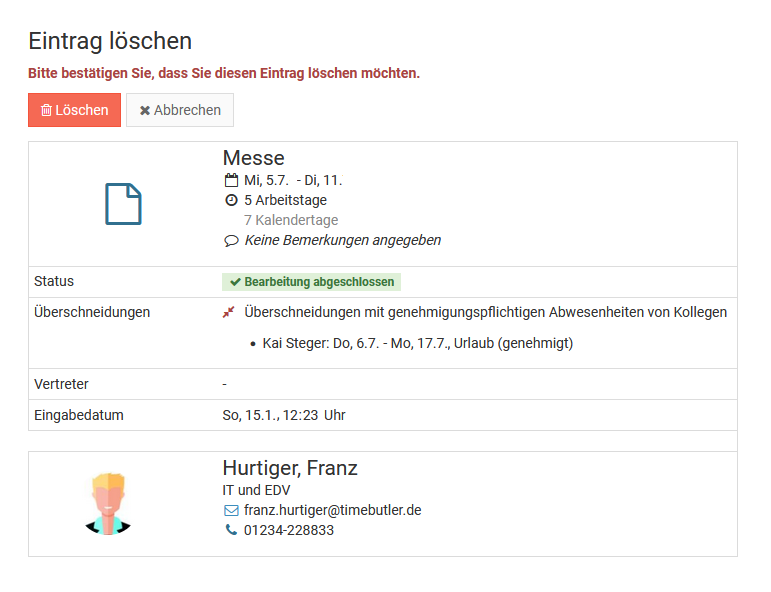
Abwesenheitsantrag genehmigen
Ein Admin kann für jeden Abwesenheitstyp (Urlaub, Homeoffice, Dienstreise, ...) einstellen, ob dieser
genehmigungspflichtig sein soll oder nicht.
Wenn ein Mitarbeiter einen genehmigungspflichtigen Abwesenheitseintrag eingibt, dann startet Timebutler den Genehmigungsworkflow und benachrichtigt den / die Vorgesetzte(n). Die Genehmigung des Abwesenheitseintrages erfolgt genau wie bei der Genehmigung eines Urlaubsantrages. Lesen Sie hier, wie
Urlaub genehmigt wird.
Screenshot: Urlaub als nicht genehmigungspflichtig einstellen
Abwesenheitseinträge Serieneinträge
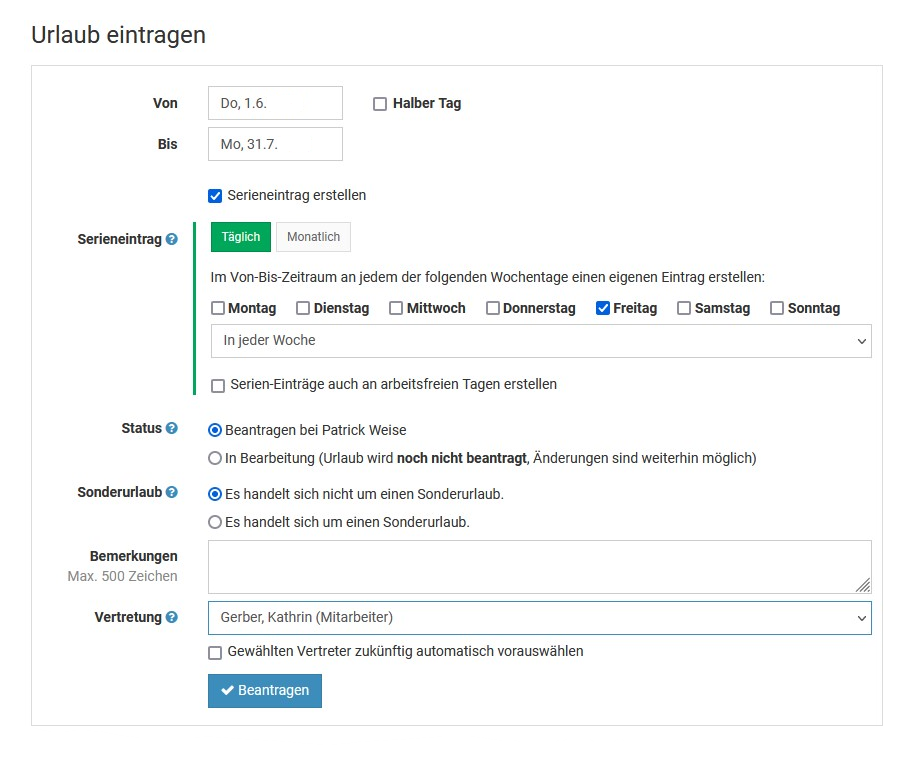
Für Urlaub und sonstige Abwesenheiten kann ein Serieneintrag eingegeben werden. Wenn Sie beispielsweise in den nächsten zwei Monaten jeden Dienstag und Donnerstag Homeoffice planen, dann ist es nicht erforderlich 16 einzelne Homeoffice-Einträge einzugeben, sondern es kann ein Serieneintrag eingegeben werden.
Serieneintrag erstellen
Um einen Serieneintrag für eine Abwesenheit einzugeben, melden Sie sich am Timebutler an und rufen die Eingabemaske für einen neun Abwesenheitseintrag auf (lesen Sie hier, wie Sie zur Eingabemaske für die
Eingabe eines Abwesenheitseintrages gelangen. In der Eingabemaske aktivieren Sie die Option "
Serieneintrag erstellen". Es werden nun weitere Optionen für das Erstellen des Serieneintrages eingeblendet.
Serieneinträge löschen
Mitarbeiter-Nutzer und Vorgesetzte erhalten direkt nach der Eintragung der Serieneinträge die Option, die Serieneinträge wieder rückgängig zu machen, also zu löschen. Wenn die Option nicht gewählt wird, dann können die Serieneinträge als ganzes nicht mehr gelöscht werden, sondern es kann nur jeder Eintrag aus der Serie einzeln gelöscht werden.
Admins können über die Auswahl
Aktionen rückgängig machen selbst erstellte, ganze Serien mit einem Mausklick wieder löschen. Diese Möglichkeit besteht für einen begrenzten Zeitraum nachdem die Serieneinträge erstellt wurden. Danach bleibt auch für Admins nur die Möglichkeit, jeden Eintrag aus der Serie einzeln zu löschen.
Masseneinträge
Sie können mit wenigen Mausklicks Abwesenheitseinträge für eine Vielzahl an Mitarbeitern eingeben und dabei beispielsweise eine Dienstreise für mehrere oder alle Mitarbeiter erstellen.
Die Masseneintragung für Abwesenheitseinträge erfolgt auf die gleiche Weise wie die Masseneintragung für Urlaub. Lesen Sie hier, wie Sie
Masseneinträge eingeben.
Abwesenheiten Massenimport
Sie können eine Vielzahl an Urlaubsanträgen und Abwesenheitseinträgen per Excel-Datei-Upload importieren. Gerade zu Beginn bei der Einrichtung von Timebutler haben Sie damit eine bequeme Möglichkeit, Dutzende oder Hunderte Urlaubsanträge und sonstige Abwesenheitseinträge zu importieren.
Massenimport durchführen
Melden Sie sich dazu als Admin am Timebutler an und klicken links unten auf "
Einstellungen > Weitere..", dann rechts auf "
Abwesenheitseinträge Massenimport".
Im ersten Schritt können Sie nun die Excel-Datei herunterladen. Darin finden Se alle Spalten, die für die Angaben der Abwesenheiten notwendig sind. Füllen Sie die Excel-Datei aus oder exportieren Sie die Daten aus einem Drittsystem und fügen sie diese in der Excel-Datei ein.
Im zweiten Schritt laden Sie dann die ausgefüllte Excel-Datei hoch und importieren damit mit einem Mausklick eine Vielzahl an Abwesenheitseinträgen.
Wenn Sie mehr Abwesenheitseinträge importieren möchten, als es Zeilen in der Excel-Datei gibt, dann laden Sie die Excel-Datei einfach mehrmals herunter, befüllen diese mehrmals und laden Sie diese mehrmals hoch.
Massenimport rückgängig machen
Lesen Sie hier, wie Sie den
Massenimport der Abwesenheiten wieder rückgängig machen.
Screenshot: Massenimport Abwesenheitseinträge
Listenansicht der Abwesenheitseinträge
In den Kalenderansicht der Abwesenheitseinträge erhalten Sie einen guten Überblick über die Abwesenheiten der Mitarbeiter - je nach Wunsch in der
Kalender Jahresansicht, in der
Kalenderansicht über mehrere Mitarbeiter oder auch in der
Kalenderansicht gruppiert nach Abteilung.
Darüber hinaus können Sie sich die Abwesenheitseinträge auch als Listenansicht einsehen. Dort haben Sie ebenfalls die Möglichkeit, die Ansicht zu filtern oder die Daten herunterzuladen. Die Listenansicht können Sie wie folgt aufrufen:
Listenansicht der Abwesenheitseinträge als Mitarbeiter aufrufen
Melden Sie sich als Mitarbeiter-Nutzer am Timebutler an und klicken links unter "
Abwesenheiten" auf "
Listenansicht".
Listenansicht der Abwesenheitseinträge als Admin oder Vorgesetzter aufrufen
Melden Sie sich als Admin oder Vorgesetzter am Timebutler an und klicken links oben auf "
Mitarbeiter", dann unter "
Abwesenheiten" auf "
Listenansicht".
Wenn Sie nur die eigenen Abwesenheiten einsehen möchten, dann klicken Sie links auf "
Eigene Einträge", dann unter "
Abwesenheiten" auf "
Listenansicht".
Screenshot: Abwesenheitseinträge in der Listenansicht herunterladen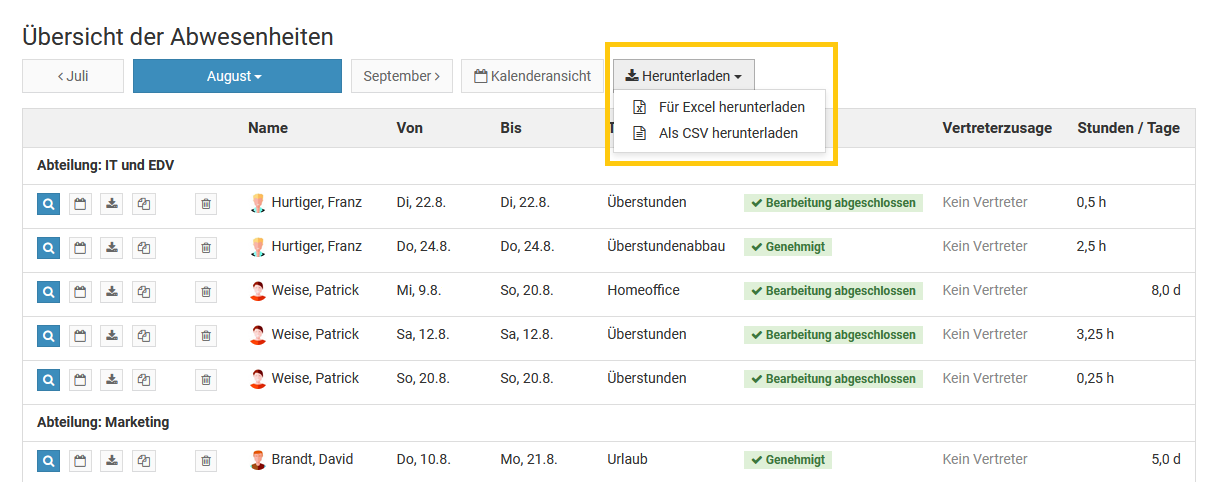
Detailansicht eines Abwesenheitseintrages
In der Detailansicht zu einem Urlaubsantrag oder Abwesenheitseintrag erhalten Sie alle Informationen zu dem Eintrag:
- Zeitraum und Anzahl Arbeitstage und Kalendertage
- Status des Antrags (beantragt, genehmigt, usw.)
- Vertreter und Status der Vertreterzusage
- Überschneidungen mit Abwesenheiten von Kollegen
- Bearbeitungshistorie
- bei Urlaubsanträgen: Kurzüberblick über das Urlaubskonto
- und weitere Informationen
Die Detailansicht zu einem Urlaubsantrag oder Abwesenheitseintrag können Sie wie folgt aufrufen:
Über den Kalender
Mitarbeiter-NutzerMelden Sie sich an Ihrem Nutzerkonto im Timebutler an und klicken links auf "
Abwesenheiten > Kalenderansicht". Im Kalender klicken Sie nun auf den gewünschten Eintrag, um zu der Detailansicht zu gelangen.
Vorgesetzter und AdminMelden Sie sich an Ihrem Nutzerkonto im Timebutler an und klicken links oben auf "
Mitarbeiter > Abwesenheiten > Kalenderansicht". Im Kalender klicken Sie nun auf den gewünschten Eintrag, um zu der Detailansicht zu gelangen.
Über die Listenansicht
Mitarbeiter-NutzerMelden Sie sich an Ihrem Nutzerkonto im Timebutler an und klicken links auf "
Abwesenheiten > Listenansicht". Klicken Sie bei dem gewünschten Eintrag auf das blaue Symbol mit der Lupe, um zu der Detailansicht zu gelangen und die Änderungshistorie einzusehen.
Vorgesetzter und AdminMelden Sie sich an Ihrem Nutzerkonto im Timebutler an und klicken links oben auf "
Mitarbeiter > Abwesenheiten > Listenansicht". Klicken Sie bei dem gewünschten Eintrag auf das blaue Symbol mit der Lupe, um zu der Detailansicht zu gelangen. Sie können die Ansicht auch zuvor über den grünen Filterbutton rechts oben auf der Seite filtern, um den gewünschten Eintrag besser finden zu können.
Screenshot: Detailansicht eines Abwesenheitseintrags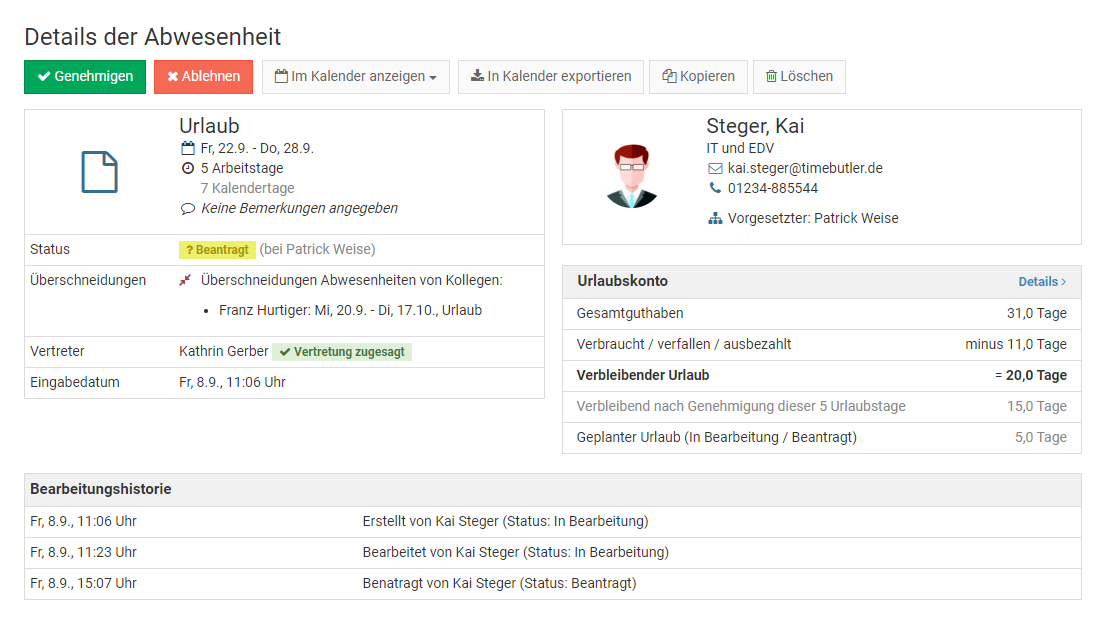
Sonderfall gelöschte Einträge
Gelöschte Einträge werden in der Kalender- und Listenansicht nicht angezeigt. Timebutler führt aber auch Protokoll über die gelöschten Urlaubs- und Abwesenheitseinträge und zeichnet auf, wer den Eintrag zu welchem Zeitpunkt gelöscht hat.
Lesen Sie hier, wie Sie
gelöschte Einträge einsehen.
Kalender Jahresansicht
In der Kalenderansicht über die Abwesenheiten werden auch die Urlaubsanträge angezeigt. Jeder Urlaubsantrag und Abwesenheitseintrag ist mit einem farblichen Balken leicht erkennbar.
Jahreskalender: Mitarbeiter-Nutzer
Mitarbeiter-Nutzer melden sich am Timebutler an und klicken links auf "
Abwesenheiten > Kalenderansicht".
Jahreskalender: Vorgesetzte und Admins
Jahreskalender eines Mitarbeiters aufrufenDer Vorgesetzte oder Admin meldet sich am Timebutler an und klickt links oben auf "
Mitarbeiter > Mitarbeiter > Jahresübersicht", anschließend auf den Namen des gewünschten Mitarbeiters.
Screenshot: Auswahl des Mitarbeiters zur Anzeige des Jahreskalenders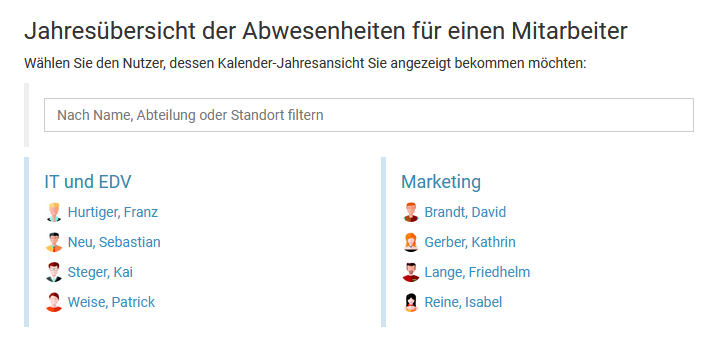
Eigenen Kalender aufrufenDer Vorgesetzte oder Admin meldet sich am Timebutler an und klickt links auf "
Eigen Daten > Abwesenheiten > Kalenderansicht"
Jahreskalender über mehrere Mitarbeiter
Eine
Jahresansicht über mehrere Mitarbeiter gibt es absichtlich nicht, da so viele Informationen auf einem Bildschirm nicht sinnvoll dargestellt werden können.
Screenshot: Mitarbeiter Jahreskalender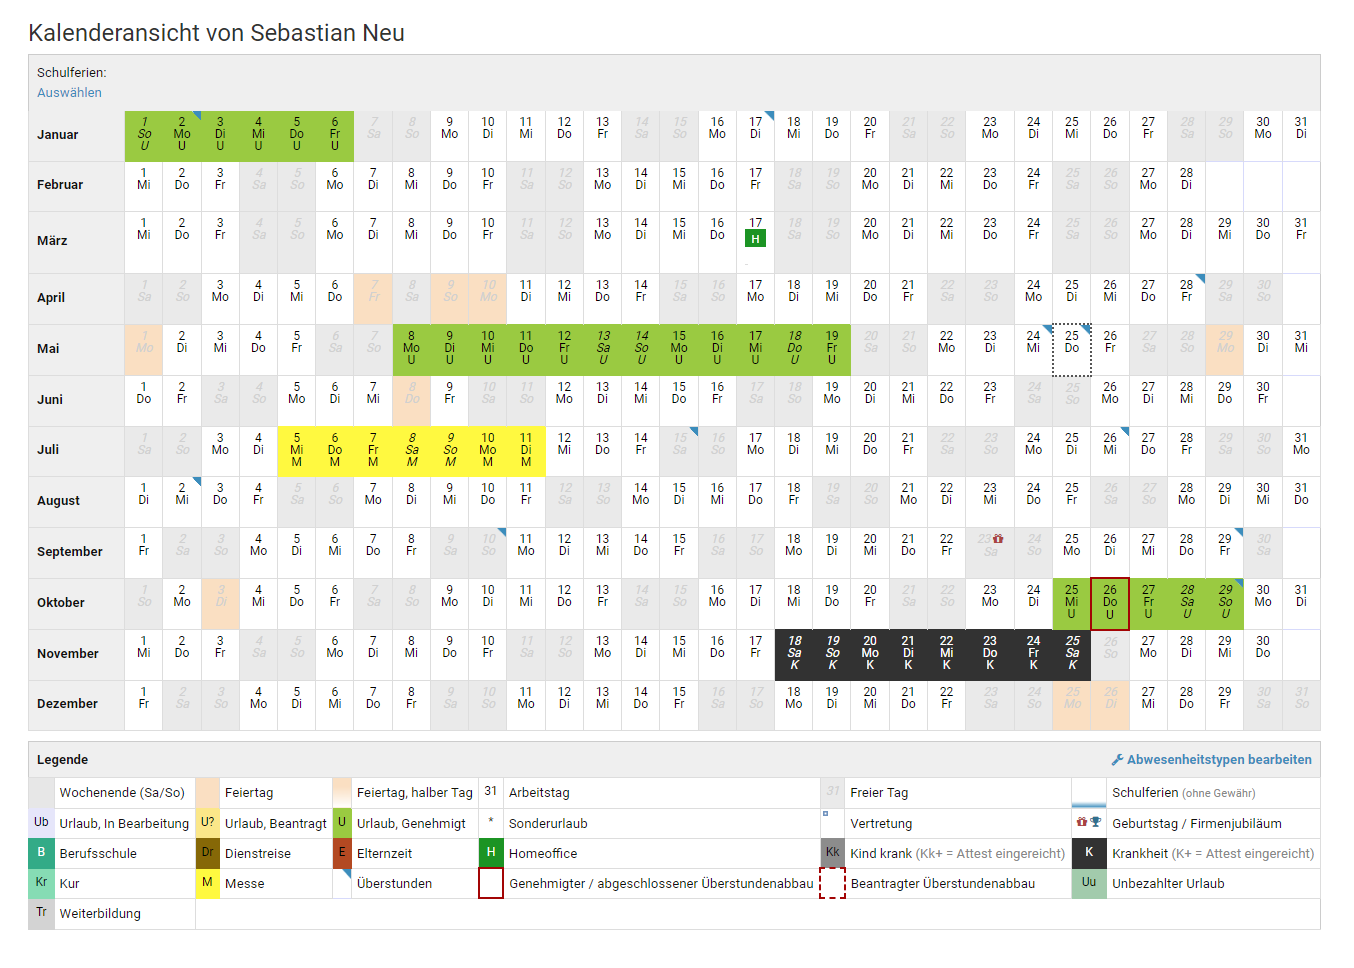
Kalenderansicht über mehrere Mitarbeiter
im Timebutler werden in der Kalenderansicht sowohl die Abwesenheiten als auch die Urlaubsanträge angezeigt.
Lesen Sie hier, wie Sie die
Kalenderansicht für die Abwesenheiten und Urlaub aufrufen.
Gruppierung nach Abteilung
In der Kalenderansicht über die Kollegen (Mitarbeiter-Nutzer) oder das eigene Team (Vorgesetzte und Admins) werden die Mitarbeiter alphabetisch sortiert angezeigt.
Es kann aber auch eine Gruppierung nach Abteilung aktivieren. Dann werden die Mitarbeiter nach Abteilung gruppiert angezeigt und innerhalb einer Abteilung werden die Mitarbeiter alphabetisch sortiert angezeigt.
Um die Gruppierung zu aktivieren, rufen Sie eine
Kalenderansicht über mehrere Nutzer auf und klicken rechts oben auf den grünen Button "
Filter anzeigen". Ändern Sie die Option "
Gruppierung" und klicken auf den Button "
Filter anwenden".
Screenshot: Kalenderansicht nach Abteilung gruppiert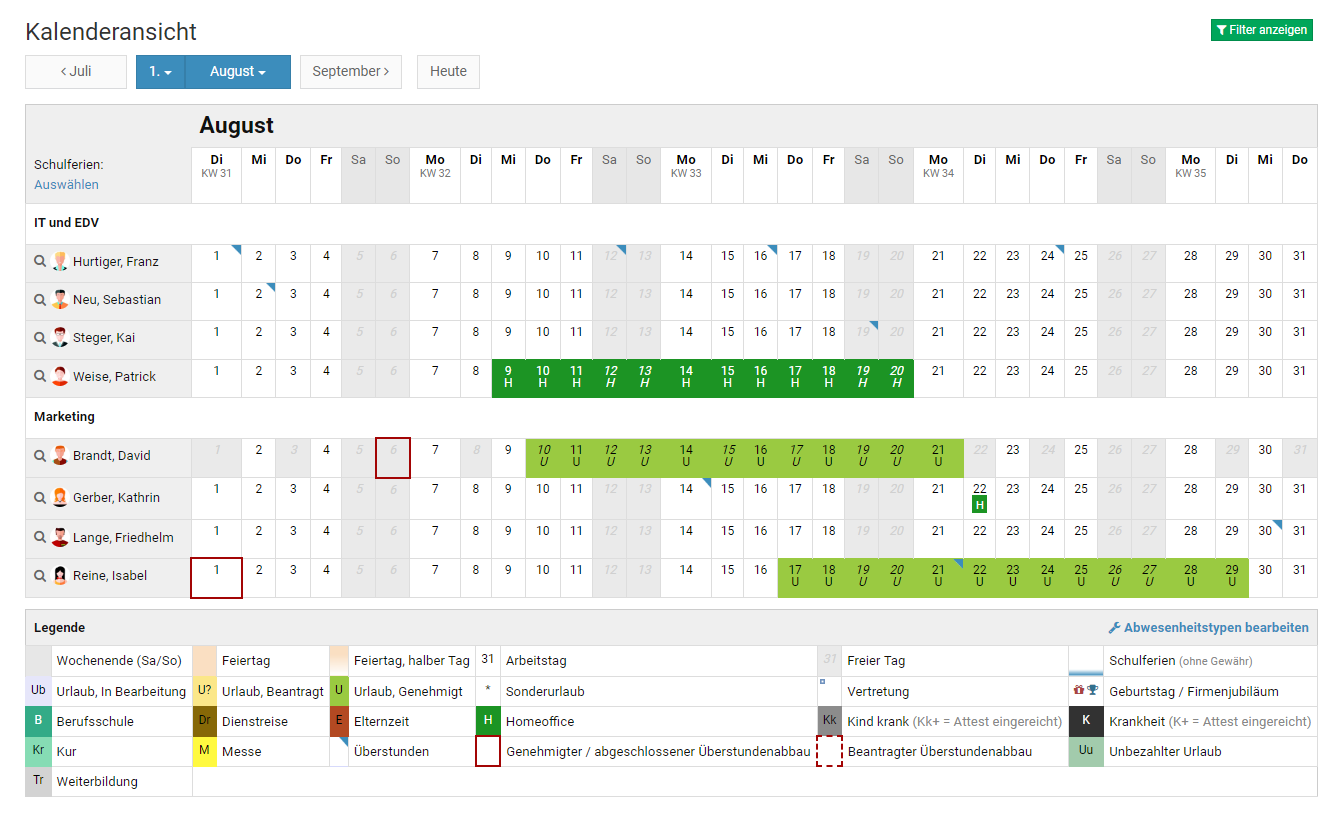
Geburtstage und Jubiläen im Kalender
Für jeden Mitarbeiter kann das Geburtsdatum im Timebutler hinterlegt werden sowie das Eintrittsdatum im Unternehmen. Anhand des Eintrittsdatums berechnet Timebutler die Firmenjubiläen des Mitarbeiters.
Lesen Sie hier alle Informationen zur
Anzeige von Geburtstagen und Firmenjubiläen.
Vertretungen im Kalender
Im Kalender wird auch angezeigt, wenn ein Mitarbeiter als Vertreter für einen Kollegen ausgewählt wurde.
Die Vertretung wird mit einem blauen Kasten in der linken oberen Ecke des jeweiligen Tages im Kalender angezeigt. Unterhalb des Kalenders findet sich auch immer ein Legende, in der die Bedeutung der Markierungen und Farben erläutert sind.
Wenn Sie mit der Maus über einen Eintrag oder die Vertretung im Kalender fahren, dann erscheint ein kleines Fenster mit zusätzlichen Informationen zu dem Eintrag und der Vertretung.
Screenshot: Anzeige der Vertretung im Kalender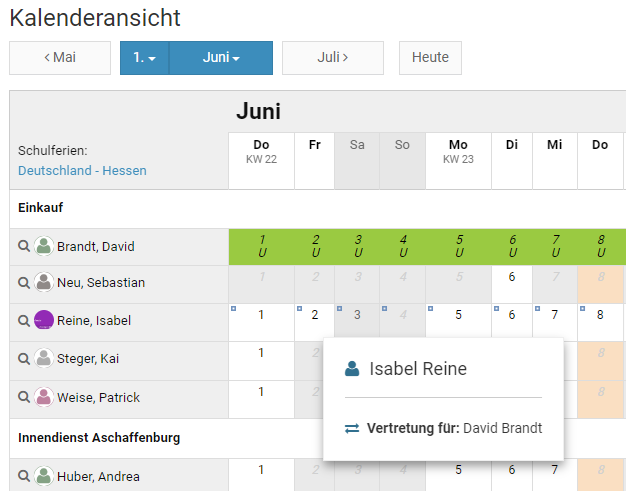
Schulferien im Kalender anzeigen
Jeder Nutzer kann die Anzeige der Schulferien im Kalender aktivieren und hat dabei die Wahl zwischen verschiedenen Schulferien.
Um die Schulferien anzuzeigen, rufen Sie eine Kalenderansicht auf und klicken im Kalender links oben auf den Link "
Schulferien: Auswählen".
Um zur Kalenderansicht zu gelangen, klicken Mitarbeiter-Nutzer links auf "
Abwesenheiten > Kalenderansicht". Vorgesetzte und Admins klicken links auf "
MItarbeiter > Abwesenheiten > Kalenderansicht".
Screenshot: Schulferien im Kalender anzeigen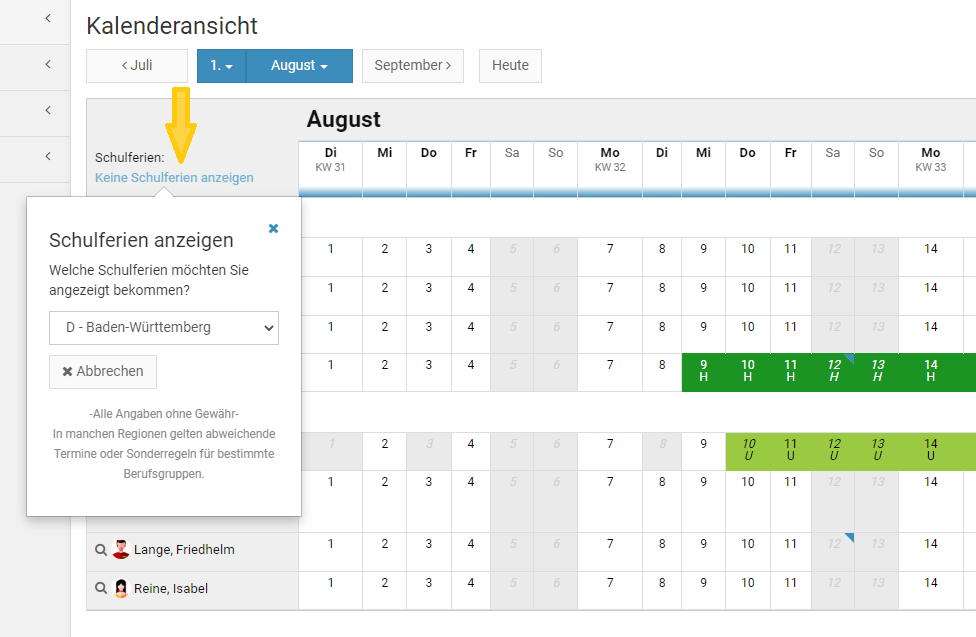
Überblick über alle Abwesenheitstypen
Sie können mit Timebutler beliebige Abwesenheitstypen erstellen und verwalten.
Nach der Anmeldung sind die gängigen Abwesenheitstypen wie Urlaub, Krankheit, Schulung, Dienstreise und weitere bereitgestellt. Sie können die Liste der Abwesenheitstypen, die Ihre Mitarbeiter eingeben und verwalten dürfen, nach Belieben ergänzen oder ändern.
Einstellungen zu den Abwesenheitstypen
Für jeden Abwesenheitstyp können umfangreiche Einstellungsmöglichkeiten vorgenommen werden wie beispielsweise
Abwesenheitstypen einsehen
Sie können die Liste der Abwesenheitstypen und die zugehörigen Einstellungen einsehen, indem Sie sich als Admin am Timebutler anmelden, dann links unten auf "
Einstellungen > Weitere.." klicken, dann rechts auf "
Abwesenheitstypen".
Screenshot: Abwesenheitstypen Überblick
Neuen Abwesenheitstyp erstellen oder bearbeiten
Wenn Sie sich am Timebutler anmelden, dann sind viele Abwesenheitstypen bereits für Sie voreingestellt: Urlaub, Krankheit, Schulung, Dienstreise, Homeoffice und andere.
Sie können Abwesenheitstypen ändern, neue Abwesenheitstypen erstellen oder auch nicht gewünscht Abwesenheitstypen deaktivieren oder löschen und Timebutler somit genau an Ihre Bedürfnisse anpassen.
Neuen Abwesenheitstyp erstellen
Melden Sie sich als Admin am Timebutler an, klicken links unten auf "
Einstellungen > Weitere.." und dann rechts auf "
Abwesenheitstypen". Klicken Sie auf den Button "
Neuen Abwesenheitstyp erstellen". Sie können nun den Namen eintragen und viele verschieden Einstellungsmöglichkeiten vornehmen.
Sobald der Abwesenheitstyp erstellt ist, können Sie
Abwesenheitseinträge für die Mitarbeiter eingeben.
Bestehenden Abwesenheitstyp bearbeiten
Melden Sie sich als Admin am Timebutler an, klicken links unten auf "
Einstellungen > Weitere.." und dann rechts auf "
Abwesenheitstypen". Sie sehen in der Übersicht die Einstellungen für jeden Abwesenheitstyp. Um einen Abwesenheitstyp zu bearbeiten, klicken Sie in der Zeile des gewünschten Abwesenheitstyps auf den grünen Button mit dem Bleistift (=Bearbeiten). Sie können nun Änderungen an den Einstellungen vornehmen und die Änderungen speichern.
Abwesenheitstyp löschen
Lesen Sie im folgenden Kapitel, wie Sie einen
Abwesenheitstyp löschen.
Screenshot: Neuen Abwesenheitsyp erstellen
Abwesenheitstyp löschen
Wenn Sie einen Abwesenheitstyp nicht mehr benötigen oder den Mitarbeitern die Eingabe neuer Abwesenheitseinträge von diesem Abwesenheitstyp nicht mehr erlauben möchten, dann können Sie den Abwesenheitstyp wie folgt löschen bzw. deaktivieren:
Abwesenheitstyp löschen
Melden Sie sich als Admin am Timebutler an, klicken links unten auf "
Einstellungen > Weitere.." und dann rechts auf "
Abwesenheitstypen". Bei dem gewünschten Abwesenheitstyp klicken Sie auf den roten Button mit dem Papierkorb. Es startet ein Countdown - klicken Sie während des Countdowns nochmal auf das rote Symbol mit dem Papierkorb, um zu bestätigen, dass Sie den Abwesenheitstyp tatsächlich löschen möchten.
Screenshot: Abwesenheitstyp löschen
Löschen nicht möglich
Wenn das Symbol mit dem Papierkorb nicht rot, sondern ausgegraut ist, dann können Sie den Abwesenheitstyp nicht löschen. Dafür kann es zwei Gründe geben:
1) Es wurden bereits Abwesenheitseinträge von dem Abwesenheitstyp eingegebenWenn bereits Abwesenheitseinträge von dem Abwesenheitstyp eingegeben wurden, dann kann der Abwesenheitstyp absichtlich nicht gelöscht werden. Wenn das möglich wäre, dann gäbe es Abwesenheitseinträge ohne Namen, die nicht mehr sinnvoll angezeigt werden können.
Auch wenn alle Abwesenheitseinträge von dem Abwesenheitstyp gelöscht wurden, kann der Abwesenheitstyp nicht gelöscht werden: die
gelöschten Abwesenheitseinträge werden protokolliert und können jederzeit heruntergeladen werden. Deswegen ist es für die gelöschten Abwesenheitseinträge notwendig, den Abwesenheitstyp beizubehalten.
In diesem Fall können Sie den Abwesenheitstyp stattdessen einfach deaktivieren, was einem Löschen fast gleichkommt. Weiter unten auf dieser Seite finden Sie die Anleitung zum Deaktivieren von Abwesenheitstypen.
2) Es handelt sich um einen Timebutler-internen AbwesenheitstypManche Abwesenheitstypen werden von Timebutler gesondert behandelt und dürfen deswegen nicht gelöscht werden, beispielsweise Urlaub, Krankheit, Überstunden und Überstundenabbau. Die Einschränkung gilt auch aus dem Grund, damit Sie zu einem späteren Zeitpunkt die Abwesenheitstypen wieder aktivieren und nutzen können.
Auch in diesem Fall können Sie den Abwesenheitstyp stattdessen einfach deaktivieren, was einem Löschen fast gleichkommt.
Screenshot: Abwesenheitstyp löschen nicht möglich
Deaktivieren, wenn Löschen nicht möglich
Wenn das Löschen eines Abwesenheitstyps nicht möglich ist, dann können Sie den Abwesenheitstyp stattdessen einfach deaktivieren. Damit kann kein Mitarbeiter mehr Abwesenheiten von diesem Abwesenheitstyp eingeben. Bestehende Abwesenheitseinträge von diesem Typ können aber weiterhin korrekt angezeigt werden.
Um einen Abwesenheitstyp zu deaktivieren, melden Sie sich als Admin am Timebutler an, klicken links unten auf "
Einstellungen > Weitere.." und dann rechts auf "
Abwesenheitstypen". Bei dem gewünschten Abwesenheitstyp klicken Sie auf den grünen Button mit dem Bleistift (=Bearbeiten). Bei der Option "
Neue Einträge" entfernen Sie das Häkchen bei "
Aktiv, neue Einträge erlaubt" und speichern die Änderung per Klick unten auf den blauen Button "
Speichern".
Screenshot: Abwesenheitstyp deaktivieren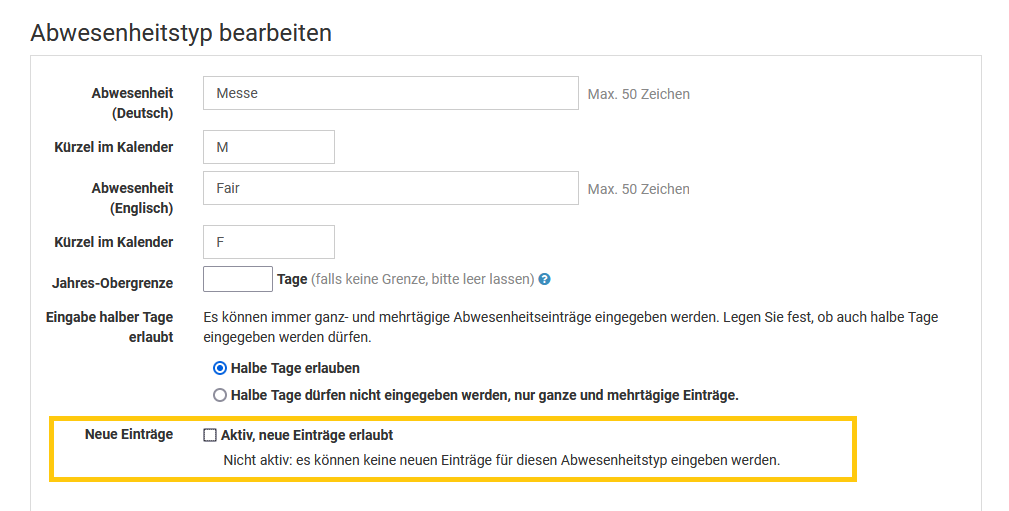
Übersicht zu den Zusatzfeldern
Für jeden Abwesenheitstyp können beliebige
Zusatzfelder eingestellt werden.
So können Sie beispielsweise bei der Eingabe von Dienstreisen festlegen, dass zusätzlich auch der Zielort (Texteingabe), der Reisegrund (mehrzeilige Texteingabe) und die zurückgelegte Distanz (Ganzzahl) eingetragen werden können.
Damit können Sie bei der Erfassung der Abwesenheitseinträge beliebig Zusatzdaten abfragen und diese später
auswerten.
Wenn ein Mitarbeiter dann einen neuen Dienstreise-Antrag eingibt, bekommt er im Eingabeformular die von Ihnen eingestellten Zusatzfelder angezeigt und kann die Angaben eintragen:
Screenshot: Zusatzfelder bei Eingabe einer Abwesenheit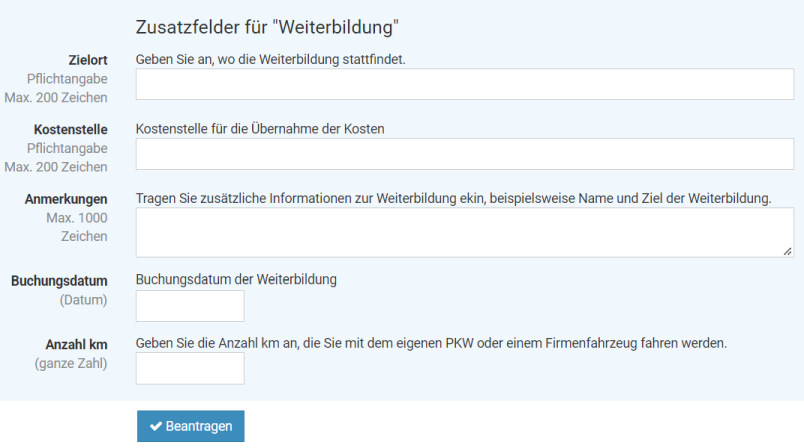
Screenshot: Konfiguration der Zusatzfelder für Abwesenheitstypen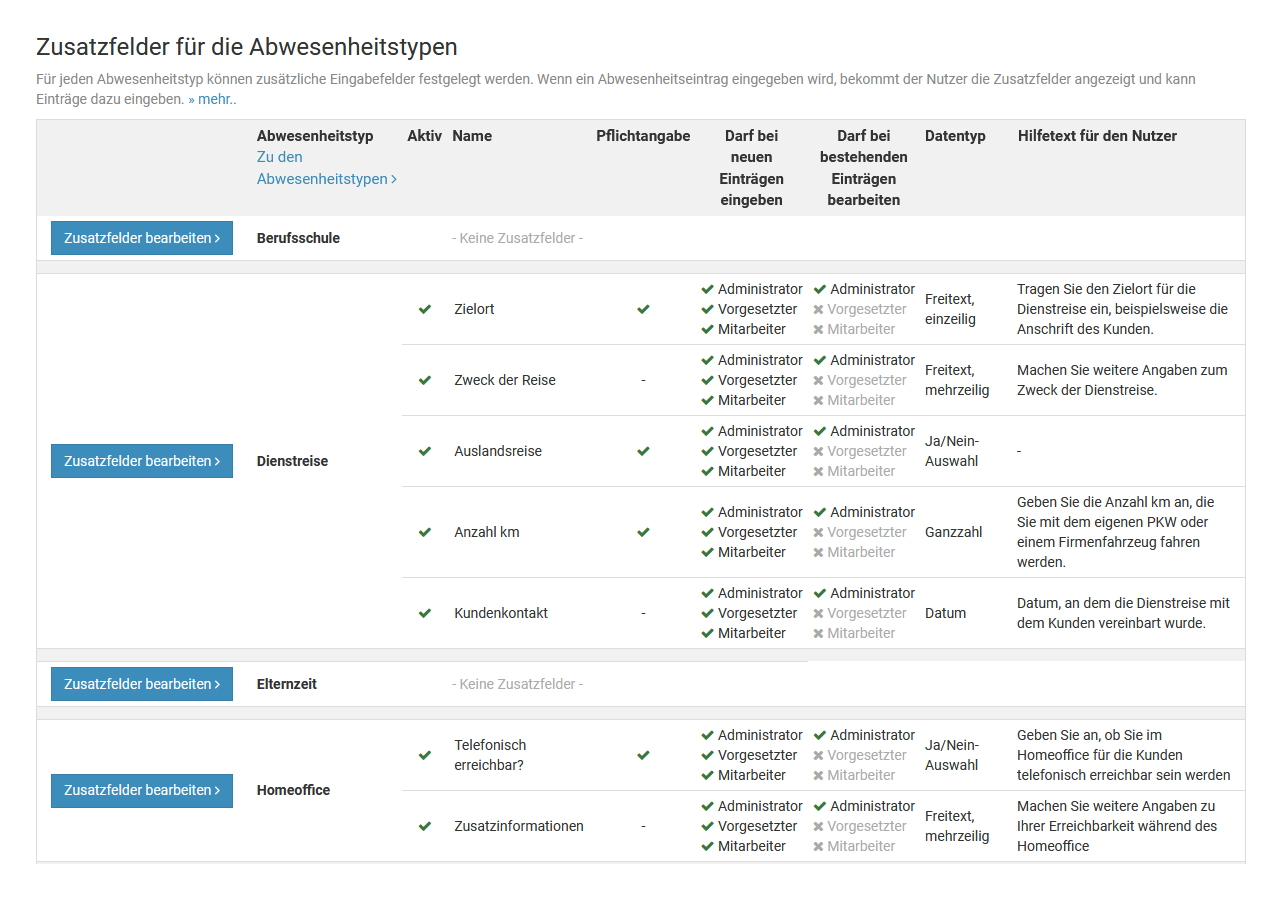
Zusatzfelder bearbeiten oder löschen
Zusatzfelder hinzufügen oder bearbeiten
Melden Sie sich als Admin am Timebutler an und klicken links unten auf "
Einstellungen > Weitere..", dann rechts auf "
Zusatzfelder für die Abwesenheitstypen". Bei dem gewünschten Abwesenheitstyp klicken Sie auf den Button "
Zusatzfelder bearbeiten". Hier können Sie nun beliebige Zusatzfelder hinzufügen oder ändern.
Zusatzfelder löschen
Wie beim Hinzufügen oder Bearbeiten der Zusatzfelder melden Sie sich als Admin am Timebutler an und klicken links unten auf "
Einstellungen > Weitere..", dann rechts auf "
Zusatzfelder für die Abwesenheitstypen". Bei dem gewünschten Abwesenheitstyp klicken Sie auf den Button "
Zusatzfelder bearbeiten". Bei dem zu löschenden Zusatzfeld klicken Sie auf den roten Button mit dem Papierkorb.
Wenn es bereits Abwesenheitseinträge mit Daten für das Zusatzfeld gibt, ist das Löschen nicht möglich: damit die Daten weiterhin korrekt zugeordnet werden können, darf das Zusatzfeld nicht gelöscht werden. Stattdessen wählen Sie bei dem Zustazfeld die Option "
Inaktiv". Damit bleibt das Feld für bestehende Einträge erhalten und kann weiterhin angezeigt werden. Bei der Eingabe neuer Einträge wird das Feld aber nicht mehr angeboten.
Screenshot: Zusatzfelder für Abwesenheitstypen bearbeiten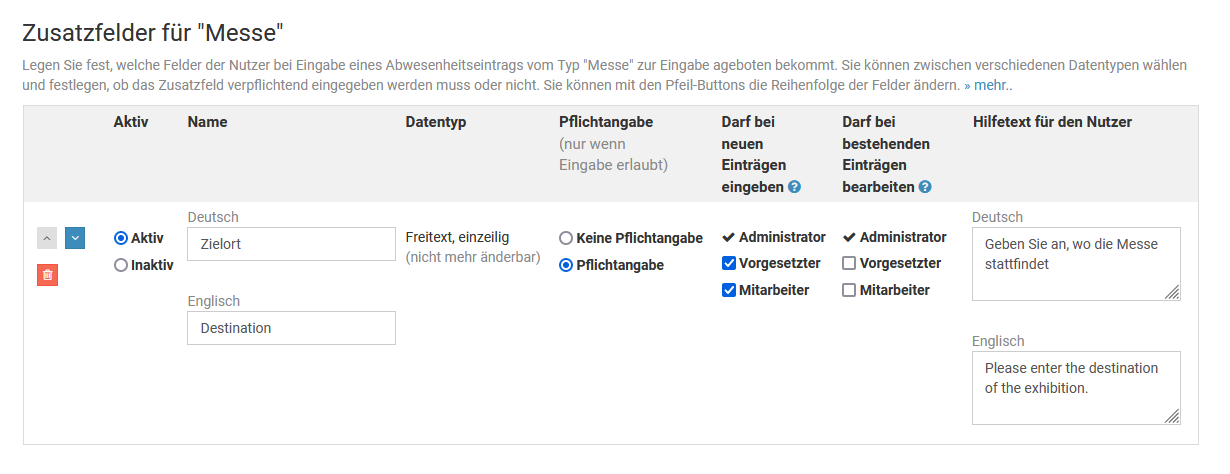
Eingaberechte für die Zusatzfelder
Bei den
Einstellungen der Zusatzfelder für die Abwesenheitstypen können Sie für jedes Zusatzfeld festlegen, ob Vorgesetzte und/oder Mitarbeiter das Zusatzfeld bei Neueintragung von Abwesenheiten eingeben dürfen. Ebenso können Sie festlegen, ob Vorgesetzte und/oder Mitarbeiter das Zusatzfeld bei bestehenden Abwesenheitseinträgen nachträglich bearbeiten dürfen.
Damit können Sie beispielsweise erreichen, bei Mitarbeiter-Nutzer bei der Abwesenheit "Dienstreise" das Zusatzfeld "Hotelkosten" eintragen können, wenn sie die Dienstreise eingeben. Eine spätere Änderung können Sie hingegen verbieten und nur den Vorgesetzten und Admins erlauben.
Admins dürfen immer alle Zusatzfelder eingeben und bearbeiten, eine Einschränkung der Rechte ist hier nicht möglich. Das wäre auch nicht sinnvoll, denn ein Admin hat ja die Möglichkeit, die Rechte zu ändern und könnte sich somit jederzeit selbst wieder das Recht auf das Zusatzfeld freischalten.
Hinweis zur Pflichtfeldangabe
Für jedes Zusatzfeld können Sie auch einstellen, ob das Feld ein Pflichtfeld ist. Sollte ein Feld als Pflichtfeld festgelegt sein, der Nutzer für das Feld jedoch keine Eingabe-/Bearbeitungsrechte haben, dann gilt das Zusatzfeld für diesen Nutzer nicht als Pflichtfeld.
Wenn Sie beispielsweise bei der Abwesenheit "Dienstreise" das Zusatzfeld "Hotelkosten" als Pflichtfeld festlegen, für Vorgesetzte die Eingabe dieses Zusatzfelds jedoch nicht erlauben, dann können Vorgesetzte dennoch eine Dienstreise eingeben, ohne das Feld "Hotelkosten" einzutragen.
Screenshot: Eingabe- und Bearbeitungsrechte bei den Zusatzfeldern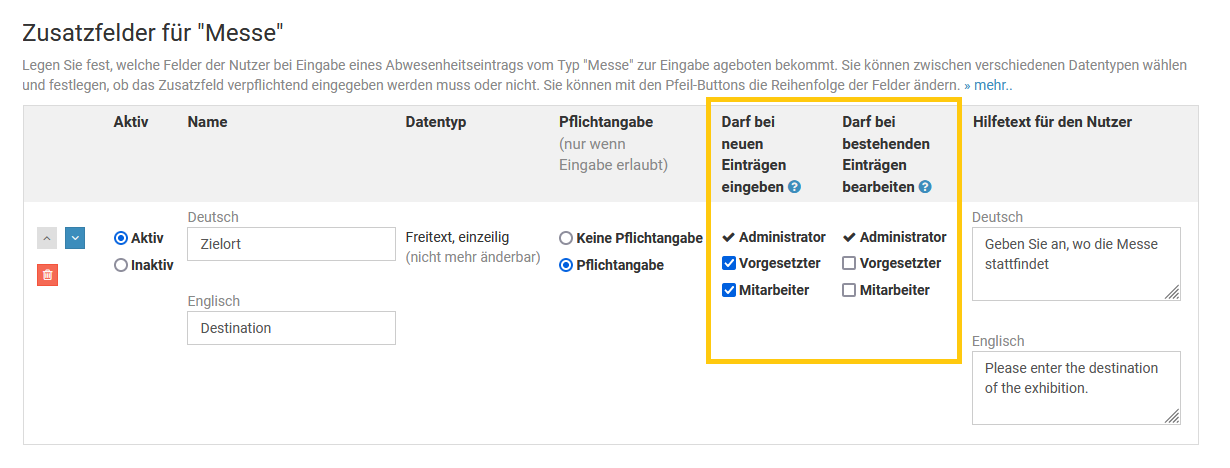
Angaben in den Zusatzfeldern bearbeiten
Über die
Eingaberechte und Bearbeitungsrechte für die Zusatzfelder können Sie festlegen, ob Mitarbeiter-Nutzer und Vorgesetzte die
Zusatzfelder zu den Abwesenheiten eintragen und nachträglich bearbeiten dürfen. Admins dürfen immer alle Zusatzfelder eingeben und nachträglich bearbeiten.
Um bei einem bestehenden Abwesenheitseintrag die Zusatzfelder nachträglich zu bearbeiten, gibt es zwei Möglichkeiten:
Abwesenheitseintrag bearbeiten
Wenn der Abwesenheitseintrag in einem Status ist, in dem Sie ihn bearbeiten dürfen, dann gehen Sie in die Bearbeitungsmaske für den Abwesenheitseintrag. Neben den Feldern für den Abwesenheitseintrag (Startdatum, Enddatum, usw.) können Sie dort dann auch die Zusatzfelder bearbeiten.
Nur Zusatzfelder bearbeiten
Wenn der Abwesenheitseintrag in einem Status ist, in dem Sie ihn nicht mehr bearbeiten dürfen (beispielsweise in der Regel bei Urlaubsanträge der Fall, die genehmigungspflichtig sind und von Ihrem Vorgesetzten genehmigt wurden), dann können Sie in die Bearbeitungsmaske nur für die Zusatzfelder wechseln und dort die Zusatzfelder bearbeiten.
Rufen Sie dazu die Detailansicht zu dem Abwesenheitseintrag auf. In der Detailansicht finden Sie den Button "
Zusatzfelder bearbeiten". Mit einem Klick darauf öffnet sich die Eingabemaske, um die Felder zu bearbeiten.
Um die Detailansicht zu einem Abwesenheitseintrag aufzurufen, gibt es zwei Möglichkeiten:
1)
Rufen Sie eine Kalenderansicht auf und klicken den gewünschten Eintrag im Kalender an.
2)
Melden Sie sich an Ihrem Nutzerkonto im Timebutler an und klicken links auf "
Abwesenheiten > Listenansicht" (Mitarbeiter-Nutzer) oder auf "
Mitarbeiter > Abwesenheiten > Listenansicht" (Vorgesetzte und Admins). Klicken Sie bei dem gewünschten Eintrag auf das blaue Symbol mit der Lupe.
Anzeige und Auswertung von Zusatzfeldern
Die Eingaben der Mitarbeiter zu den Zusatzfeldern werden an folgenden Stellen ausgegeben:
Anzeige in der Kalenderansicht
Wenn Sie in der Kalenderansicht mit der Maus über einen Abwesenheitseintrag fahren, erscheint ein kleines Fenster mit weiteren Informationen zu dem Eintrag. Hier werden auch die Angaben zu den Zusatzfeldern ausgegeben.
Hinweis: die Zusatzfelder werden in der Kalenderansicht nur angezeigt, wenn Sie in den
Globalen Einstellungen die Option "
Zusatzfelder in der Kalenderansicht anzeigen" aktiviert haben.
Anzeige in der Detailansicht
In der Detailansicht zu dem Abwesenheitseintrag werden die Angaben zu den Zusatzfeldern angezeigt.
Im Kapitel zur
Bearbeitungshistorie, die in der Detailansicht angezeigt wird, erfahren Sie, wie Sie die Detailansicht zu einem Abwesenheitseintrag aufrufen können.
In der Email an den Vorgesetzten
Bei einem genehmigungspflichtigen Abwesenheitseintrag sendet Timebutler ein Benachrichtigung an den Vorgesetzten zur Genehmigung/Ablehnung des Abwesenheitseintrages. Da die Angaben in den Zusatzfeldern oftmals zur Entscheidung für die Genehmigung des Abwesenheitseintrages benötigt werden, sind die Angaben zu den Zusatzfeldern in der Benachrichtigungs-Email an den Vorgesetzten ebenfalls aufgeführt.
Auswertung und Download
Wenn Sie die Liste der Abwesenheitseinträge als Excel-Datei herunterladen oder über das Downloadcenter die
Abwesenheitseinträge herunterladen, dann ist in der Excel-Datei für jedes Zusatzfeld eine zusätzliche Spalte angegeben, in der die Angaben der Mitarbeiter eingetragen sind.
Die Liste der Abwesenheitseinträge laden Sie als Excel-Datei herunter, indem Sie sich als Admin oder Vorgesetzter am Timebutler anmelden, dann links oben auf "
Mitarbeiter > Abwesenheiten > Listenansicht" klicken. Auf der Seite klicken Sie auf den Button "
Herunterladen".
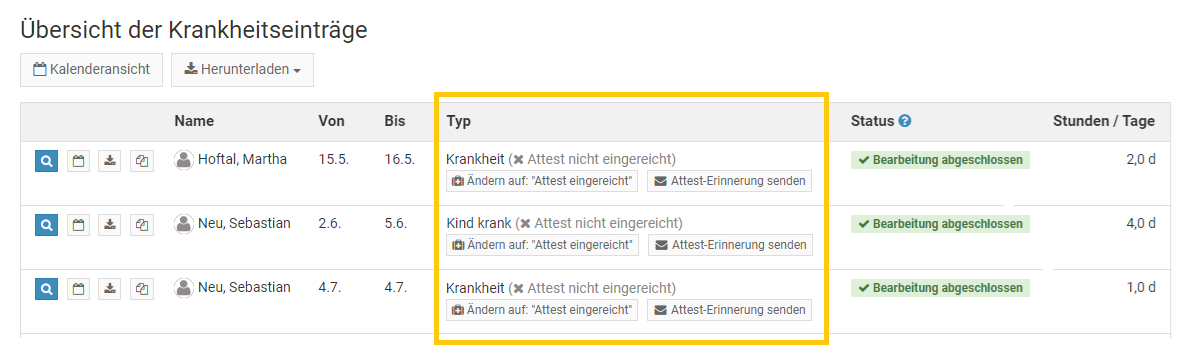
Attest-Status bei Krankheitseinträgen
Bei jedem Krankheitseintrag kann die Attest-Information bearbeitet werden. Damit wird markiert, ob für den Krankheitseintrag das ärztliche Attest beim Arbeitgeber eingegangen ist und archiviert wurde, oder ob dieses noch fehlt.
Bearbeiten des Attest-Status durch Admins
Admin-Nutzer können den Attest-Status bei jedem Krankheitseintrag ändern. Dazu meldet sich der Admin am Timebutler an, klickt links oben auf "
Mitarbeiter > Abwesenheiten > Krankmeldungen". In der Liste der Krankheitseinträge stehen Buttons zum Ändern des Attest-Status bereit. Ebenso gibt es in der Detailansicht zu dem Eintrag Buttons zum Bearbeiten des Attest-Status. Die Detailansicht kann per Klick auf das blaue Symbol mit der Lupe (=Detailansicht) aufgerufen werden.
Alternativ gelangt der Admin auch über die
Kalenderansicht zur Detailansicht des Krankheitseintrags. Im Kalender klickt er dazu einfach auf den Krankheitseintrag.
Bearbeiten des Attest-Status durch Vorgesetzte
Ein Admin kann festlegen, ob auch Vorgesetzte den Attest-Status bearbeiten dürfen: melden Sie sich mit einem Admin Nutzer am Timebutler an, klicken links unten auf "
Einstellungen > Weitere..", dann rechts auf "
Globale Einstellungen". Prüfen/ändern Sie hier die Option "
Vorgesetzte dürfen Attest-Informationen bearbeiten". In diesem Zusammenhang prüfen Sie auch die Option "
Anzeige der Attest-Information bei Krankheit"
Der Vorgesetzte kann den Attest-Status dann auf die gleich Weise bearbeiten, wie ein Admin, siehe oben.
Hinweis: Vorgesetzte dürfen die Attest-Informationen nur von Mitarbeitern bearbeiten, die ihnen zugeordnet sind. Bei Mitarbeitern, die Sie nur über die Erweiterten Sichtrechte sehen dürfen, können die Vorgesetzten die Attest-Informationen nicht bearbeiten.
Bearbeiten des Attest-Status durch Mitarbeiter-Nutzer
Die Attest-Information bedeutet
nicht, ob der Mitarbeiter ein ärztliches Attest vorliegen hat, sondern ob das ärztliche Attest beim Arbeitgeber eingegangen ist. Aus diesem Grund kann ein Nutzer mit Mitarbeiter-Rechten die Attest-Information nicht bearbeiten, sondern nur Admins oder Vorgesetzte.

Erinnerung an fehlendes Attest versenden
Sie können über Timebutler bequem Erinnerungs-Emails an die Mitarbeiter von Krankheitseinträgen versenden lassen, bei denen das ärztliche Attest fehlt.
Melden Sie sich dazu als Admin oder Vorgesetzter am Timebutler an und klicken links oben auf "
Mitarbeiter > Abwesenheiten > Krankmeldungen" (oder alternativ auf "
Mitarbeiter > Abwesenheiten > Listenansicht"). Bei jedem Krankheitseintrag ohne Attest wird ein Button "
Attest-Erinnerung senden" angezeigt. Mit einem Klick auf den Button sendet Timebutler im Hintergrund eine Email an den betroffenen Mitarbeiter mit der Aufforderung, das ärztliche Attest nachzureichen.
Timebutler speichert für die Dauer der Sitzung, welche Mitarbeiter die Attest-Erinnerung erhalten haben. Wenn Sie nach dem Versand von Erinnerungs-Emails die Listenansicht erneut aufrufen, dann wird der Erinnerungs-Button bei den entsprechenden Krankheitseinträgen nicht mehr angezeigt. Wenn Sie sich von Ihrem Timebutler Nutzerkonto abmelden und wieder anmelden, dann werden alle Erinnerungs-Buttons wieder angezeigt.
Ärztliches Attest hochladen
Das ärztliche Attest bei Krankheit, das der Mitarbeiter dem Arbeitgeber zusendet, sollte in jedem Fall aufbewahrt werden. Es ist im Timebutler absichtlich
nicht möglich, eine digitale Kopie, beispielsweise einen Scan des Attests, hochzuladen.
Das Erstellen einer Kopie und Hochladen im Timebutler ist nicht mit der Datenschutz-Grundverordnung (DS-GVO) in Einklang zu bringen. Die DS-GVO untersagt ausdrücklich die Verarbeitung von Krankheitsdaten (Artikel 9) und erlaubt nur wenige Ausnahmen. Wenn eine digitale Kopie eines ärztlichen Attests in einer Fehlzeitensoftware hochgeladen wird, obwohl das Original in jedem Fall aufbewahrt werden muss, dann handelt es sich um eine Bequemlichkeitsfunktion und somit nicht um einen berechtigten Ausnahmefall gemäß der DS-GVO.
Um die Timebutler-Nutzer vor unwissentlicher Verletzung der datenschutzrechtlichen Vorgaben zu schützen, kann absichtlich keine digitale Kopie des Attests hochgeladen werden.
Sichtrechte auf Krankheitseinträge einschränken
Ein Admin kann die Sichtrechte auf Krankheitseinträge einschränken, insbesondere für Mitarbeiter Nutzer. Sie haben folgende Möglichkeiten:
Fremde Krankheitseinträge für Mitarbeiter-Nutzer vollständig ausblenden
Ein Admin kann einstellen dass Mitarbeiter-Nutzer fremde Krankheiten nicht angezeigt bekommen. Melden Sie sich mit einem Admin Nutzer am Timebutler an, klicken links unten auf "
Einstellungen > Weitere..", dann rechts auf "
Globale Einstellungen". Prüfen/ändern Sie hier die Option "
Mitarbeiter sehen Krankheitseintragungen der Kollegen".
Fremde Krankheitseinträge für Mitarbeiter-Nutzer maskieren
Ein Admin kann einstellen dass Mitarbeiter-Nutzer fremde Krankheiten zwar im Kalender angezeigt bekommen, im Kalender jedoch nur ein neutrales "
Abwesend" angezeigt wird ohne Hinweis auf den Abwesenheitstyp. Der Vorteil dieser Maskierung gegenüber dem Ausblenden von Krankheitseinträge ist, dass der Mitarbeiter-Nutzer über die Abwesenheit der Kollegen informiert ist.
Die Maskierung kann für jeden Abwesenheitstyp individuell aktiviert werden. Lesen Sie hier, wie Sie die
Maskierung aktivieren.
Sichtrechte auf Krankheitseinträge für Vorgesetzte
Vorgesetzte sehen immer die Krankheitseinträge der Mitarbeiter, auf die sie Sichtrechte haben, da sie weisungsbefugt sind und die Informationen zur betrieblichen Steuerung und Planung benötigen, sowie als Entscheidungsgrundlage zur Genehmigung von Urlaubsanträgen und genehmigungspflichtigen Abwesenheitseinträgen.
Eigene Krankheitseinträge
Jeder Nutzer hat immer volle Sichtrechte auf die Einträge, die für ihn selbst gelten so auch für die eigenen Krankheitseinträge.
Einträge in der Vergangenheit ausblenden
Mitarbeiter-Nutzer benötigen zur Abstimmung mit den Kollegen meistens nur die Information über die zukünftigen Einträge, also sind Sichtrechte auf Einträge in der Vergangenheit nicht erforderlich. Sie können einstellen dass Mitarbeiter-Nutzer fremde Einträge in der Vergangenheit nicht angezeigt bekommen, sondern nur Einträge, die in der Zukunft liegen.
Die Einstellung können Sie in den "Globalen Einstellungen" vornehmen. Melden Sie sich als Admin am Timebutler an, klicken links unten auf "Einstellungen", dann darunter auf "Weitere..". Klicken Sie rechts oben auf "Globale Einstellungen". Prüfen/ändern Sie nun die Option "Einträge in der Vergangenheit bei Mitarbeiter-Nutzern ausblenden".
eAttest und eAU
Das ärztliche Attest auf Papier wurde für einen Großteil der Arbeitnehmer in Deutschland von einem elektronischen Attest abgelöst. Für viele Arbeitnehmer und natürlich für Arbeitnehmer außerhalb Deutschlands wird das ärztliche Attest auf Papier jedoch fortgeführt.
Lesen Sie hier, wie Sie die
elektronische Arbeitsunfähigkeitsbescheinigung abrufen und wie Sie
zusätzliche Krankheitsinformationen einstellen können.
Genehmigungspflicht bei Abwesenheiten
Ein Admin kann für jeden Abwesenheitstyp (Schulung, Homeoffice, Dienstreise, ...) festlegen, ob dieser genehmigungspflichtig sein soll oder nicht. Das ist auch für
Urlaub möglich.
Melden Sie sich als Admin am Timebutler an und klicken links unten auf "
Einstellungen > Weitere..", dann rechts auf "
Abwesenheitstypen". In der Spalte "
Genehmigungspflichtig" sehen Sie, welche Abwesenheitstypen genehmigungspflichtig sind und welche nicht.
Um die Einstellung zu ändern, klicken Sie in der Zeile des Abwesenheitstyps links auf den grünen Button mit dem Bleistift (=Bearbeiten). Ändern Sie die Einstellung "
Genehmigung" und klicken dann unten auf den Button "
Speichern".
Die Änderung ist ab sofort für
neue Einträge gültig. Die bereits bestehenden Einträge, sind weiterhin genehmigungspflichtig/nicht genehmigungspflichtig, so wie es zum Zeitpunkt der Eingabe des Abwesenheitseintrages eingestellt war.
Screenshot: Urlaub als nicht genehmigungspflichtig einstellen
Vertreterauswahl Pflicht
Sie können für jeden Abwesenheitstyp (Schulung, Homeoffice, Dienstreise, ...) festlegen, ob bei Eingabe der Abwesenheit ein Vertreter ausgewählt werden muss oder nicht.
Vertreter Auswahlpflicht einstellen
Melden Sie sich als Admin am Timebutler an und klicken links unten auf "
Einstellungen > Weitere..", dann rechts auf "
Abwesenheitstypen". In der Spalte "
Vertreterauswahl Pflicht" sehen Sie, bei welchen Abwesenheitstypen ein Vertreter ausgewählt werden muss.
Um die Einstellung zu ändern, klicken Sie in der Zeile des Abwesenheitstyps links auf den grünen Button mit dem Bleistift (=Bearbeiten). Ändern Sie die Einstellung "
Vertreterauswahl Pflicht" und klicken dann unten auf den Button "
Speichern".
Die Änderung ist ab sofort für
neue Einträge gültig.
Screenshot: Einstellung zur Pflichtangabe Vertreterauswahl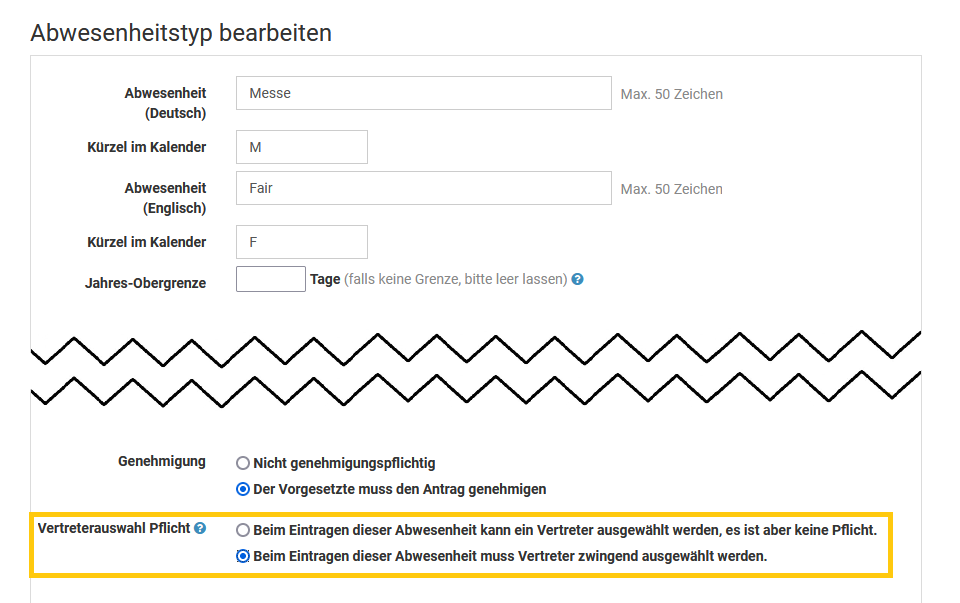
Auswahlpflicht je nach Mitarbeiter unterschiedlich
Die Einstellung gilt
für alle Mitarbeiter gleichermaßen. Es ist nicht möglich, die Pflicht zur Vertreterauswahl für bestimmte Mitarbeiter zu aktivieren und für andere zu deaktivieren. Wenn bestimmte Vorgesetzte oder Mitarbeiter keinen Vertreter auswählen müssen, dann haben Sie folgende Alternativen:
- Der Vorgesetzte/Mitarbeiter wählt dennoch einen Vertreter. Es ist auch für die Mitarbeiter des Vorgesetzten von Vorteil, wenn diese wissen, an wen sie sich während des Urlaubs / der Abwesenheit des Vorgesetzten wenden können.
- Sie können ein neues Nutzerkonto mit dem Namen "Dummy Vertreter" (und der Auswahl "Mitarbeiter ohne Email-Adresse") erstellen. Der Vorgesetzte/Mitarbeiter kann dann als Vertreter den Kollegen "Dummy Vertreter" auswählen.
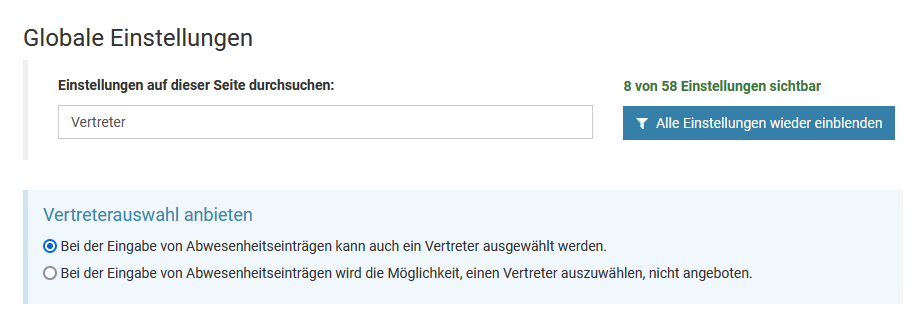
Vertretrauswahl aktivierenDie Vertreterauswahl kann vollständig deaktiviert sein. Wenn das der Fall ist, dann wird die Vertreter-Pflichtangabe nicht geprüft, da der Nutzer keine Möglichkeit hat, einen Vertreter auszuwählen.
Prüfen Sie also, ob die Vertreterauswahl aktiviert ist. Melden Sie sich dazu mit einem Admin Nutzer am Timebutler an, klicken links unten auf "
Einstellungen > Weitere..", dann rechts auf "
Globale Einstellungen". Hier finden Sie die Option "
Vertreterauswahl anbieten".
Jahresobergrenze
Sie können für nahezu jeden Abwesenheitstyp (Schulung, Homeoffice, Dienstreise, ...) festlegen, dass jeder Mitarbeiter je Kalenderjahr maximal eine bestimmte Anzahl Tage nehmen darf.
Melden Sie sich als Admin am Timebutler an und klicken links unten auf "
Einstellungen > Weitere..", dann rechts auf "
Abwesenheitstypen". In der Spalte "
Jahres-Obergrenze" sehen Sie, bei welchen Abwesenheitstypen eine Jahresobergrenze eingestellt ist.
Um die Einstellung zu ändern, klicken Sie in der Zeile des Abwesenheitstyps links auf den grünen Button mit dem Bleistift (=Bearbeiten). Ändern Sie die Einstellung "
Jahres-Obergrenze".
Sie können dann auch auswählen, ob nur die Anzahl Arbeitstage eingeschränkt werden soll oder die Anzahl Kalendertage. Wenn Sie beispielsweise eine Grenze von 7 Tagen wählen und auf Arbeitstage einschränken, dann könnte ein Eintrag beispielsweise von Montag bis Dienstag der darauffolgenden Woche eingegeben werden (sofern der Mitarbeiter von Samstag und Sonntag frei hat), da dieser zwar 9 Kalendertage, aber nur 7 Arbeitstage umfasst. Wenn Sie hingegen die Einschränkung auf Anzahl Kalendertage setzen, dann wäre ein Eintrag von Montag bis Dienstag nicht möglich, da das 9 Kalendertage umfasst, sondern nur ein Eintrag von Montag bis Sonntag.
Nach der Änderung klicken Sie unten auf den Button "
Speichern".
Die Änderung ist ab sofort für
neue Einträge gültig.
Screenshot: Jahresobergrenze für Abwesenheiten
Maskierung von Abwesenheiten
Abwesenheiten bei Mitarbeiter-Nutzern maskieren
Ein Admin kann einstellen, dass Mitarbeiter-Nutzer fremde Abwesenheitseinträge zwar im Kalender angezeigt bekommen, im Kalender jedoch nur ein neutrales "
Abwesend" angezeigt wird ohne Hinweis auf den Abwesenheitstyp.
Sie können also beispielsweise einstellen, dass Mitarbeiter-Nutzer fremde Abwesenheiten vom Typ Urlaub, Homeoffice und Dienstreise immer vollständig sehen, Abwesenheiten vom Typ Krankheit, Dienstreise und Unbezahlter Urlaub hingegen nur maskiert angezeigt werden sollen.
Die Maskierung kann für jeden Abwesenheitstyp individuell aktiviert und deaktiviert werden, wie folgt:
Melden Sie sich als Admin am Timebutler an und klicken links unten auf "
Einstellungen > Weitere..", dann rechts auf "
Abwesenheitstypen". In der Spalte "
Maskieren für Mitarbeiter" sehen Sie, welche Abwesenheitstypen maskiert werden und welche nicht.
Um die Einstellung zu ändern, klicken Sie in der Zeile des Abwesenheitstyps links auf den grünen Button mit dem Bleistift (=Bearbeiten). Ändern Sie die Einstellung "
Maskieren für Mitarbeiter" und klicken dann unten auf den Button "
Speichern".
Maskierung von Überstundenabbau und Überstunden
Überstunden (nur beim Überstundenfeature) und Überstundenabbau werden im Kalender anders dargestellt als andere Abwesenheiten (Urlaub, Schulung ,Homeoffice, usw), da die Überstunden und Überstundenabbau auch stundenweise auftreten können. Überstunden werden mit einem Rechteck im Kalendertag markiert, Überstundenabbau mit einer roten Umrandung um den Kalendertag. Da diese zwei Einträge anhand der Darstellung im Kalender sofort erkennbar sind, können sie nicht maskiert werden. Wenn Sie also die Maskierung für Überstunden oder für Überstundenabbau aktivieren, dann werden diese nicht maskiert angezeigt, sondern vollständig ausgeblendet.
Screenshot: Abwesenheitstyp maskieren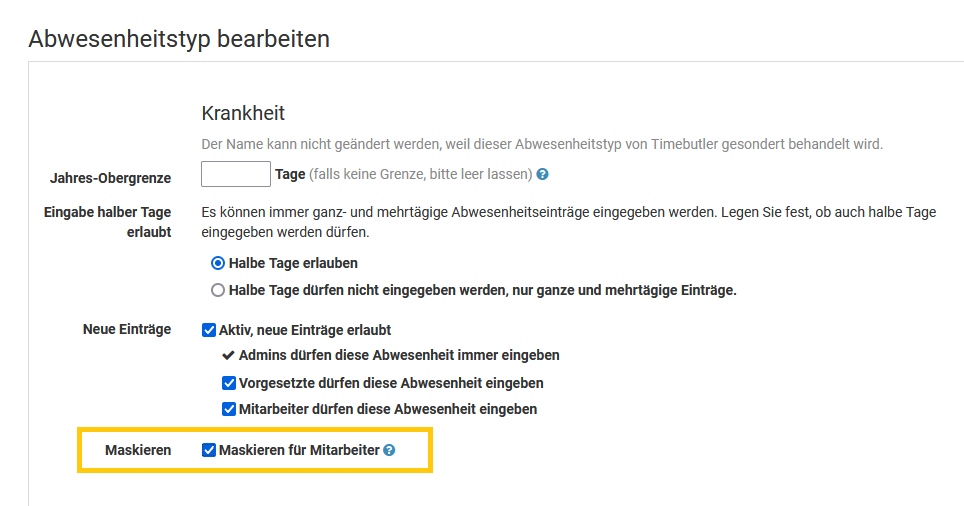
Abwesenheiten bei Vorgesetzten und Admins maskieren
Die Maskierung wird nur angewendet, wenn ein Mitarbeiter-Nutzer am Timebutler angemeldet ist. Für Vorgesetzte und Admins wird die Maskierung nicht angewendet, da diese weisungsbefugt sind und die vollständigen Informationen über die Abwesenheiten zur betrieblichen Steuerung und Planung benötigen, sowie als Entscheidungsgrundlage zur Genehmigung von Urlaubsanträgen und genehmigungspflichtigen Abwesenheitseinträgen.
Bearbeitungshistorie der Abwesenheitseinträge
In der Detailansicht zu einem Urlaubsantrag oder Abwesenheitseintrag wird unter "
Bearbeitungshistorie" angezeigt, welcher Nutzer den Eintrag zu welchem Zeitpunkt eingegeben, geändert, genehmigt, abgelehnt, usw. hat.
Lesen Sie hier, wie Sie die
Detailansicht zu einem Abwesenheitseintrag aufrufen.
Screenshot: Bearbeitungshistorie in der Detailansicht einer Abwesenheit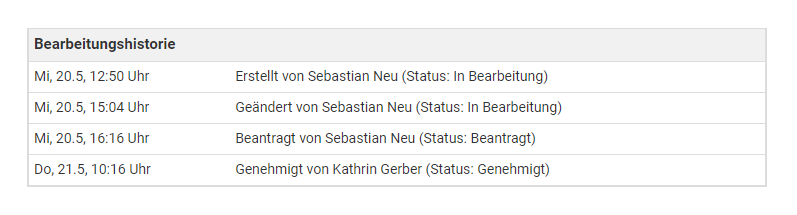
Sonderfall gelöschte Einträge
Gelöschte Einträge werden in der Kalender- und Listenansicht nicht angezeigt. Timebutler führt aber auch Protokoll über die gelöschten Urlaubs- und Abwesenheitseinträge und zeichnet auf, wer den Eintrag zu welchem Zeitpunkt gelöscht hat.
Lesen Sie hier, wie Sie
gelöschte Einträge einsehen.
Features der Zeiterfassung
Timebutler bietet eine vollwertige Zeiterfassung, inklusive virtueller Stempeluhr, umfangreichen Einstellungsmöglichkeiten, Sicht- und Bearbeitungsrechten, Buchen auf Projekte und Kategorien, Arbeitszeitkonten, gesetzlichen und individuellen Pausenregelungen, Auswertungsmöglichkeiten mit Excel-Download und vieles mehr.
Jeder Nutzer kann seine Zeiten über die virtuelle Stempeluhr erfassen oder per Direkteingabe eingeben. Ebenso können Sie das Zeiterfassungsterminal einsetzen: dazu aktivieren Sie auf einem handelsüblichen Tablet das Timebutler Zeiterfassungsterminal und stellen das Tablet am Büroeingang oder Firmeneingang bereit. Jeder Mitarbeiter kann sich dann mit wenigen Klicks am Tablet ein-/ausstempeln und Pausen stempeln.
Hier erhalten Sie einen
Überblick über die Features der Zeiterfassung.
Zeiterfassung oder Überstundenfeature
Es gibt im Timebutler das Zeiterfassungsfeature und das Überstundenfeature. Beim Zeiterfassungsfeature geben die Mitarbeiter die gesamte Arbeitszeit mit Pausen ein und Timebutler berechnet die Arbeitszeit auf durch den Vergleich von Soll- und Ist-Zeiten. Beim Überstundenfeature geben die Mitarbeiter hingegen nicht die gesamte Arbeitszeit ein, sondern nur Überstunden (und Überstundenabbau), und Timebutler berechnet daraus das Überstundenkonto.
Da die Überstunden in den zwei Features unterschiedlich ermittelt werden (Berechnung bzw. direkte Eingabe) ist es nicht möglich, sowohl das Zeiterfassungsfeature als auch Überstundenfeature gleichzeitig zu aktivieren.
Wenn Sie das Zeiterfassungsfeature aktivieren, dann wird das Überstundenfeature automatisch deaktiviert und umgekehrt.
Es ist auch nicht möglich, für einzelne/manche Nutzer das Zeiterfassungsfeature zu aktivieren und für andere Nutzer das Überstundenfeature. Das wäre verwirrend, da verschiedene Ansichten für das Arbeitszeitkonto und das Überstundenkonto angezeigt werden müssten und manche Mitarbeiter in der einen Ansicht, andere in der anderen Ansicht aufgeführt werden würden.
Sie müssen sich also für eines der beiden Features entscheiden: Zeiterfassung oder Überstunden. Dieses gilt dann für alle Mitarbeiter und kann nicht unterschiedlich eingestellt werden, aus den genannten Gründen.
Um das Zeiterfassungsfeature zu aktivieren:
Melden Sie sich als Admin am Timebutler an und klicken links unten auf "Einstellungen > Weitere..", dann rechts auf "Zeiterfassung" und aktivieren hier die Zeiterfassung.Um das Überstundenfeature zu aktivieren:
Melden Sie sich als Admin am Timebutler an und klicken links unten auf "Einstellungen", dann darunter auf "Weitere..", dann rechts auf "Überstundenfeature". Klicken Sie auf den Button "Überstundenfeature aktivieren". Auf der Seite haben Sie verschiedene Optionen zur Überstundenverwaltung, die Sie nach Ihren Wünschen einstellen können. Anschließend klicken Sie zur Bestätigung auf den Button "Überstundenfeature aktivieren"
Zeiterfassung aktivieren
Timebutler bietet eine vollwertige Zeiterfassung, inklusive
virtueller Stempeluhr, umfangreichen Einstellungsmöglichkeiten,
Arbeitszeitkonten für alle Mitarbeiter, Sicht- und Bearbeitungsrechten, Buchen auf
Projekte und
Kategorien, gesetzlichen und individuellen
Pausenregelungen,
Auswertungsmöglichkeiten mit Excel-Download und vieles mehr.
Jeder Nutzer kann seine Zeiten über die
virtuelle Stempeluhr erfassen oder über das
Eingabeformular eingeben. Ebenso können Sie das
Zeiterfassungsterminal einsetzen: dazu rufen Sie auf einem handelsüblichen Tablet die Timebutler Zeiterfassungsterminal-Ansicht auf und stellen das Tablet am Büroeingang oder Firmeneingang bereit. Jeder Mitarbeiter kann sich dann mit wenigen Klicks am Tablet ein-/ausstempeln und Pausen stempeln.
Die Zeiterfassung können Sie im Timebutler mit wenigen Mausklicks aktivieren. Da alle Mitarbeiter, bei denen die Zeiterfassung aktiviert ist, die gesamte Arbeitszeit über die Stempeluhr aufzeichnen oder eintragen müssen, ist es wichtig, die Mitarbeiter mit Vorlauf darauf hinzuweisen.
Sie können die Zeiterfassung zunächst im kleinen Kreis ausprobieren und dann später auf das gesamte Unternehmen ausweiten - Sie können die Zeiterfassung aber auch sofort für alle Mitarbeiter freischalten. Im folgenden ist beschrieben, wie Sie die Zeiterfassung im kleinen Kreis ausprobieren und dann auf alle Mitarbeiter ausweiten:
1) Zeiterfassung für eingeschränkten Nutzerkreis aktivieren
Melden Sie sich als Admin auf timebutler.de an und klicken links unten auf "
Einstellungen > Weitere..", dann rechts auf "
Zeiterfassung".
Mit der ersten Option "
Zeiterfassung aktivieren" können Sie die Zeiterfassung aktivieren. Bei der zweiten Option "
Auf Abteilungen eingrenzen" können Sie eine Eingrenzung auf bestimmte Abteilungen vornehmen. Bei der nächsten Option "
Start der Zeiterfassung" stellen Sie bitte das aktuelle Datum ein oder das Datum, zu dem Sie mit der Zeiterfassung starten möchten. Gehen Sie auch die weiteren Optionen auf der Seite durch und klicken dann unten auf der Seite auf den blauen Button "
Speichern".
Wenn Sie zusätzlich die Zeiterfassung für einzelne Mitarbeiter aktivieren oder deaktivieren möchten, dann klicken Sie links oben auf "
Mitarbeiter", dann unterhalb des kleinen "
Mitarbeiter" auf "
Übersicht". Klicken Sie dann in der Zeile bei dem gewünschten Nutzerkonto auf das grüne Symbol mit dem Bleistift (=Bearbeiten). Oben bei "
Zeiterfassung aktiv?" können Sie die gewünschte Option einstellen. Speichern Sie die Änderung mit einem Klick auf den blauen Button "
Speichern" ganz unten auf der Seite.
2) Soll-Arbeitszeiten einstellen
Nachdem Sie die Zeiterfassung aktiviert haben, klicken Sie links unten auf "
Einstellungen > Arbeitstage". Hier können Sie für jeden Mitarbeiter die tägliche Soll-Arbeitszeit prüfen und ggf. ändern (per Klick auf den blauen Button "
Bearbeiten").
3) Überstunden Start-Guthaben einstellen
Klicken Sie links unten auf "
Einstellungen > Arbeitszeitsaldo" (wird nur angezeigt, sobald die Zeiterfassung aktiviert ist). Hier können Sie in der Spalte "
Arbeitszeitsaldo zum Start der Zeiterfassung" das Überstunden Start-Guthaben der Mitarbeiter einstellen.
Siehe auch Screenshot unten.
Spalte nicht vorhanden?Möglicherweise lautet die Spaltenüberschrift in Ihrem Fall nicht "
Arbeitszeitsaldo zum Start der Zeiterfassung" sondern "
Saldo vom Vorjahr". Sie können dann einfach in der Spalte "
Saldo vom Vorjahr" die Überstunden-Start-Guthaben eintragen.
Die Spalte ist anders benannt, wenn Sie bei den Einstellungen für die Zeiterfassung noch kein
Startdatum für die Zeiterfassung eingegeben haben.
4) Zeiterfassung testen
Damit sind Sie fertig. Die aktivierten Mitarbeiter können nun die
Arbeitszeiten eingeben oder über die
Stempeluhr aufzeichnen (sofern Sie die Stempeluhr oben bei Schritt 1 aktiviert haben) und Sie können die Liste der Arbeitszeiteinträge einsehen, die Arbeitszeitkonten aufrufen, Zeiten auswerten, herunterladen, usw.
5) Zeiterfassung für alle Mitarbeiter freischalten
Wenn Sie sich für den Einsatz der Zeiterfassung im gesamten Unternehmen entschieden haben, entfernen Sie die Einschränkung der Zeiterfassung auf bestimmte Abteilungen (siehe oben bei Punkt 1). Ebenso sollten Sie dann das Datum zum Start der Zeiterfassung verschieben, da die neu aktivierten Nutzer ja seit dem bisherigen Start der Zeiterfassung noch keine Arbeitszeiteinträge eingegeben haben und somit ins Minus geraten würden. Und schließlich sollten Sie dann noch das Überstunden-Start-Guthaben anpassen siehe oben bei 3.
Screenshot: Überstunden Start-Guthaben einstellen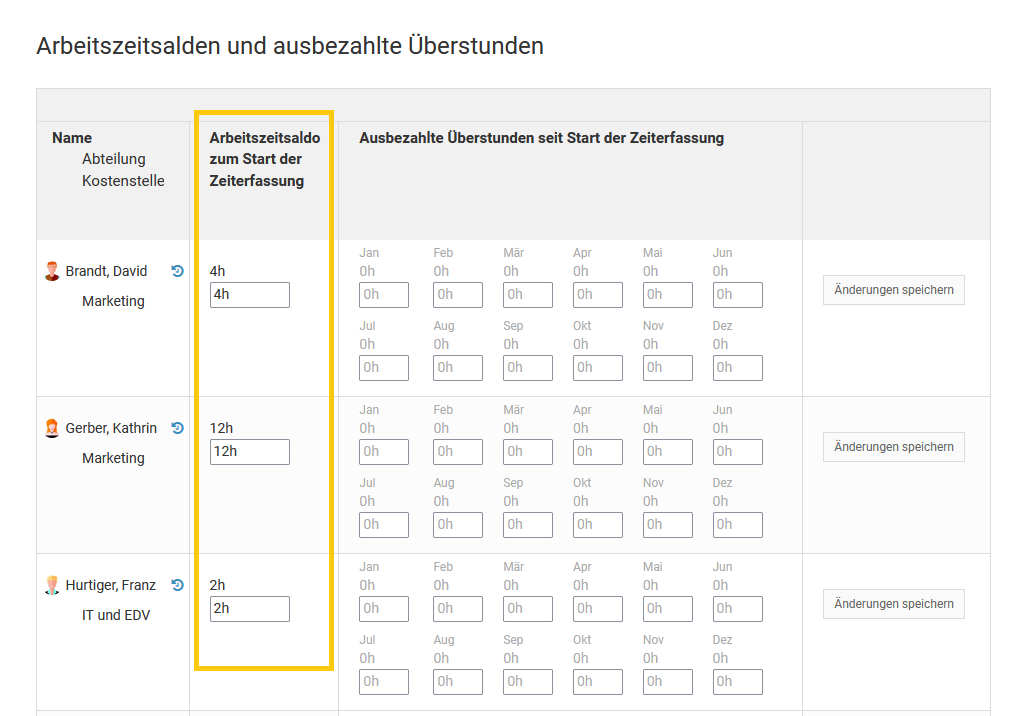
Zeiterfassung auf Abteilungen oder Mitarbeiter einschränken
Sie können die Zeiterfassung für alle Mitarbeiter im Unternehmen aktivieren oder nur für einzelne Abteilungen. Ebenso können Sie die Zeiterfassung für einzelne Mitarbeiter individuell aktivieren oder deaktivieren.
Zeiterfassung auf Abteilungen eingrenzen
Melden Sie sich als Admin am Timebutler an und klicken links unten auf "
Einstellungen > Weitere..", dann rechts auf "
Zeiterfassung". Bei der zweiten Option "
Auf Abteilungen eingrenzen" können Sie die Zeiterfassung auf bestimmte Abteilungen eingrenzen. Die Änderungen speichern Sie dann per Klick auf den blauen Button "
Speichern" ganz unten auf der Seite.
Zeiterfassung für Mitarbeiter individuell einstellen
Wenn Sie die Zeiterfassung für einzelne Mitarbeiter aktivieren oder deaktivieren möchten, dann klicken Sie links oben auf "
Mitarbeiter", dann unterhalb des kleinen "
Mitarbeiter" auf "
Übersicht". Klicken Sie in der Zeile bei dem gewünschten Nutzerkonto auf das grüne Symbol mit dem Bleistift (=Bearbeiten). Oben bei der Option "
Zeiterfassung aktiv?" stellen Sie die gewünschte Option ein. Speichern Sie die Änderung mit einem Klick auf den blauen Button "
Speichern" ganz unten auf der Seite.
Vorgesetzte und Vertrauensarbeitszeit
Vorgesetzte haben oftmals Vertrauensarbeitszeit und erfassen im Gegensatz zu den Mitarbeitern keine Arbeitszeiten. Lesen Sie hier, wie Sie
Vertrauensarbeitszeit für Mitarbeiter einstellen.
Screenshot: Zeiterfassung auf Abteilung eingrenzen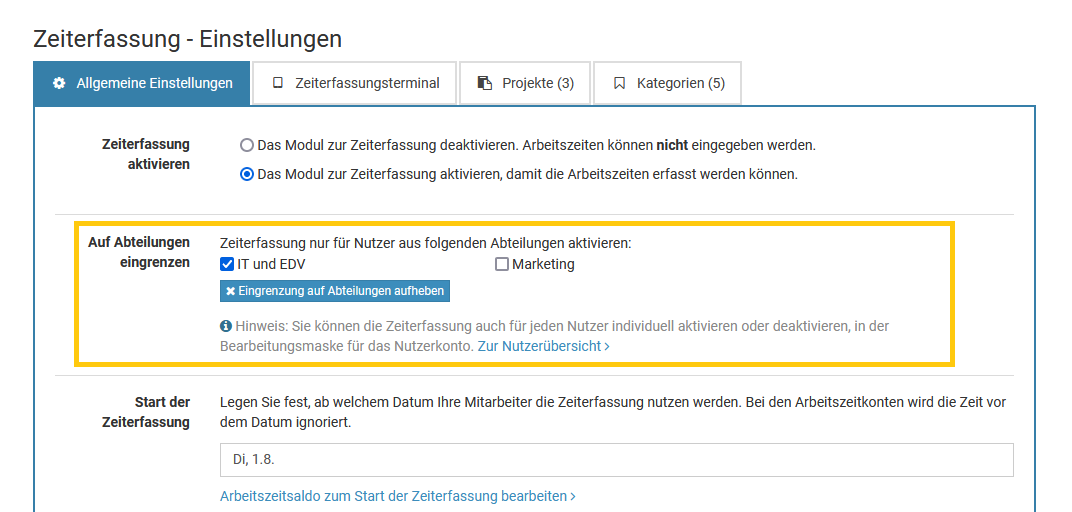
Screenshot: Mitarbeiter für Nutzer individuell einstellen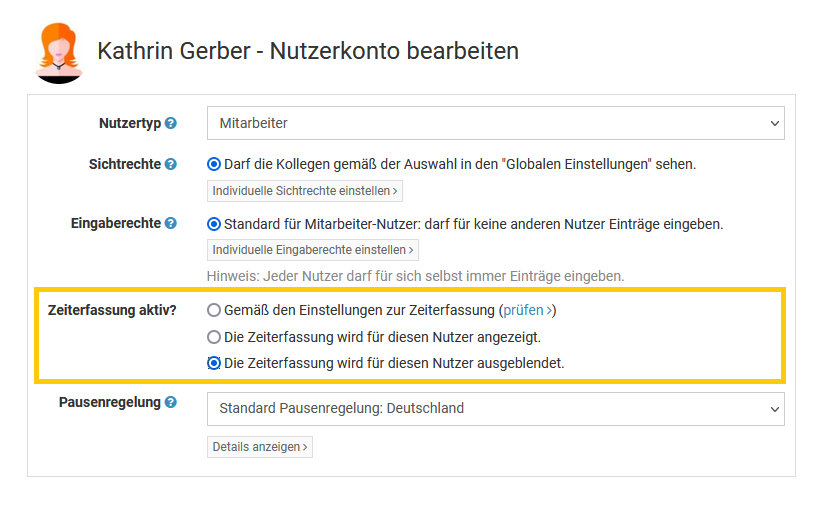
Vertrauensarbeitszeit
Vorgesetzte haben oftmals Vertrauensarbeitszeit und erfassen im Gegensatz zu den Mitarbeitern keine Arbeitszeiten. Die Vorgesetzten müssen aber die Arbeitszeiten und Arbeitszeitkonten Ihrer Mitarbeiter einsehen und bearbeiten können. Für diese Vorgesetzten können Sie die Zeiterfassung deaktivieren.
Auch wenn die Zeiterfassung für die Vorgesetzten deaktiviert ist, haben die Vorgesetzten weiterhin Einsicht in die Arbeitszeiteinträge und Arbeitszeitkonten der Mitarbeiter, auf die sie Sichtrechte haben.
Um die Zeiterfassung für die Vorgesetzten zu deaktivieren, melden Sie sich als Admin am Timebutler an und klicken links oben auf "
Mitarbeiter", dann unterhalb des kleinen "
Mitarbeiter" auf "
Übersicht". Klicken Sie in der Zeile bei dem gewünschten Nutzerkonto auf das grüne Symbol mit dem Bleistift (=Bearbeiten). Oben bei der Option "
Zeiterfassung aktiv?" stellen Sie die Option "
Die Zeiterfassung wird für diesen Nutzer ausgeblendet." ein. Speichern Sie die Änderung mit einem Klick auf den blauen Button "
Speichern" ganz unten auf der Seite.
Screenshot: Mitarbeiter für Nutzer individuell deaktivieren
Wechsel Überstundenfeature zur Zeiterfassung
Es gibt im Timebutler das Zeiterfassungsfeature und das Überstundenfeature. Es kann immer nur
eines der beiden Features aktiviert sein, nicht beide.
Wenn Sie das Überstundenfeature aktiviert haben und nun zum Zeiterfassungsfeature wechseln möchten, dann gehen Sie wie folgt vor:
1. Testen Sie die Zeiterfassung
Gehen Sie auf
www.timebutler.de, melden sich ab, falls automatisch angemeldet und klicken dann rechts oben auf "
Live Demo". Melden Sie sich als fiktiver Admin-Nutzer an und probieren nun die Zeiterfassung aus. Sie können beispielsweise links auf "
Mitarbeiter > Zeiterfassung > Arbeitszeit eingeben" oder auch "
Mitarbeiter > Zeiterfassung > Arbeitszeitkonten" klicken. Oder klicken Sie rechts oben auf das "
00:00", um die virtuelle Stempeluhr auszuprobieren. Oder Sie klicken links unten auf "
Einstellungen > Weitere..", dann rechts auf "
Zeiterfassung", um die verschiedenen Einstellungsmöglichkeiten zu prüfen.
2. Umstieg auf die Zeiterfassung
Wenn Sie sich dann für die Zeiterfassung entschieden haben, legen Sie einen Stichtag fest, zu dem Sie die Zeiterfassung aktivieren möchten. Hier bietet sich der erste Tag eines Monats an.
Überstundenguthaben herunterladenMelden Sie sich an dem Stichtag mit einem Admin-Nutzer am Timebutler an und klicken links oben auf "
Mitarbeiter > Überstundenkonten". Laden Sie die Ansicht der Urlaubskonten als Excel-Datei herunter: die Zahlen in der Spalte "
Guthaben" werden Sie später noch benötigen.
Zeiterfassung aktivierenKlicken Sie nun links unten auf "
Einstellungen > Weitere..", dann rechts auf "
Zeiterfassung". Aktivieren Sie die Zeiterfassung, stellen bei "
Start der Zeiterfassung" das Datum des gewählten Stichtags ein und nehmen die weiteren Einstellungen vor und klicken unten auf den blauen Button "
Speichern". Das Überstundenfeature wird nun automatisch deaktiviert.
Überstundenguthaben eintragenKlicken Sie nun links unten auf "
Einstellungen > Arbeitszeitsaldo" und tragen in der Spalte "
Arbeitszeit Saldo zum Start der Zeiterfassung" die Werte ein, die Sie in der Spalte "
Guthaben" bei den Überstundenkonten hatten.
Ab sofort können Ihre Mitarbeiter die Arbeitszeiten im Timebutler eingeben oder über die Stempeluhr oder das Zeiterfassungsterminal erfassen und Sie nutzen die Zeiterfassung mit allen Features.
Arbeitszeiten eingeben: Stempeluhr
Sofern ein Admin in den
Einstellungen für die Zeiterfassung die Stempeluhr aktiviert hat, können Sie die Arbeitszeit über die virtuelle Stempeluhr bequem mit wenigen Mausklicks aufzeichnen.
Virtuelle Stempeluhr in der oberen Leiste
Nach der Anmeldung am Timebutler wird auf allen Seiten rechts oben ein "
00:00" für die Stempeluhr angezeigt:

Stempeluhr starten
Mit einem Klick darauf klappt die Stempeluhr herunter und Sie können auf den Button "
Starten" klicken, um die Stempeluhr zu starten:

Stempeluhr läuft
In der Leiste rechts oben auf allen Seiten ist die Anzeige der Stempeluhr nun grün und signalisiert, dass die Stempeluhr läuft:

Stempeluhr pausiert
Um die Stempeluhr zu pausieren, klicken Sie auf die Zeitangabe in der Leiste und klicken dann in der Stempeluhr auf den Button "
Pausieren". In der Leiste wird die Anzeige der Stempeluhr orange angezeigt und damit signalisiert, dass die Stempeluhr pausiert ist.

Stempeluhr stoppen, Arbeitszeit speichern
Zum Ende der Arbeitszeit klicken Sie wieder auf die Zeitangabe in der Leiste und klicken dann in der Stempeluhr auf "
Arbeitszeit speichern". Der Arbeitszeiteintrag wird gespeichert und die Leiste wird wieder blau dargestellt mit der Anzeige "
00:00".
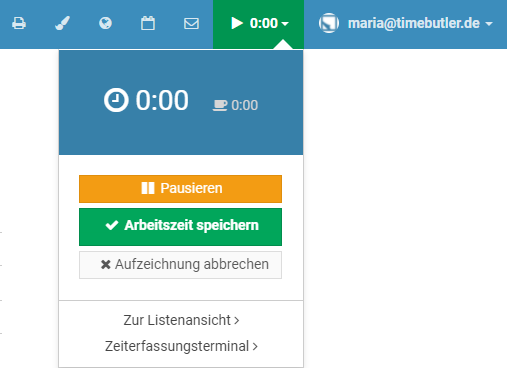
Unterbrechungen, Abmelden
Wenn die Stempeluhr läuft oder Sie in der Pause sind, dann können Sie sich vom Timebutler abmelden oder den Laptop/PC herunterfahren oder zu einem Kundentermin fahren. Timebutler zeichnet die Arbeitszeit im Hintergrund weiterhin auf.
Wenn Sie sich dann zu einem späteren Zeitpunkt wieder am Timebutler anmelden, wurde die Arbeitszeit weiter aufgezeichnet und Sie können die Stempeluhr stoppen und damit die Arbeitszeit speichern.
Arbeitszeiten eingeben: Eingabeformular
Sofern ein Admin in den
Einstellungen für die Zeiterfassung die Eingabe der Arbeitszeiten über das Eingabeformular für die
Mitarbeiter erlaubt hat, können die Arbeitszeiten wie folgt eingegeben werden:
Mitarbeiter-Nutzer
Der Mitarbeiter-Nutzer meldet sich am Timebutler an und klickt links auf "
Zeiterfassung > Arbeitszeit eintragen".
Um mehrere Arbeitszeiteinträge in einem Formular einzugeben, beispielsweise für eine ganze Woche, klickt er links auf "
Zeiterfassung > Arbeitszeiten eintragen".
Vorgesetzte und Admins
Der Vorgesetzte oder Admin meldet sich am Timebutler an und klickt links oben auf "
Mitarbeiter > Zeiterfassung > Arbeitszeit eintragen".
Um mehrere Arbeitszeiteinträge in einem Formular einzugeben, beispielsweise für eine ganze Woche, klickt er links oben auf "
Mitarbeiter > Zeiterfassung > Arbeitszeiten eintragen".
Dauer oder Start/Ende-Uhrzeit eingeben
Ein Admin kann in den
Einstellungen für die Zeiterfassung bei der Option "
Eingabeart" einstellen, ob die Mitarbeiter nur die Arbeitszeitdauer eingeben dürfen, die Start-/Ende-Uhrzeit eingeben oder beide Möglichkeiten zur Auswahl haben. Mit der Option "
Pausenzeiten eingeben" kann eingestellt werden, ob die Start- und Ende-Uhrzeiten der Pausen ebenfalls eingegeben werden müssen. Daneben gibt es viele weitere nützliche Einstellungen in den
Einstellungen für die Zeiterfassung.
Screenshot: Arbeitszeiteintrag über das Eingabeformular eintragen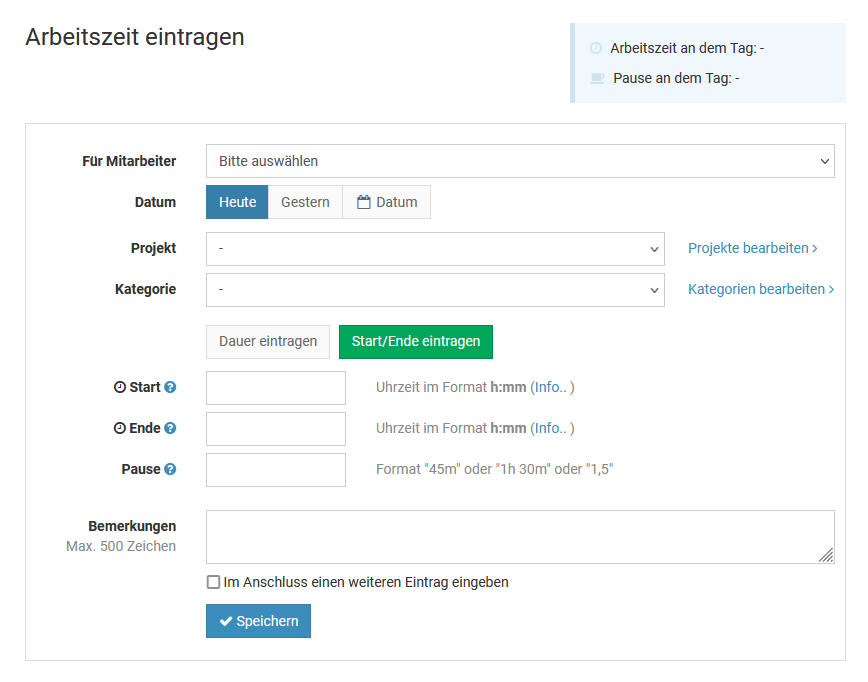
Screenshot: Arbeitszeiteinträge Masseneingabe über das Eingabeformular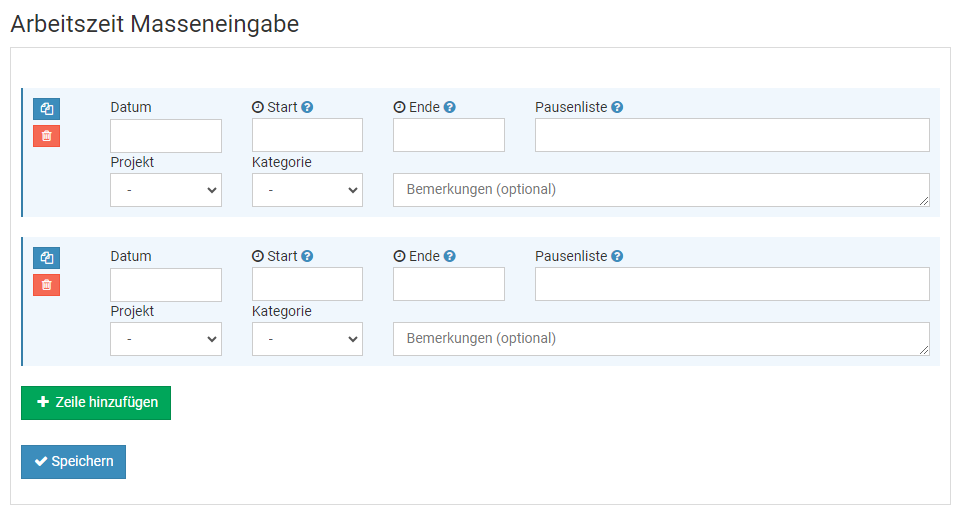
Screenshot: Arbeitszeiteinträge Masseneingabe für einen Tag über das Eingabeformular
Arbeitszeiten eingeben: Zeiterfassungsterminal
Timebutler bietet eine vollintegrierte Zeiterfassungsterminal-Lösung.
Sie können das
Zeiterfassungsterminal auf einem handelsüblichen Tablet aktivieren. Das Tablet stellen Sie am Büro- oder Firmeneingang bereit (es gibt professionelle Halterungen für Tablets) und jeder Mitarbeiter kann dann morgens am Zeiterfassungsterminal seine Zeiten stempeln, wie folgt:
Arbeitszeit stempeln
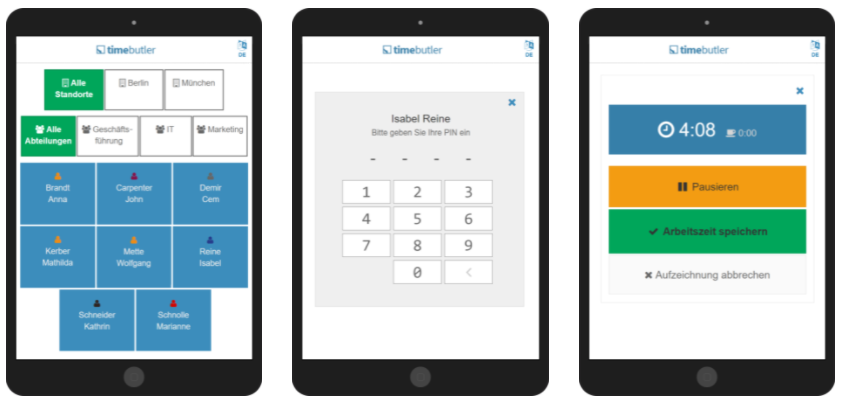
Auf dem Zeiterfassungsterminal wird für jeden Mitarbeiter eine Kachel angezeigt. Der Mitarbeiter tippt auf die Kachel mit seinem Namen und gibt als nächstes seine persönliche PIN ein. Er bekommt nun die Stempeluhr angezeigt und kann diese starten, pausieren, die Pause beenden oder die Stempeluhr stoppen, ebenfalls mit einem Klick auf den Bildschirm.
PIN für das Zeiterfassungsterminal
Jeder Mitarbeiter kann die PIN für das Zeiterfassungsterminal einsehen und auch ändern. Dazu meldet er sich am Timebutler Nutzerkonto an, klickt links unten auf "
Einstellungen > Ihr Nutzerkonto" und bekommt dann rechts oben die PIN angezeigt, zusammen mit der Möglichkeit, die eigene Wunsch-PIN einzustellen.
Das Timebutler Zeiterfassungsterminal auf einem Tablet
Arbeitszeiteinträge ändern
Die Arbeitszeiteinträge können nachträglich geändert werden, wie folgt:
Mitarbeiter-Nutzer
Möglichkeit 1:Der Mitarbeiter-Nutzer meldet sich am Timebutler an und klickt links auf "
Zeiterfassung > Listenansicht". Bei dem gewünschten Arbeitszeiteintrag klickt er auf das grüne Symbol mit dem Bleistift (=Bearbeiten). Nun kann er Änderungen am Arbeitszeiteintrag vornehmen und die Änderung speichern.
Möglichkeit 2:Der Mitarbeiter-Nutzer ruft die
Kalenderansicht der Arbeitszeiteinträge auf und klickt dann im Kalender auf den gewünschten Tag. In einem kleinen Fenster erscheint die Liste der Arbeitszeiteinträge für den Tag. Bei dem gewünschten Arbeitszeiteintrag klickt er auf das grüne Symbol mit dem Bleistift (=Bearbeiten). Nun kann er Änderungen am Arbeitszeiteintrag vornehmen und die Änderung speichern.
In beiden Fällen gilt:
Ein Admin kann in den
Einstellungen für die Zeiterfassung festlegen, ob die Änderung sofort übernommen wird, oder ob der Vorgesetzte über die Änderung informiert wird und die Änderung zunächst genehmigen muss.
Vorgesetzte und Admins
Möglichkeit 1:Der Vorgesetzte oder Admin meldet sich am Timebutler an und klickt links oben auf "
Mitarbeiter > Zeiterfassung > Listenansicht". Bei dem gewünschten Arbeitszeiteintrag klickt er auf das grüne Symbol mit dem Bleistift (=Bearbeiten). Nun kann er Änderungen am Arbeitszeiteintrag vornehmen und die Änderung speichern.
Möglichkeit 2:Vorgesetzte und Admins können auch über die
Kalenderansicht der Arbeitszeiteinträge den Arbeitszeiteintrag auffinden und ändern, so wie oben bei Mitarbeiter-Nutzern beschrieben:
Der Vorgesetzte oder Admin ruft die
Kalenderansicht der Arbeitszeiteinträge auf und klickt dann im Kalender auf den gewünschten Tag. In einem kleinen Fenster erscheint die Liste der Arbeitszeiteinträge für den Tag. Bei dem gewünschten Arbeitszeiteintrag klickt er auf das grüne Symbol mit dem Bleistift (=Bearbeiten). Nun kann er Änderungen am Arbeitszeiteintrag vornehmen und die Änderung speichern.
Rechte einstellenEin Admin kann in den
Einstellungen für die Zeiterfassung die Eingaberechte festlegen. Damit kann eingeschränkt werden, dass die Arbeitszeiten nur bis zu einer bestimmten Anzahl Tage in der Vergangenheit geändert werden dürfen, dass die Arbeitszeiteinträge ab einem bestimmten Tag im Monat für alle Vormonate automatisch eingefroren werden und weitere Einschränkungen.
Screenshot: Arbeitszeiteintrag bearbeiten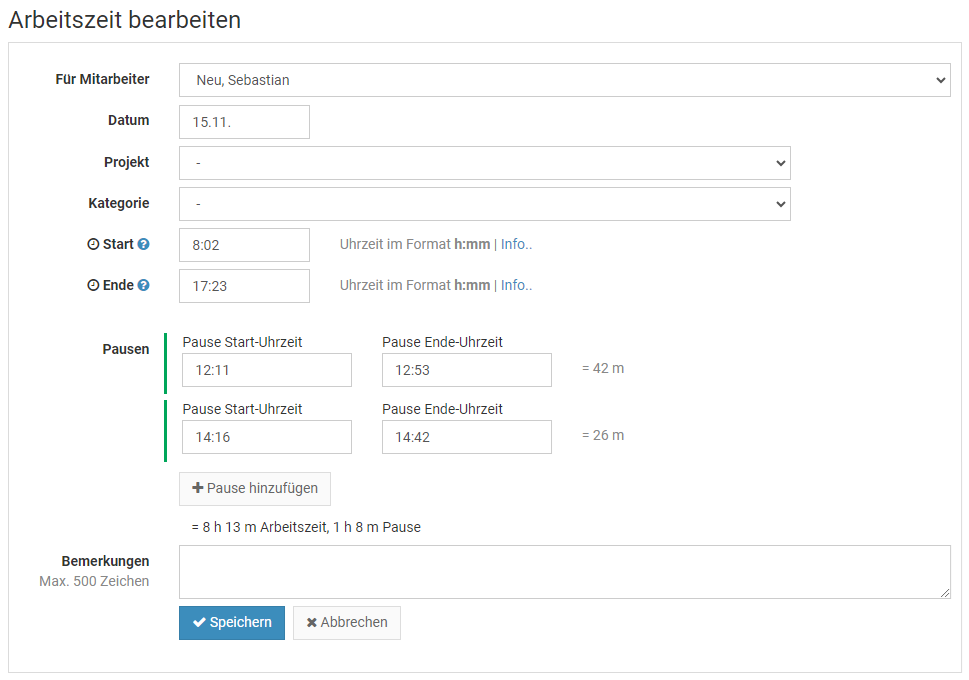
Arbeitszeiteinträge löschen
Ein Arbeitszeiteintrag kann wie folgt gelöscht werden:
Mitarbeiter-Nutzer
Der Mitarbeiter-Nutzer meldet sich am Timebutler an und klickt links auf "
Zeiterfassung > Listenansicht". Bei dem gewünschten Arbeitszeiteintrag klickt er auf das Symbol mit dem Papierkorb.
Ein Admin kann in den
Einstellungen für die Zeiterfassung festlegen, ob die Änderung sofort übernommen wird, oder ob der Vorgesetzte über die Änderung informiert wird und die Änderung zunächst genehmigen muss.
Vorgesetzte und Admins
Der Vorgesetzte oder Admin meldet sich am Timebutler an und klickt links oben auf "
Mitarbeiter > Zeiterfassung > Listenansicht". Wenn gewünscht kann die Ansicht mit Klick rechts oben auf den grünen Button "
Filter anzeigen" gefiltert werden. Bei dem gewünschten Arbeitszeiteintrag klickt er auf das Symbol mit dem Papierkorb.
Dienstgänge erfassen
Die Mitarbeiter können über die
Stempeluhr oder dem
Zeiterfassungsterminal auf einem Tablet die Arbeitszeiten bequem stempeln.
Manchmal nehmen Mitarbeiter einen Dienstgang vor, beispielsweise um die Ausgangspost zur örtlichen Postannahmestelle auszuliefern oder Büromaterial zu besorgen. Über die Stempeluhr und das Zeiterfassungsterminal können die Dienstgänge mit wenigen Klicks erfasst werden.
Erfassung von Dienstgängen erlauben
Die Aufzeichnung von Dienstgängen ist zunächst deaktiviert. Sie können die Aufzeichnung erlauben, indem Sie sich als Admin am Timebutler anmelden, dann links unten auf "
Einstellungen" klcken, dann darunter auf "
Weitere..". Klicken Sie nun rechts auf "
Zeiterfassung".
Hier finden Sie die Option "
Dienstgang aufzeichnen". Aktivieren Sie die Option und bestätigen Sie die Änderung per Klick auf den blauen Button "
Speichern" unten auf der Seite.
Dienstgänge erfassen
Sobald die Erfassung von Dienstgängen in den Einstellungen für die Zeiterfassung erlaubt wurde, finden die Mitarbeitenden in der Stempeluhr und im Zeiterfassungsterminal einen Button "
Dienstgang beginnen" vor (nur wenn die Stempeluhr gestartet ist). Per Klick darauf wird die Startuhrzeit des Dienstgangs gespeichert. Die Stempeluhr zeichnet die Arbeitszeit auch während des Dienstgangs weiter auf.
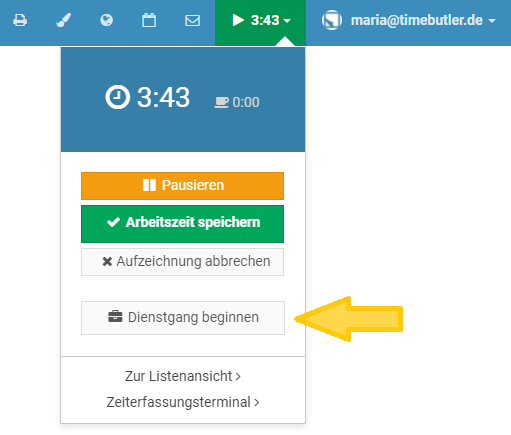
In der oberen Navigationsleiste wird während des Dienstgangs das Symbol
angezeigt.

Wenn der Dienstgang beendet ist, klickt der Nutzer auf den Button "
Dienstgang beenden".
Anzeige der Dienstgang-Uhrzeiten
In der
Live Status Anzeige der Stempeluhren wird angezeigt, welche Mitarbeiter sich gerade auf Dienstgang befinden und seit welcher Uhrzeit.
Auch nachträglich ist es möglich, für jeden Arbeitszeiteintrag die Zeiten der Dienstgänge einzusehen. In der
Detailansicht zum Arbeitszeiteintrag werden die Uhrzeiten der Dienstgänge angezeigt.
Arbeitszeitkonto - Übersicht
Timebutler führt für jeden Mitarbeiter, für den die Zeiterfassung aktiviert ist, ein Arbeitszeitkonto. Auf diese Weise haben alle Mitarbeiter immer einen Überblick über die geforderte Arbeitszeit (Soll-Arbeitszeit), die geleistete Arbeitszeit, etwaige Abzüge und Überträge und somit den Überstundenstand zu jedem beliebigen Datum.
In dem Arbeitszeitkonto werden die Soll-Arbeitszeiten anhand der individuellen
Soll-Arbeitszeiten der Wochenarbeitstage des Mitarbeiters berechnet und unter Berücksichtigung der Feiertage, Urlaub, Krankheit und
weiterer Abwesenheiten . Daraus ergibt sich die bereinigte Soll-Arbeitszeit. Aus der Summe der eingetragenen Arbeitszeiteinträge ergibt sich die geleistete Arbeitszeit. Weiterhin werden die Einstellungen zum
Kappen von Überstunden, dem
Runden von Arbeitszeiten und den
Rüstzeiten eingerechnet, woraus sich das Arbeitszeitsaldo ergibt.
Arbeitszeitkonto aufrufen
Um die Ansicht der Arbeitszeitkonten aufzurufen, melden Sie sich am Timebutler an und klicken links oben auf "
Mitarbeiter > Zeiterfassung > Arbeitszeitkonten". Mitarbeiter-Nutzer klicken links auf "
Zeiterfassung > Arbeitszeitkonten".
Hinweis: ein Admin kann einstellen, dass Mitarbeiter-Nutzer oder Vorgesetzte oder Admins das Arbeitszeitkonto nicht aufrufen dürfen. Wenn Sie die oben genannten Links zum Arbeitszeitkonto nicht angezeigt bekommen, dann wurde die Anzeige der Arbeitszeitkonten für Ihren Nutzertyp von einem Admin deaktiviert.
Das Arbeitszeitkonto hat zwei Ansichten:
1) Arbeitszeitsaldo im Zeitraum
In der Ansicht
Arbeitszeitsaldo im Zeitraum können Sie sich anzeigen lassen, wie viel Arbeitszeit in einem bestimmten Zeitraum geleistet wurde. Hier werden die Übertrage und das Kappen der Überstunden zwischen den Monaten und Jahren nicht eingerechnet, sondern es wird lediglich die Arbeitszeit in dem Zeitraum angezeigt.
Um die Ansicht Arbeitszeitsaldo im Zeitraum anzuzeigen, rufen Sie das Arbeitszeitkonto auf (siehe oben) und klicken dann auf den Button "
Arbeitszeit im Zeitraum".
2) Überstundenstand zum Stichtag
In der Ansicht
Überstundenstand zum Stichtag können Sie sich den Überstundenstand der Mitarbeiter zu jedem beliebigen Datum anzeigen lassen. Darin sind auch alle historischen Daten und das Kappen von Überstunden, Rundungen, Rüstzeiten und sonstige Kürzungen eingerechnet.
Um die Ansicht Überstundenstand zum Stichtag anzuzeigen, rufen Sie das Arbeitszeitkonto auf (siehe oben) und klicken dann auf den Button "
Überstundenstand zum Stichtag".
Start-Ansicht ändern
Sie können einstellen, welche der zwei Ansichten beim Aufrufen des Arbeitszeitkontos angezeigt werden soll. Rufen Sie dazu das Arbeitszeitkonto auf und klicken auf den Button "Startansicht".
Das Arbeitszeitkonto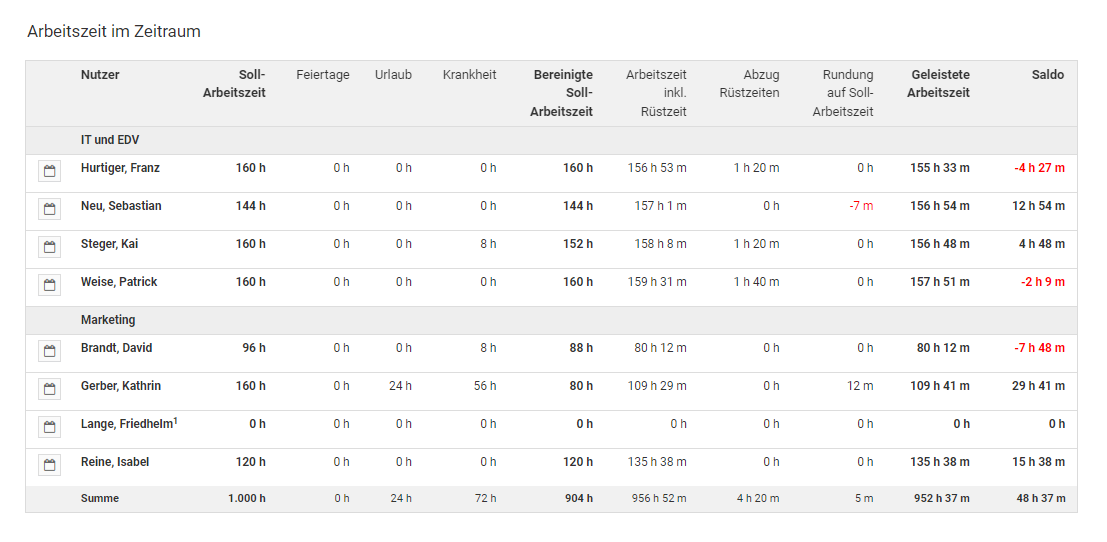
Arbeitszeit im Zeitraum
In der Ansicht Arbeitszeitsaldo im Zeitraum können Sie sich anzeigen lassen, wie viel Arbeitszeit in einem bestimmten Zeitraum geleistet wurde. Hier werden die Überträge und das Kappen der Überstunden zwischen den Monaten und Jahren nicht eingerechnet, sondern es wird lediglich die Arbeitszeit in dem Zeitraum angezeigt. Lesen Sie hier, wie Sie das
Arbeitszeitkonto aufrufen.Das Arbeitszeitkonto lesen Sie am besten von links nach rechts: nahezu alle Zahlen im Arbeitszeitkonto ergeben sich durch Addieren oder Subtrahieren der Zahlen in den jeweiligen Spalten. Im Detail:
| Spalte im Arbeitszeitkonto | Bedeutung |
|---|
| Nutzer | Name des Mitarbeiters. Mit einem Klick auf das Symbol gelangen Sie zur Kalenderansicht der Arbeitszeiteinträge. |
| Soll-Arbeitszeit | Die gesamte Soll-Arbeitszeit des Mitarbeiters in dem gewählten Zeitraum. Diese ergibt sich aus der Summe aller Soll-Arbeitszeiten der Kalendertage in dem Zeitraum |
| Feiertage | Die gesamte Anzahl Stunden an Feiertagen in dem gewählten Zeitraum. Diese ergibt sich aus der Summe aller Soll-Arbeitszeiten an allen Tagen, die als Feiertag für den Mitarbeiter festgelegt sind. |
| Urlaub | Die gesamte Anzahl Stunden an Urlaub in dem gewählten Zeitraum. Diese ergibt sich aus der Summe aller Soll-Arbeitszeiten an allen Tagen, an den der Mitarbeiter Urlaub eingetragen (und genehmigt) hat. |
| Krankheit | Die gesamte Anzahl Stunden an Krankheit in dem gewählten Zeitraum. Diese ergibt sich aus der Summe aller Soll-Arbeitszeiten an allen Tagen, an den der Mitarbeiter Krankheit eingetragen hat. |
| Sonstige Abwesenheiten | Die gesamte Anzahl Stunden an sonstigen Abwesenheiten in dem gewählten Zeitraum, bei denen eingestellt ist, dass sie die Soll-Arbeitszeit verringern. Diese ergibt sich aus der Summe aller Soll-Arbeitszeiten an allen Tagen, an den der Mitarbeiter eine der Abwesenheiten eingetragen hat. |
| Bereinigte Soll-Arbeitszeit | Die tatsächliche Soll-Arbeitszeit. Der Wert ergibt sich aus der Spalte "Soll-Arbeitszeit" abzüglich "Feiertage", "Urlaub", "Krankheit" und "Sonstige Abwesenheiten". |
| Arbeitszeit inkl Rüstzeit1 | Die tatsächlich geleistete Arbeitszeit. Der Wert ergibt sich aus der Summe aller Arbeitszeiteinträge des Mitarbeiters in dem Zeitraum. Darin sind die Abzüge wegen Rüstzeiten oder Runden von Überstunden noch nicht beinhaltet. |
| Abzug Rüstzeiten1 | Die Summe an Zeit, die wegen der Einstellung zur Rüstzeit abgezogen wird. |
| Rundung auf Soll-Arbeitszeit1 | Die Summe an Zeit, die wegen der Einstellung zur Rundung der Arbeitszeit abgezogen oder hinzugefügt wird. |
| Geleistete Arbeitszeit | Die tatsächlich geleistete Arbeitszeit nach Abzug etwaiger Rundungen und Rüstzeiten. Der Wert ergibt sich aus der Summe aller Arbeitszeiteinträge des Mitarbeiters in dem Zeitraum. Wenn Rüstzeiten oder Runden von Arbeitszeiten eingestellt sind, dann sind die Abzüge in dieser Spalte mit eingerechnet. |
| Saldo | Anzahl Stunden über oder unterhalb der zu leistenden Arbeitszeit. Ergibt sich aus der Differenz der Spalte "Geleistete Arbeitszeit" minus "Bereinigte-Soll-Arbeitszeit". |
1 Diese Spalten werden nur angezeigt, wenn die Einstellungen dazu aktiviert wurden. Hilfe zu jeder Spalte
Wenn Sie im Arbeitszeitkonto mit der Maus über die Spaltenüberschriften fahren, erhalten Sie zusätzliche Informationen.
Das Arbeitszeitkonto in der Ansicht "Arbeitszeit im Zeitraum"
Überstundenguthaben zum Stichtag
In der Ansicht Überstundenstand zum Stichtag können Sie sich den Überstundenstand der Mitarbeiter zu jedem beliebigen Datum anzeigen lassen. Darin sind auch alle historischen Daten und das Kappen von Überstunden, Rundungen, Rüstzeiten und sonstige Kürzungen eingerechnet. Lesen Sie hier, wie Sie das
Arbeitszeitkonto aufrufen.Das Arbeitszeitkonto lesen Sie am besten von links nach rechts: nahezu alle Zahlen im Arbeitszeitkonto ergeben sich durch Addieren oder Subtrahieren der Zahlen in den jeweiligen Spalten von links nach rechts. Im Detail:
| Spalte im Arbeitszeitkonto | Bedeutung |
|---|
| Nutzer | Name des Mitarbeiters. Mit einem Klick auf das Symbol gelangen Sie zur Kalenderansicht der Arbeitszeiteinträge. |
| Soll-Arbeitszeit | Die gesamte Soll-Arbeitszeit des Mitarbeiters in dem gewählten Zeitraum. Diese ergibt sich aus der Summe aller Soll-Arbeitszeiten der Kalendertage in dem Zeitraum |
| Feiertage | Die gesamte Anzahl Stunden an Feiertagen in dem gewählten Zeitraum. Diese ergibt sich aus der Summe aller Soll-Arbeitszeiten an allen Tagen, die als Feiertag für den Mitarbeiter festgelegt sind. |
| Urlaub | Die gesamte Anzahl Stunden an Urlaub in dem gewählten Zeitraum. Diese ergibt sich aus der Summe aller Soll-Arbeitszeiten an allen Tagen, an den der Mitarbeiter Urlaub eingetragen (und genehmigt) hat. |
| Krankheit | Die gesamte Anzahl Stunden an Krankheit in dem gewählten Zeitraum. Diese ergibt sich aus der Summe aller Soll-Arbeitszeiten an allen Tagen, an den der Mitarbeiter Krankheit eingetragen hat. |
| Sonstige Abwesenheiten | Die gesamte Anzahl Stunden an sonstigen Abwesenheiten in dem gewählten Zeitraum, bei denen eingestellt ist, dass sie die Soll-Arbeitszeit verringern. Diese ergibt sich aus der Summe aller Soll-Arbeitszeiten an allen Tagen, an den der Mitarbeiter eine der Abwesenheiten eingetragen hat. |
| Bereinigte Soll-Arbeitszeit | Die tatsächliche Soll-Arbeitszeit. Der Wert ergibt sich aus der Spalte "Soll-Arbeitszeit" abzüglich "Feiertage", "Urlaub", "Krankheit" und "Sonstige Abwesenheiten". |
| Arbeitszeit inkl Rüstzeit1 | Die tatsächlich geleistete Arbeitszeit. Der Wert ergibt sich aus der Summe aller Arbeitszeiteinträge des Mitarbeiters in dem Zeitraum. Darin sind die Abzüge wegen Rüstzeiten oder Runden von Überstunden noch nicht beinhaltet. |
| Abzug Rüstzeiten1 | Die Summe an Zeit, die wegen der Einstellung zur Rüstzeit abgezogen wird. |
| Rundung auf Soll-Arbeitszeit1 | Die Summe an Zeit, die wegen der Einstellung zur Rundung der Arbeitszeit abgezogen oder hinzugefügt wird. |
| Geleistete Arbeitszeit | Die tatsächlich geleistete Arbeitszeit nach Abzug etwaiger Rundungen und Rüstzeiten. Der Wert ergibt sich aus der Summe aller Arbeitszeiteinträge des Mitarbeiters in dem Zeitraum. Wenn Rüstzeiten oder Runden von Arbeitszeiten eingestellt sind, dann sind die Abzüge in dieser Spalte mit eingerechnet. |
| Saldo vor Abzug abgegoltene Überstunden1 | Anzahl Überstunden oder Minusstunden im Zeitraum vor dem Abzug abgegoltener Überstunden. Ergebnis aus der Spalte "Geleistete Arbeitszeit" minus "Bereinigte Soll-Arbeitszeit". |
| Abzug abgegoltene Überstunden1 | Anzahl Stunden, die aufgrund der Einstellung zum Kappen von Überstunden abgezogen werden. |
| Saldo | Die Anzahl Stunden und Minuten, die in dem Zeitraum zu viel oder zu wenig gearbeitet wurden, nach Abzug der abgegoltenen Überstunden. Ergebnis aus der Spalte "Saldo vor Abzug abgegoltene Überstunden" minus "Abzug abgegoltene Überstunden". |
| Saldo vom Vorjahr | Überstundenstand zum 1.1. des Jahres, übertragen vom Überstundenstand am 31.12. des Vorjahres (die Zahlen stimmen nicht überein? Lesen Sie hier, wie Sie den Überstundenstand übertragen). |
| Ausbezahlte Überstunden | Anzahl ausbezahlter Überstunden in dem Zeitraum. |
| Überstundenguthaben am tt.mm.jjjj | Das Überstundenguthaben des Mitarbeiters an dem ausgewählten Datum (inklusive aller historischen Daten, gekappten Überstunden, Rundungen, Rüstzeiten und sonstige Kürzungen) |
1 Diese Spalten werden nur angezeigt, wenn die Einstellungen dazu aktiviert wurden. Hilfe zu jeder Spalte
Wenn Sie im Arbeitszeitkonto mit der Maus über die Spaltenüberschriften fahren, erhalten Sie zusätzliche Informationen.
Das Arbeitszeitkonto in der Ansicht "Überstundenguthaben zum Stichtag"
Arbeitszeitkonto: Monatsdetails aufklappen
Wenn Sie das Arbeitszeitkonto aufrufen und darin die Ansicht
Überstundenguthaben zum Stichtag aufrufen, dann berechnet Timebutler das Überstundenguthaben auch unter Beachtung der monatlichen
Kappung von Überstunden, dem
Abzug von Rüstzeiten, dem
Runden von Arbeitszeiten und anderen Vorgaben. Die Berechnungen wirken sich auf Kalendermonate aus, somit also auf den Übertrag von einem Monat auf den nächsten.
Wenn Sie im Arbeitszeitkonto die Ansicht "
Überstundenguthaben zum Stichtag" aufrufen, dann können Sie in der Tabellenüberschrift auf einen der Buttons "
Details" klicken, um die Zeilen mit den Werten jedes einzelnen Monats aufzuklappen. Auf diese Weise können Sie für jeden Monat einsehen, wie die angezeigten Werte zustande kommen.
Der Button "
Details" wird allen Nutzern angezeigt, sowohl Mitarbeiter-Nutzer, Vorgesetzte als auch Admins. Allerdings haben die verschiedenen Nutzertypen natürlich nur Sichtrechte auf bestimmte Nutzer: beispielsweise Mitarbeiter-Nutzer sehen immer nur das eigene Arbeitszeitkonto, keine Konten von Kollegen.
Der Button "Details" wird nicht angezeigt?
Der Button "
Details" wird im Arbeitszeitkonto nur angezeigt, wenn folgende zwei Bedingungen erfüllt sind:
Bedingung 1
Im Arbeitszeitkonto gibt es zwei Ansichten: "Arbeitszeit im Zeitraum" und "Überstundenguthaben zum Stichtag" (über die zwei Buttons auf der Seite). Nur bei letzterem wird der Übertrag von Monat zu Monat berechnet und eine Kappung von Überstunden und Rüstzeiten eingerechnet. Somit ist das Aufklappen der Monate nur bei "Überstundenguthaben zum Stichtag" sinnvoll und nur dort wird der Button "Details" angezeigt.
Bedingung 2
Der Button "Details" wird nur angezeigt, wenn bei mindestens einem Mitarbeiter im Arbeitszeitkonto eine Kappung von Überstunden eingetragen ist, eine Rundung von Arbeitszeiten oder Rüstzeiten. Nur dann werden monatsweise Überstunden gekappt, Stunden gerundet oder Rüstzeiten angerechnet und nur dann ist die Monats-Detailansicht sinnvoll, um die Werte der einzelnen Monate zu erfahren.
Mitarbieter-Nutzer sehen nur das eigene Arbeitszeitkonto. Wenn für einen Mitarbeiter-Nutzer keine Überstundenkappung, Rundung oder Rüstzeiten eingestellt sind, dann wird der Details-Button nicht angezeigt, da keine monatlichen Werte berechnet werden müssen.
Bei Admins wird der Details-Button also viel häufiger angezeigt: Admins haben Sichtrechte auf alle Nutzer und häufig ist bei mindestens einem der Nutzer eine Überstundenkappung, Rundung oder Rüstzeit eingestellt.
Screenshot: Monatsdetails im Arbeitszeitkonto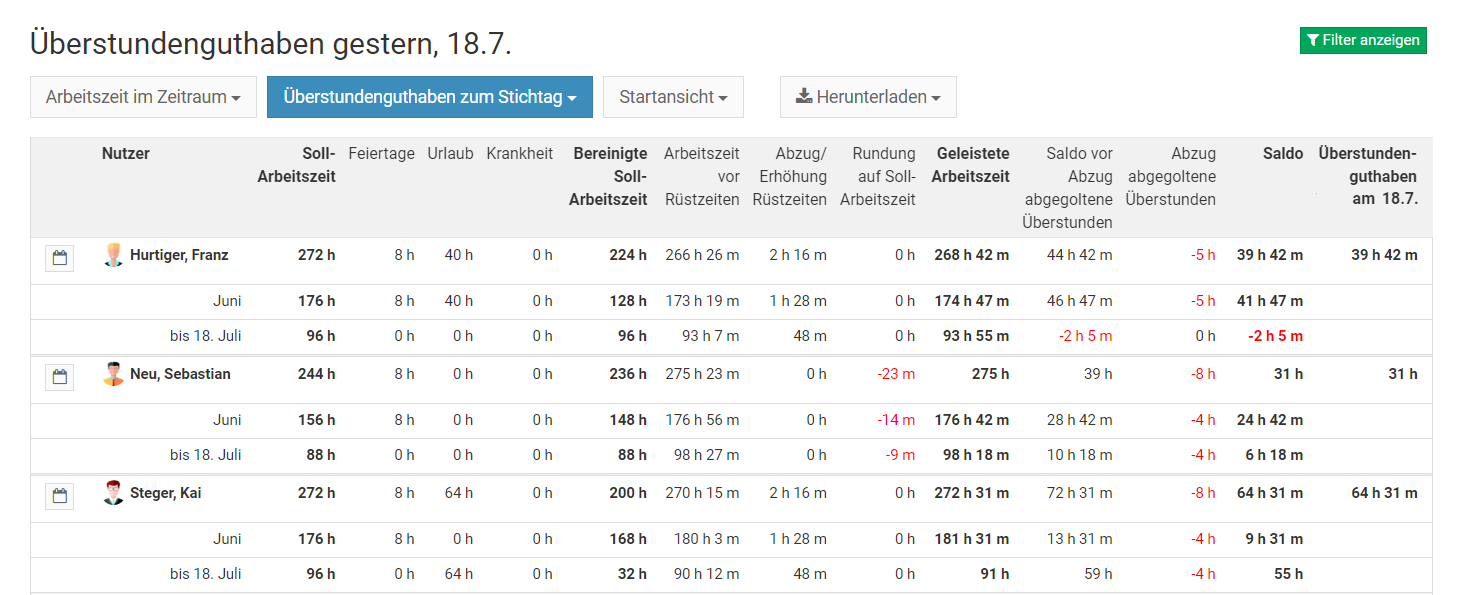
Übertrag Überstundenguthaben in das Folgejahr
Das Überstundenguthaben (und der Resturlaub) werden absichtlich nicht vollautomatisch in das nächste Jahr übertragen. Sie können das aber einfach mit wenigen Mausklicks erledigen und brauchen das nicht mühselig ausrechnen und manuell eintragen.
Lesen Sie hier, wie Sie
Überstundenguthaben und Resturlaub ins nächste Jahr übertragen.
Start der Zeiterfassung
Ein Admin kann das Startdatum der Zeiterfassung einstellen. Das ist wichtig, damit Timebutler das Arbeitszeitsaldo erst ab dem Datum berechnet und die Tage vor dem Datum ignoriert. Ohne Startdatum kann es zu einem
hohen Minusstand auf dem Arbeitszeitkonto kommen.
Start der Zeiterfassung einstellen
Um das Startdatum der Zeiterfassung zu prüfen oder einzustellen, melden Sie sich als Admin am Timebutler an und klicken links unten auf "
Einstellungen > Weitere..", dann rechts auf "
Zeiterfassung". Ändern Sie die Option "
Start der Zeiterfassung" und klicken dann unten auf der Seite auf den blauen Button "
Speichern".
Beachten Sie:
Das hier eingestellte Startdatum
gilt für alle Mitarbeiter, außer für diejenigen Mitarbeitern, bei denn im Nutzerkonto ein anderes Startdatum eingestellt wurde (siehe unten).
Die Änderung wird im
Arbeitszeitkonto sofort angewendet.
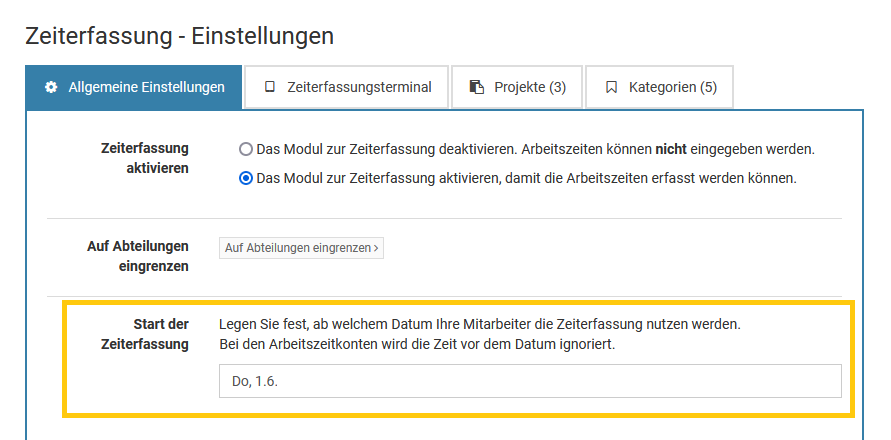
Startdatum individuell für einen Mitarbeiter einstellen
Wenn ein Mitarbeiter neu in das Unternehmen eintritt und Sie ein Nutzerkonto für den Mitarbeiter erstellen, dann können Sie neben dem Eintrittsdatum auch das Startdatum der Zeiterfassung für diesen Mitarbeiter individuell einstellen.
Das Mitarbeiter-individuelle Startdatum kann jedoch auch nachträglich eingestellt werden: melden Sie sich mit einem Admin am Timebutler an und klicken links oben auf "
Mitarbeiter > Mitarbeiter > Übersicht", dann bei dem gewünschten Mitarbeiter auf das grüne Symbol mit dem Bleistift (=Bearbeiten). Ändern Sie die Angabe im Feld "
Start der Zeiterfassung" und klicken dann unten auf der Seite auf den blauen Button "
Speichern".
Auch hier gilt: die Änderung wird umgehend im
Arbeitszeitkonto angewendet.

Startdatum für mehrere Mitarbeiter ändern
Sie können mit wenigen Mausklicks das Startdatum für die Zeiterfassung für eine Vielzahl an Mitarbeitern ändern, eintragen oder löschen.
Melden Sie sich dazu als Admin am Timebutler an, klicken links unten auf "
Einstellungen", dann darunter auf "
Weitere..". Klicken Sie rechts auf die Überschrift "
Nutzerkonten Massenänderung". Hier finden Sie die Optionen zum Ändern des Zeiterfassungs-Startdatums im Bereich "
Start der Zeiterfassung".
Hier gilt ebenfalls: die Änderung wird umgehend im
Arbeitszeitkonto angewendet.
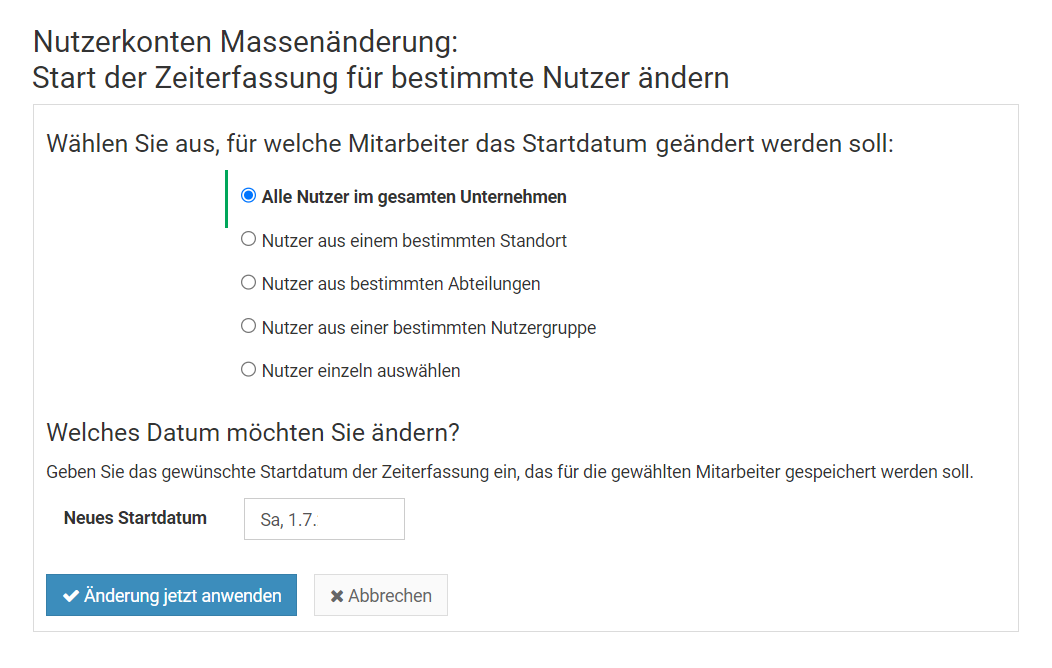
Überstunden Startsaldo einstellenSie können einstellen, welches Überstundenguthaben die Mitarbeiter zum Start der Zeiterfassung haben. Dazu melden Sie sich als Admin am Timebutler an und klicken links unten auf "
Einstellungen", dann darunter auf "
Arbeitszeitsaldo". In der Spalte "
Arbeitszeitsaldo zum Start der Zeiterfassung am tt.mm.jjjj" (bzw. "
Saldo vom Vorjahr") können Sie das Überstunden-Startguthaben der Mitarbeiter zum Start der Zeiterfassung einstellen. Diese Angabe wird sofort in das
Arbeitszeitkonto übernommen.
Urlaub in Arbeitszeitguthaben wandeln
Ausbezahlte Überstunden (Zeiterfassung)
Wenn für einen Mitarbeiter Überstunden ausbezahlt wurden, dann können Sie das im Timebutler wie folgt eintragen:
Melden Sie sich mit einem Admin-Nutzer am Timebutler an und klicken links unten auf "
Einstellungen > Arbeitszeitsaldo". In der Zeile des betroffenen Mitarbeiters erhöhen Sie den Wert im betroffenen Monat bei "
Ausbezahlte Überstunden" um die Anzahl ausbezahlte Überstunden. Klicken Sie dann auf den blauen Button "
Änderungen speichern" (rechts in der Zeile).
Wenn beispielsweise für den Monat März "0 h" eingetragen ist und Sie im März an den Mitarbeiter 40 Überstunden ausbezahlt haben, dann tragen Sie in der Spalte für März ein 40 ein und speichern die Änderung. Wenn jedoch beispielsweise bereits "15 h" eingetragen ist und Sie im gleichen Monat zusätzlich 20 Überstunden ausbezahlt haben, dann tragen Sie eine 35 ein und speichern die Änderung.
Die Änderung wird sofort im
Arbeitszeitkonto des Mitarbeiters eingerechnet und reduziert den Überstundenstand.
Die ausbezahlten Überstunden werden im Arbeitszeitkonto vermeintlich nicht abgezogen? Das hat folgenden Grund:Im Arbeitszeitkonto gibt es zwei Ansichten. Wenn Sie im Arbeitszeitkonto die Ansicht
Arbeitszeit im Zeitraum aufrufen, dann bekommen Sie genau das angezeigt: die Arbeitszeit in dem gewählten Zeitraum. Hier werden keine Überstunden berechnet und es werden keine ausbezahlten Überstunden abgezogen, denn hier sollen ja nur die Zeiten angezeigt werden, die in dem gewählten Zeitraum geleistet wurden.
Stattdessen rufen Sie im Arbeitszeitkonto einfach die Ansicht
Überstundenguthaben zum Stichtag auf und wählen ein Datum (das nach dem Monat liegt, in dem die Überstunden ausbezahlt wurden). Sie werden sehen, dass die ausbezahlten Überstunden in der Spalte "
Ausbezahlte Überstunden" angezeigt werden. Ebenso werden die ausbezahlten Überstunden vom Überstundenguthaben abgezogen. Der Wert in der Spalte "
Überstundenguthaben am tt.mm.jjjj" ganz rechts ist entsprechend geringer.
Positive Zahlen eintragen
Geben Sie die ausbezahlten Überstunden als positive Zahl ein, also ohne ein Minus. Um beispielsweise 10 Stunden auszubezahlen, tragen Sie "10 h" ein, nicht "-10 h".
Screenshot: Ausbezahlte Überstunden eintragen (Zeiterfassung)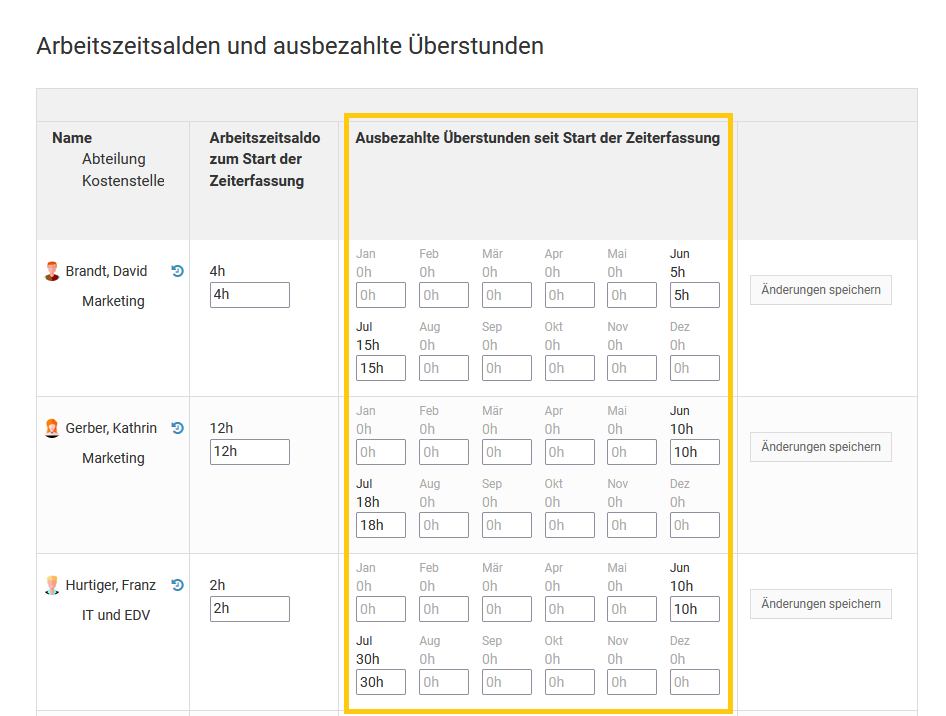
Arbeitszeitangaben bei Stundenlohnempfängern
Für Stundenlohnempfänger, also Mitarbeiter, die keinen Monatslohn erhalten, sondern stundenbasiert entlohnt werden, sind zusätzliche Informationen über die geleisteten Arbeitszeiten notwendig.
Bei Stundenlohnempfängern ergibt sich der ausbezahlte Lohn aus den geleisteten Stunden, zusammen mit den Stunden für Urlaub, Krankheit und Feiertage, da letztere auch bezahlte Abwesenheiten sind. Diese Gesamtsumme wird im Arbeitszeitkonto zunächst nicht ausgewiesen, da nur wenige Unternehmen Stundenlohnempfänger einsetzen.
Ein Admin kann die Anzeige der Gesamtsumme mit wenigen Mausklicks aktivieren, wie folgt: melden Sie sich als Admin am Timebutler an und klicken links unten auf "
Einstellungen > Weitere..", dann rechts auf "
Zeiterfassung". Hier finden Sie die Option "
Angaben zu Stundenlohnempfängern", die Sie aktivieren. Speichern Sie die Änderung durch Klick unten auf den blauen Button "
Speichern".
Wenn die Option aktiviert ist, dann wird im
Arbeitszeitkonto eine zusätzliche Spalte "
Gesamtzeit Stundenlohnempfänger" angezeigt.
Bitte beachten Sie:Die Spalte wir nur angezeigt, wenn Sie im Arbeitszeitkonto die Ansicht "
Arbeitszeit im Zeitraum" wählen. In der Ansicht "
Überstundenguthaben zum Stichtag" wird die Spalte absichtlich nicht angezeigt, da die Angabe für die Berechnung der Überstunden nicht relevant ist.
Nur Stundenlohnempfänger anzeigenSie können
eine neue Nutzergruppe erstellen, dieser den Namen "Stundenlohnempfänger" geben und die entsprechenden Mitarbeiter hinzufügen. Sobald Sie die Nutzergruppe erstellt haben, können Sie in der Ansicht der Arbeitszeitkonten auf den grünen Filter-Button rechts oben klicken und den Filter auf die Nutzergruppe "Stundenlohnempfänger" einstellen. Sie bekommen nun die Arbeitszeitkonten nur der Stundenlohnempfänger angezeigt und müssen nicht mühselig in der langen Liste der Mitarbeiter nach den Stundenlohnempfängern suchen.
Daten exportieren und weitergeben
Die Ansicht der Arbeitszeitkonten können Sie mit einem Mausklick auf den Button "Herunterladen" als Excel-Datei herunterladen und dann beispielsweise an die Lohnbuchhaltung senden oder weiterverarbeiten (so wie nahezu alle anderen Listenansichten im Timebutler).
Kalenderansicht der Arbeitszeiteinträge aufrufen
In der Kalenderansicht der Arbeitszeiteinträge erhalten Sie einen schnellen Überblick über die Arbeitszeiten, Überstunden und Minusstunden eines Mitarbeiter im Verlauf des Jahres. Zeiten mit viel Mehrarbeit sind sofort ersichtlich und Sie finden schnell die Ursachen, wenn ein Mitarbeiter einen
hohen Minusstand im Arbeitszeitkonto hat.
Aufruf der Kalenderansicht durch Vorgesetzte und Admins
Rufen Sie die Ansicht der
Arbeitszeitkonten auf. Melden Sie sich dazu am Timebutler an und klicken links auf "
Mitarbeiter > Zeiterfassung > Arbeitszeitkonto". In der Tabelle des Arbeitszeitkontos klicken Sie links neben dem Namen des gewünschten Mitarbeiters auf das Symbol mit dem Abreißkalender:
Aufruf der eigenen Kalenderansicht durch Mitarbeiter-Nutzer
Melden Sie sich am Timebutler an und klicken links unterhalb "
Zeiterfasung" auf "
Kalenderansicht".
Kalenderansicht der Überstunden
Kalenderansicht der Überstunden
Bei der Kalenderansicht der Arbeitszeiteinträge gibt es zwei Ansichten: die Kalenderansicht der Überstunden und die
Kalenderansicht der Arbeitszeiten. Den Wechsel der Ansicht können Sie über die zwei Buttons oberhalb des Kalenders vornehmen (beachten Sie den Hinweis weiter unten auf dieser Seite).
In der Kalenderansicht der Überstunden wird im Kalender für jeden Tag die Anzahl Überstunden und Minusstunden angezeigt. Die farbliche Markierung dient zum Erkennen der Tage, an denen besonders viele Überstunden aufgebaut oder viele Minusstunden entstanden sind. Das Grün steht für Überstunden und je dunkler die Farbe ist, desto mehr Überstunden wurden an dem Tag aufgebaut. Das Rot steht für Minusstunden und je dunkler die Farbe, desto mehr Minusstunden sind aufgetreten.
Kalenderansicht aufrufenLesen Sie hier, wie Sie die
Kalenderansicht der Arbeitszeiteinträge und Überstunden aufrufen.
Hinweis:Ein Admin kann für jeden Nutzertyp Mitarbeiter, Vorgesetzter und Admin einstellen, ob in der Kalenderansicht der Arbeitszeiteinträge die Überstundenansicht aufgerufen werden darf oder nicht. Wenn Sie den Button zum Wechsel in die Überstundenansicht nicht angezeigt bekommen, dann liegt es daran, dass ein Admin diese Anzeige für Ihren Nutzertyp deaktiviert hat.
Zeitgrenzen für die Farben festlegen
Ein Admin kann einstellen, welche Farbabstufung ab welcher Anzahl Überstunden bzw. Minusstunden im Kalender angezeigt werden. Dazu klicken Sie als Admin auf der Kalenderansicht der Überstunden unten auf der Seite auf den Button "Zeitgrenzen bearbeiten".
Kalenderansicht der Überstunden
Kalenderansicht der Arbeitszeiten
Bei der Kalenderansicht der Arbeitszeiteinträge gibt es zwei Ansichten: die
Kalenderansicht der Überstunden und die Kalenderansicht der Arbeitszeiten. Den Wechsel der Ansicht können Sie über die zwei Buttons oberhalb des Kalenders vornehme (beachten Sie den Hinweis weiter unten auf dieser Seite).
In der Kalenderansicht der Arbeitszeiten wird im Kalender für jeden Tag die Anzahl Summe der Arbeitszeiteinträge angezeigt. Falls tägliche
Rüstzeiten oder das
Runden der Arbeitszeiten eingestellt ist, dann sind die entsprechenden Abzüge oder Erhöhungen der Arbeitszeit in den Angaben auch eingerechnet.
Kalenderansicht aufrufenLesen Sie hier, wie Sie die
Kalenderansicht der Arbeitszeiteinträge aufrufen.
Hinweis:Ein Admin kann für jeden Nutzertyp Mitarbeiter, Vorgesetzter und Admin einstellen, ob in der Kalenderansicht der Arbeitszeiteinträge die Überstundenansicht aufgerufen werden darf oder nicht. Wenn Sie den Button zum Wechsel in die Überstundenansicht nicht angezeigt bekommen, dann liegt es daran, dass ein Admin diese Anzeige für Ihren Nutzertyp deaktiviert hat.
Kalenderansicht der Arbeitszeiteinträge
Details für einen Kalendertag
In der
Kalenderansicht der Arbeitszeiteinträge können Sie sich die Detailinformationen zu einem Kalendertag anzeigen lassen. Fahren Sie dazu mit der Maus über die Kalendertage, dann werden zu jedem Kalendertag weitere Informationen eingeblendet.
Details zu einem Kalendertag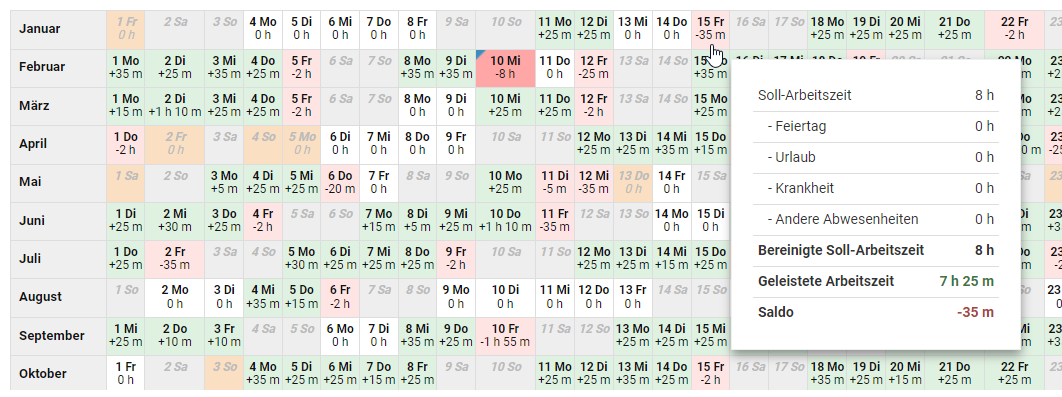
Arbeitszeiteinträge anzeigen und bearbeiten
In der
Kalenderansicht der Arbeitszeiteinträge können Sie sich die Arbeitszeiteinträge zu einem Kalendertag anzeigen lassen und diese bearbeiten. Klicken Sie dazu mit der Maus auf einen Kalendertag und Sie bekommen die Arbeitszeiteinträge für den Tag in einem neuen Fenster angezeigt. In dem Fenster können Sie per Klick auf
die Details des Arbeitszeiteintrages aufrufen und per Klick auf
Arbeitszeiteinträge an einem Kalendertag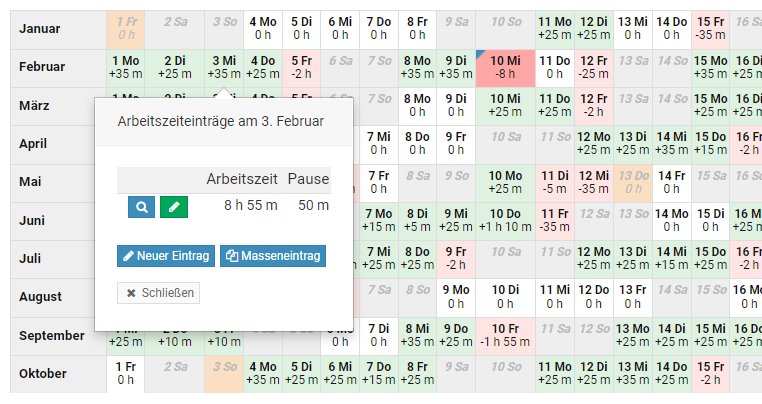
Pausenregelung einstellen
Mit den Pausenregelungen erhalten Sie die Sicherheit, dass Ihre Mitarbeiter die Arbeitszeiten im Einklang mit den Vorgaben an Mindestpausen eintragen. Sie wählen eine Pausenregelung aus und Timebutler stellt für Sie sicher, dass die Mindestpausen erfüllt sind und die maximale Arbeitszeit an einem Kalendertag nicht überschritten wird.
Pausenregelung für alle Mitarbeiter einstellen
Melden Sie sich als Admin am Timebutler an und klicken links unten auf "
Einstellungen > Weitere..", dann rechts auf "
Zeiterfassung". Bei der Option "
Pausenregelung" können Sie die für Sie geeignete Pausenregelung einstellen. Klicken Sie unten auf den blauen Button "
Speichern".
Abweichende Pausenregelung für einzelne Mitarbeiter einstellen
Neben der oben genannten allgemeinen Pausenregelung können Sie für einzelne Mitarbeiter individuell eine andere Pausenregelung einstellen oder auch deaktivieren. Lesen Sie hier, wie Sie die
Pausenregelung bei einem Mitarbeiter individuell einstellen.
Abweichende Pausenregelung für mehrere Mitarbeiter einstellen
Wenn Sie die Pausenregelung bei mehreren Mitarbeiten ändern möchten, dann wäre die Änderung in jedem einzelnen Nutzerkonto aufwändig. Stattdessen können Sie über die eine Vielzahl an Mitarbeitern mit der
Massenänderung von Arbeitszeitmodellen bearbeiten.
Eigene Pausenregelung erstellenDie gesetzlichen Pausenregelungen für verschiedene Länder sind im Timebutler bereits hinterlegt. Wenn in Ihrem Unternehmen abweichende Pausenregelungen gelten sollen, dann können Sie
eine eigene Pausenregelung erstellen.
Wahlmöglichkeit bei der PausenregelungSie können festlegen, ob die Anwendung der Pausenregelungen verpflichtend ist oder ob die Mitarbeiter eine
Wahlmöglichkeit erhalten sollen, ob die Pausenregelung angewendet werden soll oder nicht.
Screenshot: Pausenregelung nicht eingehalten, Änderung am Arbeitszeiteintrag
Wahlmöglichkeit bei der Pausenregelung
Mit den
Pausenregelungen legen Sie die Mindestpausen bei bestimmten Arbeitszeiten und die maximal tägliche Arbeitszeit fest.
Der Admin kann festlegen, welche Wahlmöglichkeiten die Mitarbeiter bei den Pausenregelungen haben. Melden Sie sich dazu als Admin am Timebutler an und klicken links unten auf "
Einstellungen > Weitere..", dann rechts auf "
Zeiterfassung".
Hier finden Sie die Einstellung "
Wahlmöglichkeit bei der Pausenregelung" mit folgenden Optionen:
Wenn ein Nutzer einen Arbeitszeiteintrag eingibt, der gegen die Vorgaben in der für ihn geltenden Pausenregelung verstößt, dann zeigt Timebutler je nach Einstellung zur "
Wahlmöglichkeit bei der Pausenregelung" folgendes an:
1) Wahlmöglichkeit erlauben
Option: "Der Nutzer kann wählen, ob er die Änderungen am Arbeitszeiteintrag annehmen möchte oder den Arbeitszeiteintrag ohne Änderung speichern möchte."
Timebutler zeigt eine Warnmeldung und einen Vorschlag zur Anpassung der Arbeitszeit an, um die Vorgaben der Pausenregelung zu erfüllen. Der Mitarbeiter hat nun die Wahl, die notwendige Anpassung anzunehmen und den Eintrag automatisch ändern zu lassen oder er lehnt die notwendige Anpassung ab und der Arbeitszeiteintrag wird gespeichert unter Verletzung der Vorgaben der Pausenregelung.
Sie können dann auch wählen, ob der Vorgesetzte per E-Mail informiert werden soll, wenn der Nutzer gegen die Pausenregelung verstößt.
2) Anpassungen müssen bestätigt werden
Option: "Der Nutzer kann den Arbeitszeiteintrag nur speichern, wenn er die vorgeschlagenen Änderungen am Arbeitszeiteintrag annimmt."
Timebutler zeigt eine Fehlermeldung und einen Vorschlag zur Anpassung der Arbeitszeit an, um die Vorgaben der Pausenregelung zu erfüllen. Der Nutzer muss die Änderung annehmen, um den Arbeitszeiteintrag zu speichern. Wenn er der Änderung widerspricht, wird der Arbeitszeiteintrag nicht gespeichert.
3) Anpassungen werden automatisch durchgeführt
Option: "Falls Änderungen am Arbeitszeiteintrag notwendig sind, dann werden diese automatisch angewendet und gespeichert. Der Nutzer kann/muss die Änderungen nicht bestätigen."
Timebutler zeigt keine Warn- oder Fehlermeldung an, sondern passt den Arbeitszeiteintrag automatisch an, um die Vorgaben der Pausenregelung zu erfüllen. Der Nutzer wird im Anschluss daran lediglich über die automatische Änderung informiert.
Einstellung gilt für alle Mitarbeiter
Die Einstellung zur Wahlmöglichkeit bei der Pausenregelung gilt für alle Mitarbeiter gleichermaßen und kann nicht für verschiedene Mitarbeiter unterschiedlich eingestellt werden.
Screenshot zu der Einstellung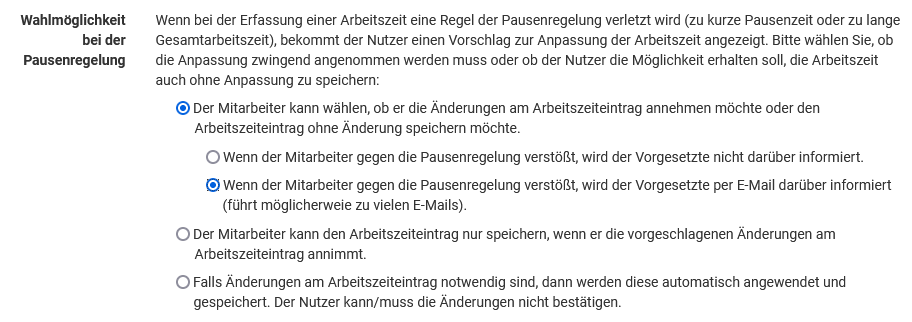
Screenshot: Pausenregelung nicht eingehalten, Änderung am Arbeitszeiteintrag
Eigene Pausenregelung erstellen
Im Timebutler stehen die gesetzlichen Pausenregelungen für Arbeitnehmer in Deutschland, Österreich und Schweiz zur Auswahl zur Verfügung (jeweils für Erwachsene und für Jugendliche).
Wenn in Ihre Unternehmen aufgrund einer individuellen Betriebsvereinbarung, Branchnvorgaben oder aus anderen Gründen eine Pausenregelung mit abweichenden Vorgaben gilt, dann können Sie im Timebutler eine eigene Pausenregelung individuell erstellen.
Melden Sie sich dazu als Admin am Timebutler an, klicken links unten auf "
Einstellungen > Weitere..", dann rechts auf "
Pausenregelungen". Klicken Sie auf den Button "
Neue Pausenregelung erstellen".
Sobald Sie die eigene Pausenregelung erstellt haben, können Sie die neue
Pausenregelung aktivieren oder
einzelnen Mitarbeitern zuweisen.
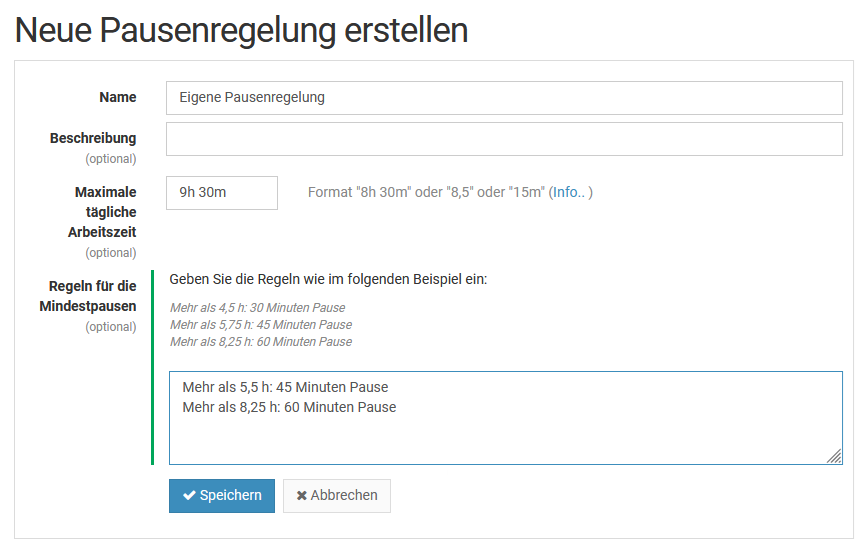
Pausenregelung an Mitarbeiter zuweisen
Sie können eine
Standard Pausenregelung festlegen, die für alle Mitarbeiter gilt, sofern für den Mitarbeiter keine andere Einstellung vorgenommen wird.
Sie können abweichend dazu für einzelne Mitarbeiter eine andere Pausenregelung festlegen oder auch deaktivieren. Das ist beispielsweise nützlich, wenn Sie die Pausenregelung für Arbeitnehmer aktiviert haben und Berufsschüler oder Azubis haben, bei denen die Pausenregelung für Arbeitnehmer unter 18 Jahren eingestellt werden soll.
Gehen Sie dazu wie folgt vor:
Pausenregelung für einen Mitarbeiter individuell einstellen
Melden Sie sich als Admin am Timebutler an, klicken links oben auf "
Mitarbeiter", dann unterhalb des kleinen "
Mitarbeiter" auf "
Übersicht". Klicken Sie in der Zeile bei dem gewünschten Nutzerkonto auf das grüne Symbol mit dem Bleistift (=Bearbeiten).
Ändern Sie die Option "
Pausenregelung" und klicken dann auf den blauen Button "
Speichern" ganz unten auf der Seite.
Pausenregelung bei mehreren Mitarbeitern ändern
Die Pausenregelung, die als
Standard Pausenregelung eingestellt ist, gilt für alle Mitarbeiter, bei denen keine Pausenregelung im Nutzerkonto individuell eingestellt ist. Wenn Sie also die
Standard Pausenregelung ändern, dann gilt die Änderung automatisch für alle Mitarbeiter, bei denen keine Pausenregelung im Nutzerkonto individuell eingestellt ist.
Falls Sie für Mitarbeiter die Pausenregelung ändern wollen, bei denen eine Pausenregelung im Nutzerkonto individuell eingestellt ist, dann ist es notwendig, die Nutzerkonten einzeln zu bearbeiten.
Pausenregelung bei einem Mitarbeiter einstellen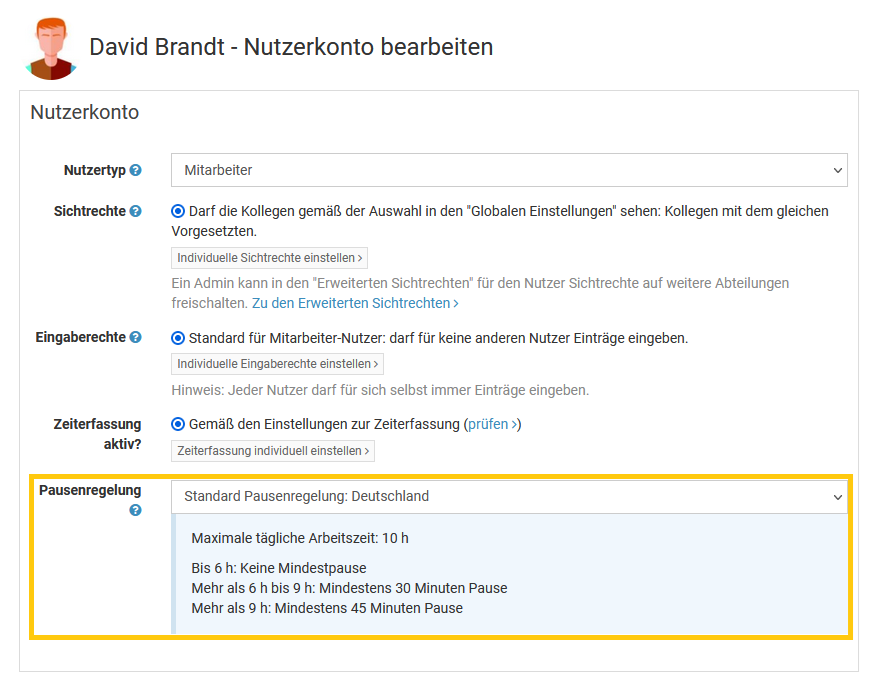
Anwendung der Pausenregelungen
Sobald eine
Pausenregelung aktiviert wurde ist, prüft Timebutler, ob die Vorgaben aus der Pausenregelung eingehalten wurden.
Wenn ein Mitarbeiter einen Arbeitszeiteintrag über die
Stempeluhr oder das
Zeiterfassungsterminal aufzeichnet oder über das
Eingabeformular einträgt, prüft Timebutler die Eingaben auf die Einhaltung der Vorgaben aus der Pausenregelung. Wenn die Vorgaben nicht erfüllt wurden, also die Mindestpausen bei der Arbeitszeit/Anwesenheitszeit nicht eingehalten wurden oder die maximale tägliche Arbeitszeit überschritten wurde, wird die Pausenregelung angewendet.
Je nach Einstellung zur
Wahlmöglchkeit bei der Pausenregelung wird die Anpassung automatisch vorgenommen, vom Mitarbeiter die Bestätigung zur Anpassung eingeholt oder dem Mitarbeiter die Wahlmöglichkeit geboten, die Anpassung v
orzunehmen oder abzulehnen.
Berechnung der Vorgaben
Timebutler berücksichtigt bei der Berechnung der Arbeitszeit alle Arbeitszeiteinträge des Kalendertages. Wenn ein Mitarbeiter also beispielsweise einen Arbeitszeiteintrag über 4 h eingibt, dann einen Arbeitszeiteintrag über 2 h und einen weiteren über 2,5 h, dann ergibt sich eine gesamte Arbeitszeit für den Tag von 8,5 h. Es wird dann also die Mindestpause angewendet, die für die Arbeitszeit ab 8,5 h gilt.
Ebenso werden die Pausen addiert: wenn bei den drei Arbeitszeiteinträgen 15 Minuten Pause, 0 Minuten Pause und 10 Minuten Pause eingetragen wurden, dann ergeben sich in Summe 25 Minuten Pause. Wenn die Mindestpause 30 Minuten beträgt, dann ergänzt Timebutler die Pause um 5 Minuten.
Fehler bei den Pausenregelungen
Hier erfahren Sie mehr zu vermeintlichen
Fehlern bei den Pausenregelungen.
Meldung bei Verletzung der Pausenregelungen
Meldung in der Stempeluhr, wenn die Vorgaben aus der Pausenregelung nicht eingehalten wurden: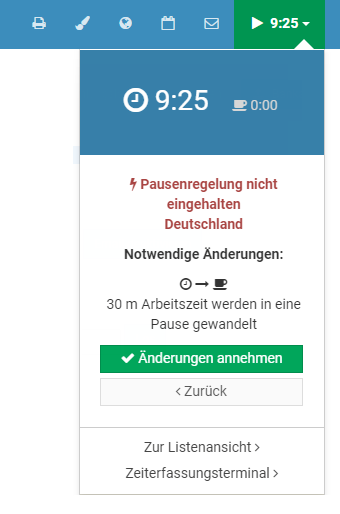 Meldung beim Speichern eines Arbeitszeiteintrages, wenn die Vorgaben aus der Pausenregelung nicht eingehalten wurden:
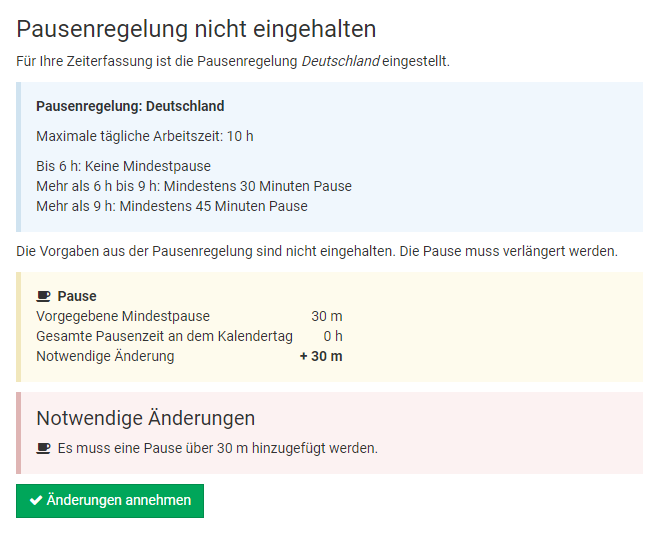
Fehler bei den Pausenregelungen
Ein Mitarbeiter hat eine Änderung aufgrund der Vorgaben einer Pausenregelung angezeigt bekommen und Sie sind der Meinung, dass die Pausenregelung falsch angewendet wurde?
Hier erfahren Sie mehr zu vermeintlichen
Fehlern bei den Pausenregelungen.
Wochenarbeitstage
Für jeden Mitarbeiter können die Wochenarbeitstage und die Soll-Arbeitszeit für jeden Wochentag festgelegt werden.
Die Wochenarbeitstage und auch die Soll-Arbeitszeit können Sie beim Erstellen der Nutzerkonten eintragen. Um die Wochenarbeitstage später einzusehen oder zu ändern, melden Sie sich als Admin am Timebutler an, klicken links unten auf "
Einstellungen > Arbeitstage". In der Spalte ganz rechts bekommen Sie die Wochenarbeitstage für den Mitarbeiter angezeigt. Um die Einstellung zu bearbeiten, klicken Sie bei dem gewünschten Mitarbeiter auf den blauen Button "
Bearbeiten".
Sie können auch für eine Vielzahl an Mitarbeitern die
Wochenarbeitstage per Massenänderung ändern.
In der
Detailansicht eines Nutzerkontos können Sie einsehen, welche Wochenarbeitstage für den Mitarbeiter eingestellt sind.
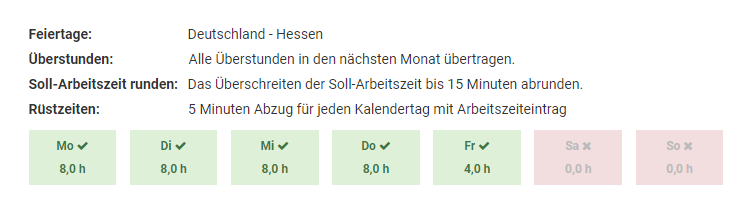
Mehrere ArbeitszeitmodelleLesen Sie hier, wie Sie
mehrere Arbeitszeitmodelle einstellen, wenn ein Mitarbeiter zu einem bestimmten Datum die Wochenarbeitstage oder die Soll-Arbeitszeiten ändert, beispielsweise aufgrund einer Arbeitszeitreduzierung.
Alternierende ArbeitstageLesen Sie hier, wie Sie bei
alternierenden Arbeitstagen vorgehen, beispielsweise wenn ein Mitarbeiter abwechselnd in einer Woche von Montag bis Donnerstag arbeitet und in der nächsten Woche von Dienstag bis Freitag.
Soll-Arbeitszeit
Sie können für jeden Mitarbeiter und jeden Wochentag die Soll-Arbeitszeit einstellen. Auf Basis der Soll-Arbeitszeit berechnet Timebutler das
Arbeitszeitkonto des Mitarbeiters.
Arbeitstage und Soll-Arbeitszeit für einen Mitarbeiter einstellen
Die Wochenarbeitstage und auch die Soll-Arbeitszeit können Sie beim Erstellen der Nutzerkonten eintragen. Um die Wochenarbeitstage später einzusehen oder zu ändern, melden Sie sich als Admin am Timebutler an, klicken links unten auf "
Einstellungen > Arbeitstage". In der Spalte ganz rechts bekommen Sie die Wochenarbeitstage für den Mitarbeiter angezeigt. Um die Einstellung zu bearbeiten, klicken Sie bei dem gewünschten Mitarbeiter auf den blauen Button "
Bearbeiten".
Arbeitstage und Soll-Arbeitszeit für eine Vielzahl Mitarbeiter ändern
Sie können eine Massenänderung der Arbeitstage und Soll-Arbeitszeit für eine Vielzahl an Mitarbeitern vornehmen und müssen die Änderung nicht für jeden Mitarbeiter einzeln vornehmen.
Melden Sie sich dazu als Admin am Timebutler an, klicken links unten auf "
Einstellungen", dann darunter auf "
Weitere..". Klicken Sie rechts auf die Überschrift "
Nutzerkonten Massenänderung".
Mehrere Arbeitszeitmodelle
Lesen Sie hier, wie Sie
mehrere Arbeitszeitmodelle einstellen, wenn ein Mitarbeiter zu einem bestimmten Datum die Wochenarbeitstage oder die Soll-Arbeitszeiten ändert, beispielsweise aufgrund einer Arbeitszeitreduzierung.
Aktuelles Arbeitszeitmodell einsehen
In der
Detailansicht eines Nutzerkontos können Sie einsehen, welche Wochenarbeitstage und welche Soll-Arbeitszeit für den Mitarbeiter eingestellt sind.
Aktuelle Arbeitszeitmodell mehrerer Mitarbeiter einsehen
Melden Sie sich als Admin am Timebutler an, klicken links unten auf "
Einstellungen > Arbeitstage". In der Spalte ganz rechts bekommen Sie die Wochenarbeitstage und Soll-Arbeitszeiten für die Mitarbeiter angezeigt.
Wöchentliche oder monatliche Soll-ArbeitszeitSie können bei den Einstellungen zu den Wochenarbeitstagen die Soll-Arbeitszeit für jeden Wochentag Montag bis Sonntag festlegen. Lesen Sie hier, wie Sie vorgehen, wenn ein Mitarbeiter nicht tägliche Soll-Arbeitszeiten hat, sondern eine
wöchentliche oder monatliche Soll-Arbeitszeit.
Überstunden kappen
Mit der Kappung von Überstunden können Sie für jeden Mitarbeiter eine Überstundenregelung einstellen und festlegen, ob und wie viele Überstunden im Monat gekappt werden sollen, beispielsweise weil sie mit dem Gehalt abgegolten sind oder weil die Überstundenhöhe auf ein bestimmtes Maximum begrenzt werden soll.
Optionen zum Kappen
Alle Überstunden in den nächsten Monat übertragenDas ist die Standardeinstellung, bei der alle Überstunden übertragen werden und keine Kappung stattfindet.
Alle Überstunden sind abgegolten, weder Überstunden noch Minusstunden in den nächsten Monat übertragenDiese Einstellung ist beispielsweise für freie Mitarbeiter geeignet oder für Mitarbeiter, die nach Stunden bezahlt werden. Hier werden keine Überstunden angesammelt und das Arbeitszeitkonto ist am Monatsanfang immer auf den Stand des letzten Monats zurückgesetzt.
Die Überstunden eines Monats sind bis zu einer bestimmten Anzahl abgegolten. Nur Überstunden oberhalb der Grenze werden in den nächsten Monat übertragen:Wenn für einen Mitarbeiter eine bestimmte Anzahl Überstunden im Monat mit dem Gehalt abgegolten sind, dann aktivieren Sie diese Option. Nur Überstunden, die oberhalb der angegeben Grenze liegen, werden dann in den nächsten Monat übertragen.
Es werden maximal bis zu einer bestimmten Anzahl Überstunden eines Monats in den nächsten Monat übertragen.Wenn die Mitarbeiter nur eine maximale Anzahl Überstunden je Monat vergütet bekommen, dann aktivieren Sie diese Option. Sollte der Mitarbeiter darüber hinaus weitere Überstunden leisten, werden diese zum Monatsende gekappt.
Der Überstundenstand am ersten Tag jedes Monats soll maximal einen bestimmten Wert betragen dürfen - Mehrarbeit wird gekapptIm Gegensatz zu den vorangegangenen Optionen wird mit dieser Option die maximale Gesamtüberstunden-Höhe am Monatsanfang begrenzt. Es wird also nicht der Zuwachs je Monat begrenzt, wie in den vorangehenden Optionen, sondern der maximale Gesamt-Überstundenstand am Monatsanfang.
Kappung der Überstunden für einzelne Mitarbeiter einstellen
Die Einstellung zur Kappung der Überstunden können Sie einsehen oder ändern, indem Sie sich als Admin am Timebutler anmelden, dann links unten auf "
Einstellungen > Arbeitstage" klicken. In der Spalte ganz rechts bekommen Sie bei "
Überstunden" die Einstellung zu dem Mitarbeiter angezeigt. Um die Einstellung zu bearbeiten, klicken Sie bei dem gewünschten Mitarbeiter auf den blauen Button "
Bearbeiten".
Kappung der Überstunden für eine Vielzahl an Mitarbeitern einstellen
Wenn Sie die Kappung für eine Vielzahl an Mitarbeitern einstellen oder ändern möchten, dann ist das über die
Massenänderung der Arbeitszeitmodelle bequem möglich.
Einstellung zur Überstundenkappung einsehen
In der
Detailansicht eines Nutzerkontos können Sie einsehen, welche Überstundenkappung für den Mitarbeiter eingestellt ist.
Gekappte Überstunden im Arbeitszeitkonto
Die gekappten Überstunden werden im
Arbeitszeitkonto, Ansicht "Überstundenguthaben zum Stichtag" ausgewiesen. Dort können auch die
Details zu jedem Monat angezeigt werden, um die genaue Berechnung für jeden Monat zu erfahren.
Arbeitszeiten runden
Mit dem Runden von Arbeitszeiten können Sie erreichen, dass bei geringer Überschreitung oder Unterschreitung der Arbeitszeit an einem Kalendertag die Arbeitszeit auf die Soll-Arbeitszeit gerundet wird.
Beispielsweise können Sie einstellen, dass ein Unterschreiten der Soll-Arbeitszeit um bis zu 5 Minuten aufgerundet wird und ein Überschreiten von bis zu 10 Minuten abgerundet wird. Bei einem Mitarbeiter mit 8 h Soll-Arbeitszeit wird eine Arbeitszeit von 7 h 55 min bis 8 h 10 min dann immer auf 8 h gerundet. Eine Arbeitszeit oberhalb oder unterhalb dieser Grenzen bleibt hingegen unverändert.
Runden der Arbeitszeit für einzelne Mitarbeiter einstellen
Die Einstellung zum Runden der Arbeitszeit können Sie einsehen oder ändern, indem Sie sich als Admin am Timebutler anmelden, dann links unten auf "
Einstellungen > Arbeitstage" klicken. In der Spalte ganz rechts bekommen Sie bei "
Runden auf Soll-Arbeitszeit" die Einstellung zu dem Mitarbeiter angezeigt. Um die Einstellung zu bearbeiten, klicken Sie bei dem gewünschten Mitarbeiter auf den blauen Button "
Bearbeiten".
Runden der Arbeitszeit für eine Vielzahl Mitarbeiter einstellen
Wenn Sie die Rundung für eine Vielzahl an Mitarbeitern einstellen oder ändern möchten, dann ist das über die
Massenänderung der Arbeitszeitmodelle bequem möglich.
Einstellung prüfen
In der
Detailansicht eines Nutzerkontos können Sie einsehen, welche Rundung für den Mitarbeiter eingestellt ist:
Gerundete Arbeitszeit im Arbeitszeitkonto
Die Arbeitszeit, die wegen der Rundung abgezogen wurde, sind im
Arbeitszeitkonto, Ansicht "Überstundenguthaben zum Stichtag" ausgewiesen. Dort können auch die
Details zu jedem Monat angezeigt werden, um die genaue Berechnung für jeden Monat zu erfahren.
Änderung ab einem bestimmten MonatLesen Sie hier, wie Sie vorgehen, wenn sich die Einstellungen zu der Rundung der Arbeitszeit
ab einem bestimmten Monat ändern.
Rüstzeiten
Mit den Rüstzeiten können Sie für Mitarbeiter eine bestimmte Anzahl Minuten einstellen, die von der Arbeitszeit abgezogen oder hinzugefügt werden sollen.
Wenn die Mitarbeiter beispielsweise die Stempeluhr starten und dann zunächst die Arbeitskleidung anziehen müssen und die Zeit für dieses Umziehen nicht als Arbeitszeit angerechnet werden soll, dann können Sie einen Abzug der Rüstzeiten einstellen. Damit wir diese Zeit von den Arbeitszeiteinträgen abgezogen.
Wenn hingegen das Wechseln der Arbeitskleidung als Arbeitszeit gilt, die Mitarbeiter aber erst danach die Stempeluhr starten können, dann können Sie über die Rüstzeit eine automatische Erhöhung der Arbeitszeit einstellen.
Der Abzug bzw. die Erhöhung der Rüstzeiten geschieht dabei nur an Kalendertagen, an denen mindestens ein Arbeitszeiteintrag eingegeben wurde. Falls an einem Arbeitstag mehrere Arbeitszeiteinträge eingegeben werden, wendet Timebutler die Rüstzeiten dennoch nur ein Mal an, nicht mehrmals.
Rüstzeiten einstellen
Die Einstellung zu den Rüstzeiten können Sie einsehen oder ändern, indem Sie sich als Admin am Timebutler anmelden, dann links unten auf "
Einstellungen > Arbeitstage" klicken. In der Spalte ganz rechts bekommen Sie bei "
Rüstzeiten" die Einstellung zu dem Mitarbeiter angezeigt. Um die Einstellung zu bearbeiten, klicken Sie bei bei dem gewünschten Mitarbeiter auf den blauen Button "
Bearbeiten".
Wenn Sie die Rüstzeiten für eine Vielzahl an Mitarbeitern einstellen oder ändern möchten, dann ist das über die
Massenänderung der Arbeitszeitmodelle bequem möglich.
In der
Detailansicht eines Nutzerkontos können Sie die Rüstzeiten ebenfalls einsehen.
Rüstzeiten im Arbeitszeitkonto
Der Abzug bzw. die Erhöhung der Arbeitszeiten aufgrund von Rüstzeiten wird im
Arbeitszeitkonto in der Ansicht "Überstundenguthaben zum Stichtag" ausgewiesen.
Änderung ab einem bestimmten MonatLesen Sie hier, wie Sie vorgehen, wenn sich die Einstellungen zu den Rüstzeiten der Mitarbeiter
ab einem bestimmten Monat ändern.
Arbeitszeitmodell bearbeiten
Mit dem Arbeitszeitmodell sind die folgenden Einstellungen zusammengefasst:
Einstellungen eines Mitarbeiters zum ArbeitszeitmodellAktuelles Arbeitszeitmodell einsehen
In der
Detailansicht eines Nutzerkontos können Sie einsehen, welche Einstellungen für den Mitarbeiter aktiv sind.
Um die Einstellungen für alle Mitarbeiter auf einer Seite einzusehen, gehen Sie so vor, wie unten bei "Bearbeiten des Arbeitszeitmodells" beschrieben.
Bearbeiten des Arbeitszeitmodells
Alle Einstellungen des Arbeitszeitmodells können Sie wie folgt ändern: melden Sie sich als Admin am Timebutler an, klicken links unten auf "
Einstellungen > Arbeitstage". In der Spalte ganz rechts bekommen Sie die Wochenarbeitstage und alle weiteren Einstellungen für den Mitarbeiter angezeigt. Um die Einstellung zu bearbeiten, klicken Sie bei dem gewünschten Mitarbeiter auf den blauen Button "
Bearbeiten".
Hinweise
Arbeitszeitmodell zu einem bestimmten Termin ändernLesen Sie hier, wie Sie vorgehen, wenn sich die Einstellungen zu dem Arbeitszeitmodell
ab einem bestimmten Monat ändern.
MassenänderungWenn Sie das Arbeitszeitmodell bei vielen Mitarbeiten ändern möchten, dann verwenden Sie dazu die
Massenänderung von Arbeitszeitmodellen.
Alternierende WochenarbeitstageLesen Sie hier, wie Sie bei
alternierenden Arbeitstagen vorgehen, beispielsweise wenn ein Mitarbeiter abwechselnd in einer Woche von Montag bis Donnerstag arbeitet und in der nächsten Woche von Dienstag bis Freitag.
Wöchentliche oder monatliche Soll-ArbeitszeitSie können bei den Einstellungen zu den Wochenarbeitstagen die Soll-Arbeitszeit für jeden Wochentag Montag bis Sonntag festlegen. Lesen Sie hier, wie Sie vorgehen, wenn ein Mitarbeiter nicht tägliche Soll-Arbeitszeiten hat, sondern eine
wöchentliche oder monatliche Soll-Arbeitszeit.
Screenshot: Übersicht der Arbeitstage und Arbeitszeitmodelle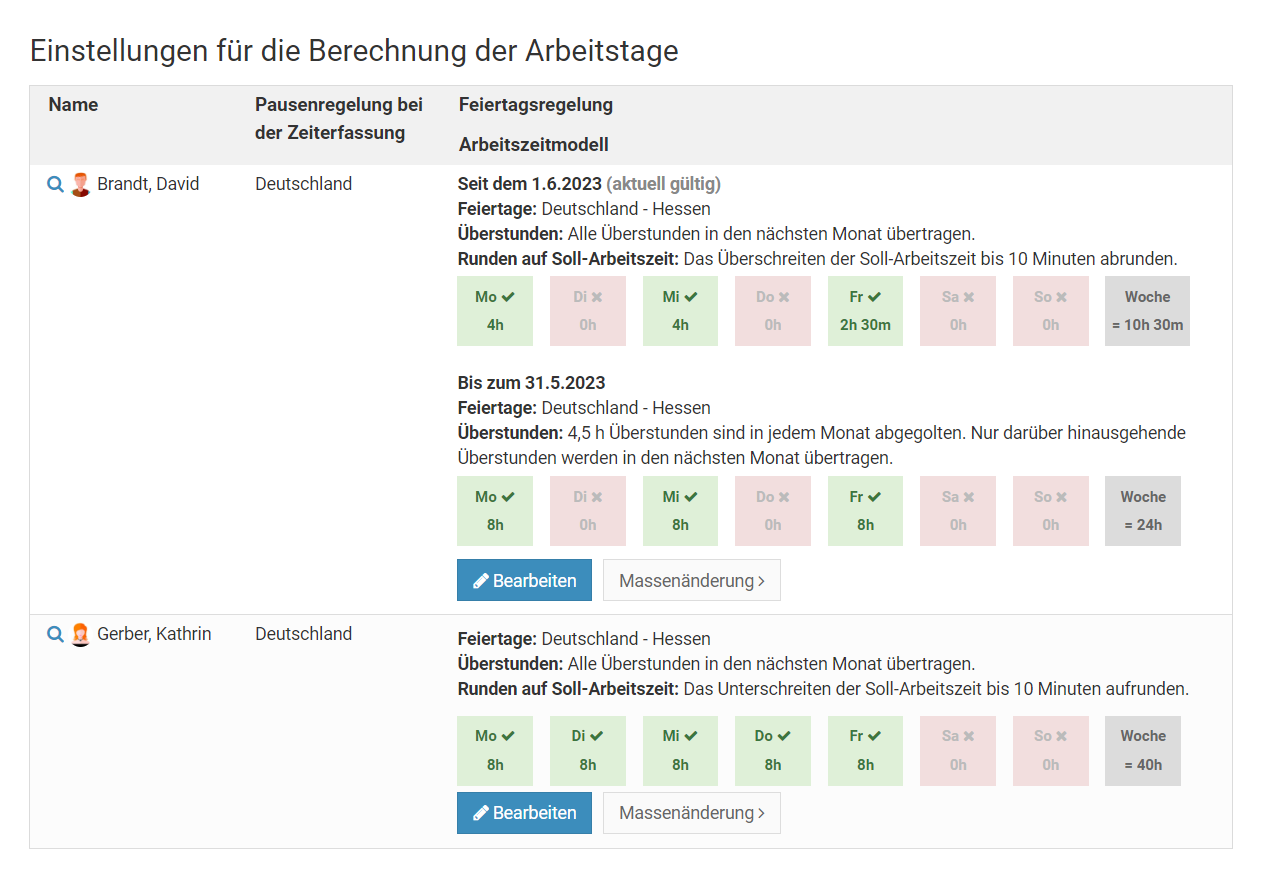
Screenshot: Arbeitstage und Arbeitszeitmodelle bearbeiten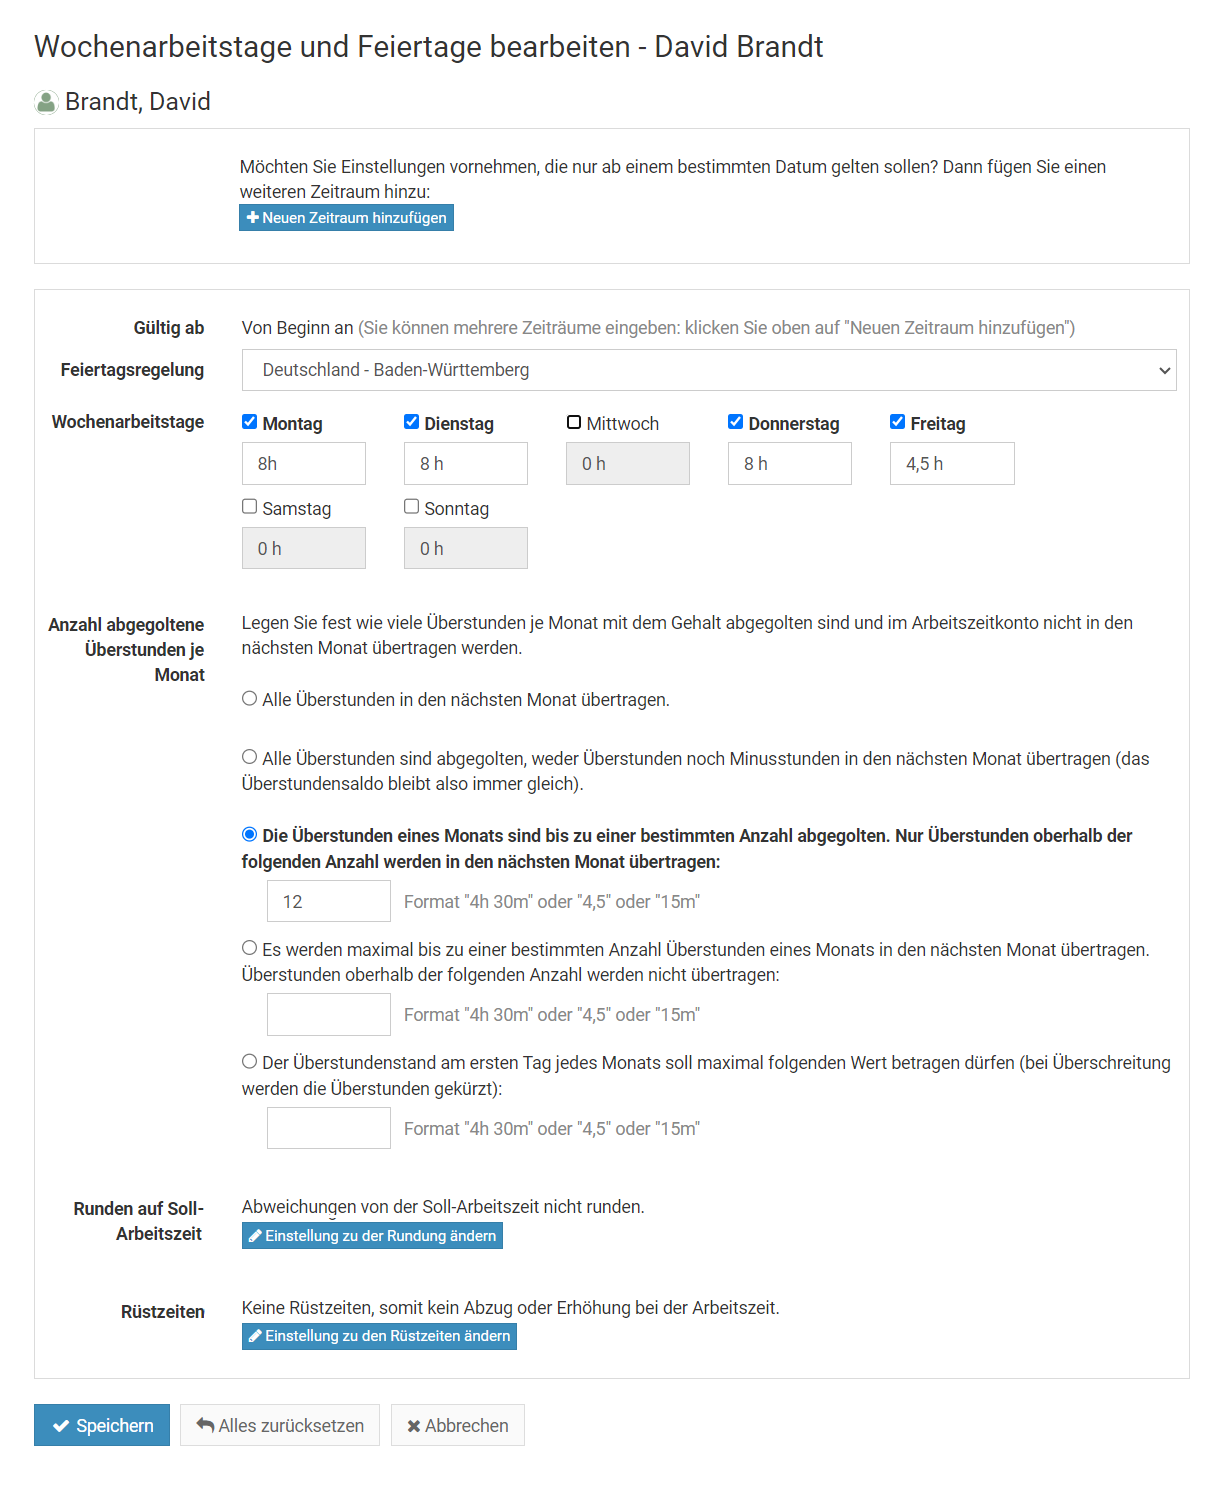
Mehrere Arbeitszeitmodelle - Änderung zu einem bestimmten Datum
Im Timebutler kann mit wenigen Mausklicks eingestellt werden, dass ein Mitarbeiter das Arbeitszeitmodell zu einem bestimmten Termin wechselt. Das ist beispielsweise in folgenden Fällen notwendig:
- Der Mitarbeiter ändert die Wochenarbeitstage (beispielsweise "Bis 14. Mai Wochenarbeitstage Montag bis Freitag, ab 15. Mai nur noch Montag bis Donnerstag"),
- Der Mitarbeiter ändert seine Soll-Arbeitszeit, beispielsweise aufgrund einer Arbeitszeitverkürzung,
- Der Mitarbeiter wechselt den Standort und für ihn gelten ab einem bestimmten Datum andere Feiertage.
- Wegen einer Änderung im Arbeitsvertrag gelten ab einem bestimmten Datum neue Regeln für das Kappen der Überstunden, für das Runden der Arbeitszeiten oder die Rüstzeiten
Änderung hinzufügen
Um einzustellen, dass sich das Arbeitszeitmodell zu einem bestimmten Datum ändert, gehen Sie wie folgt vor:
Melden Sie sich mit einem Admin am Timebutler an und klicken links unten auf "
Einstellungen > Arbeitstage". Bei dem gewünschten Mitarbeiter klicken Sie auf den Button "
Bearbeiten". Klicken Sie nun auf den blauen Button "
Neuen Zeitraum hinzufügen". Oben im Feld "
Gültig ab:" geben Sie das Datum ein, ab dem die Änderung gelten soll. Nun können Sie im oberen Bereich die Einstellungen zu den Wochenarbeitstagen, Soll-Arbeitszeit, Feiertagen, usw. vornehmen, die ab dem eingestellten Datum gelten sollen.
Klicken Sie dann unten auf den blauen Button "
Speichern".
Damit sind Sie fertig. Sie sehen nun wieder die Übersicht der Wochenarbeitstage und bei dem soeben geänderten Mitarbeiter sehen Sie nun mehrere Zeiträume. Timebutler hat im Hintergrund alle Urlaubsanträge, Abwesenheitseinträge, das Urlaubskonto und das Arbeitszeitkonto des Mitarbeiters neu berechnet.
Mehrere Zeiträume erstellen
Mit dem oben genannten Vorgang kann nur ein neuer Zeitraum hinzugefügt werden. Dennoch ist es aber natürlich möglich, mehrere Zeiträume hinzuzufügen. Dazu erstellen Sie einen neuen Zeitraum gemäß der oben genannten Schritte. Danach wiederholen Sie den Vorgang und erstellen einen weiteren, neuen Zeitraum, wieder gemäß der oben genannten Schritte.
Änderung für mehrere Mitarbeiter vornehmen
Wenn Sie für mehrere Mitarbeiter ein Arbeitszeitmodell hinzufügen möchten, dann ist es nicht notwendig, die Änderung für jeden Mitarbeiter einzeln vorzunehmen. Stattdessen können Sie das bequem über die
Massenänderung der Arbeitszeitmodelle durchführen (die Änderung ist mit Ausnahme der Feiertage für alle Einstellungen des Arbeitszeitmodells möglich).
Screenshot: Neuen Zeitraum für ein Arbeitszeitmodell hinzufügen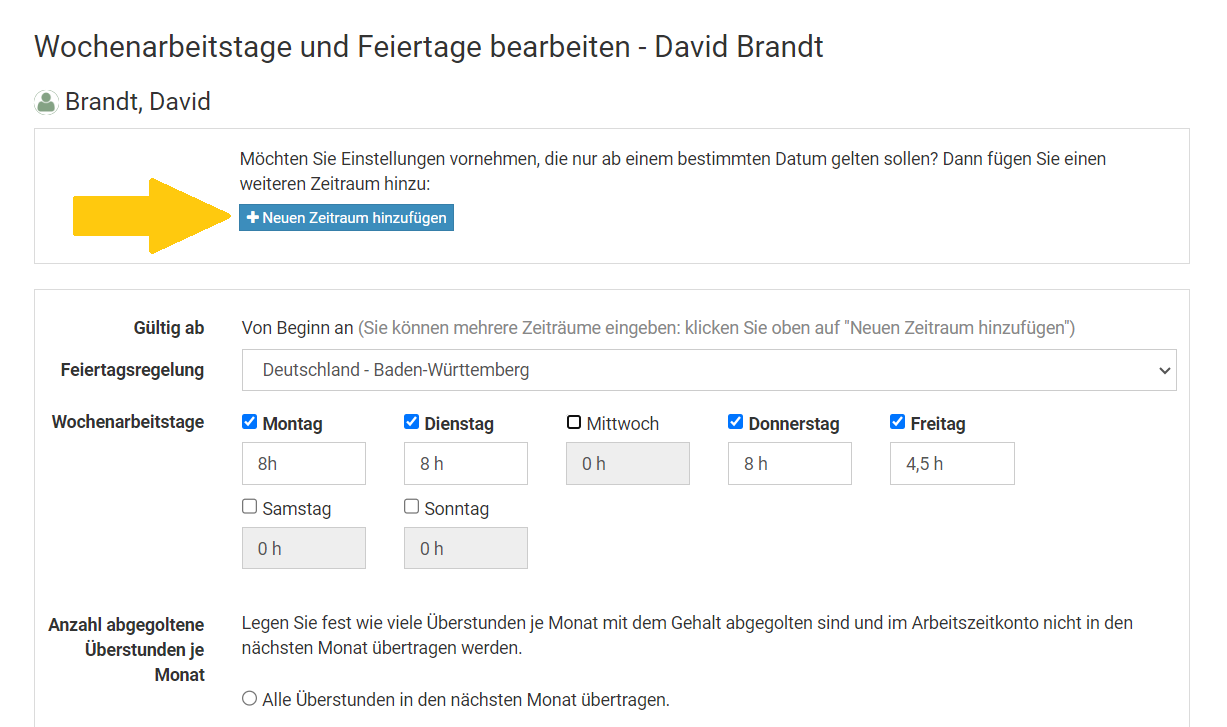
Alternierende Wochenarbeitstage
Manche Mitarbeiter haben alternierende Wochenarbeitstage, arbeiten also beispielsweise wochenweise im Wechsel in der einen Woche von Montag bis Donnerstag und in der darauf folgenden Woche von Dienstag bis Freitag.
Lesen Sie hier, wie Sei
alternierende Wochenarbeitstage im Timebutler einstellen.
Wochen- oder Monats-Soll-Arbeitszeit
Sie können bei den Einstellungen zu den Wochenarbeitstagen die Soll-Arbeitszeit für jeden Wochentag Montag bis Sonntag festlegen.
Lesen Sie hier, wie Sie vorgehen, wenn ein Mitarbeiter nicht tägliche Soll-Arbeitszeiten hat, sondern eine
wöchentliche oder monatliche Soll-Arbeitszeit.
Massenänderung der Arbeitszeitmodelle
Für jeden Mitarbeiter kann das Arbeitszeitmodell individuell eingestellt werden. Wenn Sie Änderungen an den Arbeitszeitmodellen an einer Vielzahl von Mitarbeitern vornehmen möchten, dann ist das über die Massenänderung er Arbeitszeitmodelle am einfachsten möglich. Damit vermeiden Sie den Aufwand, die Arbeitszeitmodelle jedes Mitarbeiters einzeln bearbeiten zu müssen.
Melden Sie sich als Admin am Timebutler an und klicken links unten auf "
Einstellungen", dann darunter auf "
Weitere..". Klicken Sie rechts auf "
Nutzerkonten Massenänderung". Hier finden Sie im Kasten "
Arbeitszeitmodell" die Optionen für die Massenänderung.
Arbeitszeitmodell für bestimmte Nutzer ändern
Wenn Sie im oben genannten Kasten auf den Link "
Arbeitszeitmodelle für bestimmte Nutzer ändern" klicken, dann können Sie auf der nächsten Seite zunächst auswählen, für welche Mitarbeiter Sie das Arbeitszeitmodell ändern möchten.
Wählen Sie dann aus, ab welchem Datum sollen die Änderungen am Arbeitszeitmodell gelten sollen: Sie können ein bestimmtes Datum auswählen, ab dem die neuen Vorgaben für das Arbeitszeitmodell gelten sollen oder Sie wählen die Option "Für das Arbeitszeitmodell, das aktuell für den jeweiligen Mitarbeiter gültig ist." aus: dann wird das aktuell gültige Arbeitszeitmodell angepasst (auch rückwirkend, seit dem Beginn des Arbeitszeitmodells).
Als nächstes können Sie auswählen, welche Einstellungen geändert werden sollen. Nur die gewählten Einstellungen ändern sich, die restlichen Optionen bleiben unverändert. Mit einem Klick auf den Button "
Änderung jetzt anwenden" werden die Änderungen auf die Arbeitszeitmodelle der gewählten Mitarbeiter angewendet. Alle Abwesenheitseinträge, Arbeitszeitkonten und Urlaubskonten der Mitarbeiter werden automatisch neu berechnet. Deswegen kann es ein paar Sekunden dauern, bis die Änderung übernommen wurde.
Beispiel
Sie möchten für die Mitarbeiter im Standort Hamburg einstellen, dass ab Mai bis zu 10 Überstunden mit dem Gehalt abgegolten sind und gekappt werden sollen. Dazu rufen Sie die Massenänderung des Arbeitszeitmodells auf, wählen den Standort Hamburg und stellen als Datum den 1.4. ein. Bei der Option "Anzahl abgegoltene Überstunden je Monat" klicken Sie auf den Button "Ändern" und stellen ein, dass 10 Überstunden abgegolten sind. Anschließend klicken Sie auf "Änderung jetzt anwenden".
Timebutler wird nun für die Mitarbeiter in Hamburg ein neues Arbeitszeitmodell erstellen, das ab dem 1.4. gilt und bei dem eingestellt ist, dass bis zu 10 Überstunden gekappt werden. Alle anderen Einstellungen, wie Wochenarbeitstage, Feiertagsregelung, Soll-Arbeitszeit, Rüstzeiten, usw. bleiben unverändert, es gelten also die gleichen Vorgaben wie vor der Änderung.
Arbeitszeitmodelle löschen
Wenn Sie im oben genannten Kasten auf den Link "
Arbeitszeitmodelle löschen" klicken, dann können Sie auf der nächsten Seite zunächst auswählen, für welche Mitarbeiter Sie das Arbeitszeitmodell löschen möchten. Bei "
Startdatum des Arbeitszeitmodells" können Sie ein Datum einstellen: bei denjenigen Mitarbeitern, die ein Arbeitszeitmodell mit diesem Startdatum haben, wird das Arbeitszeitmodell gelöscht. Das vorangehende Arbeitszeitmodell wird dann bis zum Ende des gelöschten Arbeitszeitmodells verlängert.
Beispiel
Sie haben über die Massenänderung der Arbeitszeitmodelle für alle Mitarbeiter in München ein neues Arbeitszeitmodell erstellt, dass ab dem 1. April gültig ist. Jedoch haben Sie sich im Datum geirrt, das Arbeitszeitmodell sollte eigentlich erst ab 1. Mai gültig sein. Sie können dann für die Mitarbeiter die Arbeitszeitmodelle mit Start am 1. April wieder löschen.
Beispiel
Ein Mitarbeiter hat Arbeitszeitmodelle für folgende Zeiträume:
- Arbeitszeitmodell 1: von Beginn bis 31.5.
- Arbeitszeitmodell 2: vom 1.6. bis 31.8.
- Arbeitszeitmodell 3: vom 1.9. bis unbegrenzt
Sie rufen die Massenänderung auf und stellen ein, dass die Arbeitszeitmodelle gelöscht werden sollen, die am 1.6. beginnen. Damit wird für den Mitarbeiter das Arbeitszeitmodell 2 gelöscht. Das Arbeitszeitmodell 1 ist dann gültig von Beginn bis 31.8.
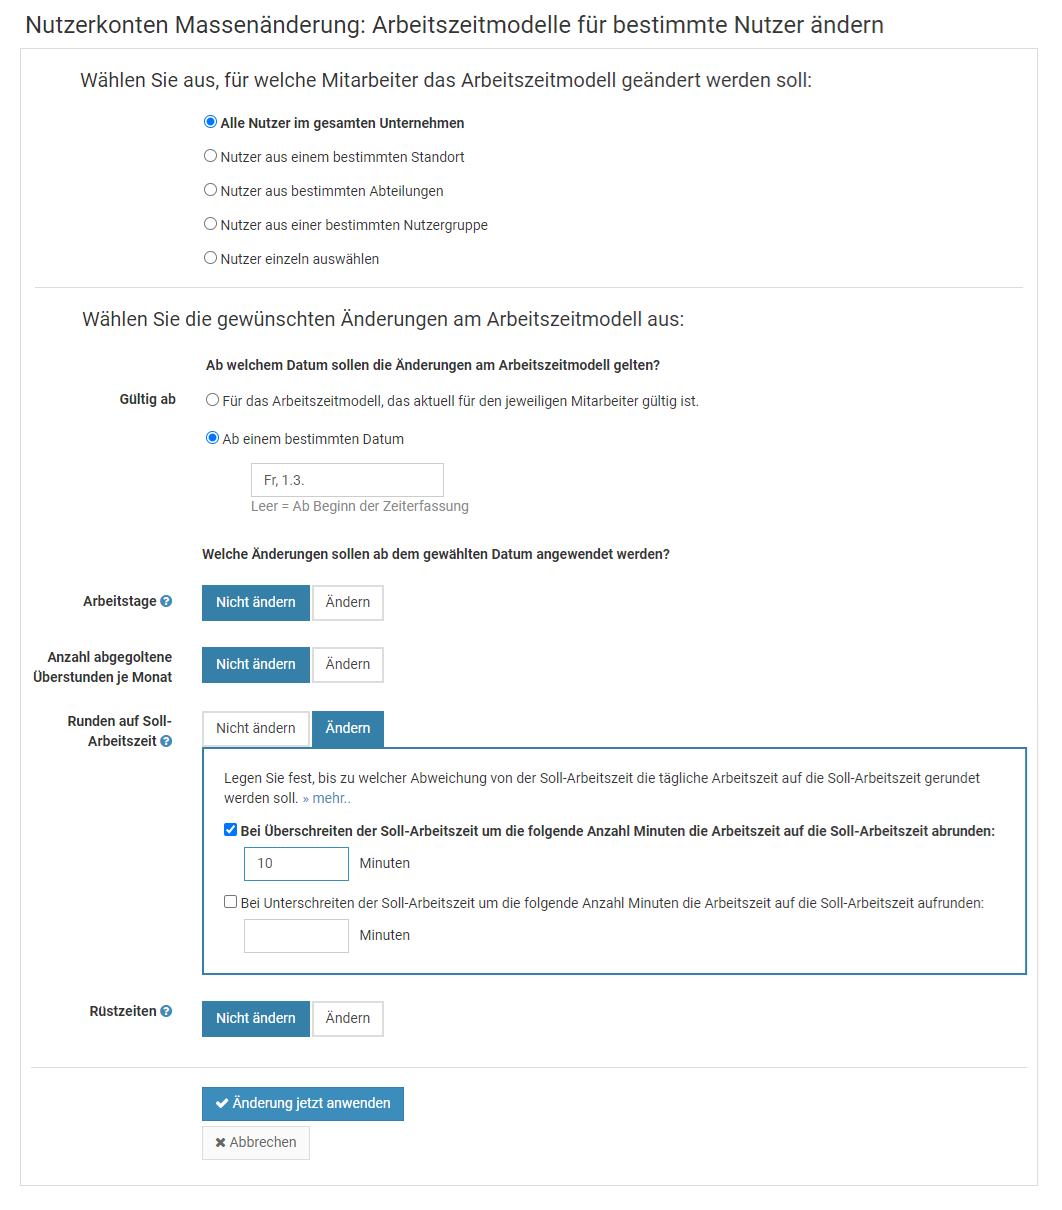
Stempeluhrstatus aufrufen
Wenn die Zeiterfassung und die Stempeluhr oder das Zeiterfassungsterminal aktiviert ist, dann können Sie sich den Live Stempeluhrstatus der Mitarbeiter anzeigen lassen.
Admins
Admins erhalten in einem entsprechenden Kasten rechts oben auf dem Dashboard, nach der Anmeldung am Timebutler, die Zusammenfassung, wie viele Stempeluhren laufen, wie viel ruhen und wie viele in der Pause sind. Bei Klick auf den Kasten gelangt der Admin zur Ansicht des Live Stempeluhrstatus aller Mitarbeiter mit Detailinformationen über die Start-Uhrzeit, Pausen und Abwesenheiten.
Ebenso kann der Admin den Live Stempeluhrstatus aufrufen, indem er links auf "
Mitarbeiter > Zeiterfassung > Stempeluhrstatus" klickt.
Vorgesetzte
Ein Vorgesetzter kann den Live Stempeluhrstatus aufrufen, indem er links auf "
Mitarbeiter > Zeiterfassung > Stempeluhrstatus" klickt.
Mitarbeiter-Nutzer
Ein Mitarbeiter kann den Live Stempeluhrstatus aufrufen, indem er links auf "
Kollegen > Stempeluhrstatus" klickt.
Sichtrechte freischaltenBeachten Sie, dass Mitarbeiter keine Sichtrechte auf den Stempeluhr-Status haben, wenn die
Sichtrechte auf den Stempeluhrstatus nicht freigeschaltet wurden.
Sichtrechte auf den Stempeluhrstatus
Wenn die Zeiterfassung und die Stempeluhr oder das Zeiterfassungsterminal aktiviert ist, dann kann im Timebutler der
Live Stempeluhrstatus der Mitarbeiter eingesehen werden. Je nach Nutzertyp gelten unterschiedliche Sichtrechte:
Sichtrechte von Admins
Admins haben immer volle Sicht- und Bearbeitungsrechte auf alle Nutzer und somit auch auf den Live Stempeluhrstatus aller Mitarbeiter.
Sichtrechte von Vorgesetzten
Vorgesetzte haben immer Sichtrechte auf den Live Stempeluhrstatus der Mitarbeiter, auf die sie Sichtrechte haben.
Ein Admin kann erlauben, dass die Vorgesetzten den Live Stempeluhrstatus aller Mitarbeiter sehen dürfen. Dazu meldet sich ein Admin am Timebutler an, klickt links unten auf "
Einstellungen > Weitere..", dann rechts auf "
Zeiterfassung". Hier gibt es die Einstellung "
Stempeluhrstatus aller Nutzer".
Sichtrechte für Mitarbeiter-Nutzer
Damit Mitarbeiter-Nutzer den Live Stempeluhrstatus sehen dürfen, muss die entsprechende Einstellung vom Admin freigeschaltet werden. Dazu meldet sich ein Admin am Timebutler an, klickt links unten auf "
Einstellungen > Weitere..", dann rechts auf "
Zeiterfassung". Hier gibt es die Einstellungen "
Stempeluhrstatus für Mitarbeiter-Nutzer".
Angezeigte Informationen
Aus Datenschutzgründen werden nicht alle Detailinformationen für alle Nutzer angezeigt. Folgende Tabelle zeigt, welche Informationen den verschiedenen Nutzertypen angezeigt wird:
| Information | Mitarbeiter | Vorgesetzter | Administrator |
|---|
| Stempeluhr gestartet, pausiert oder gestoppt | | | |
| Information, ob die Stempeluhr im Status "Dienstgang" ist | | | |
| Uhrzeit, zu der die Stempeluhr gestartet wurde | | | |
| Uhrzeit, zu der die aktuelle Pause gestartet wurde | | | |
| Uhrzeiten aller Pausen | | | |
| Information über aktuelle Abwesenheit (Urlaub, Schulung, usw.) | | | |
Zeiterfassungsterminal auf einem Tablet
Timebutler bietet eine vollintegrierte Zeiterfassungsterminal-Lösung.
Sie können das Zeiterfassungsterminal auf einem handelsüblichen Tablet aktivieren. Das Tablet stellen Sie am Büro- oder Firmeneingang bereit (es gibt professionelle Halterungen für Tablets) und jeder Mitarbeiter kann dann morgens am Zeiterfassungsterminal seine Zeiten stempeln, mit wenigen Klicks. Sie erhalten also ein vollwertiges Zeiterfassungsterminal für den günstigen Preis eines Tablets - und haben die Zeiten automatisch direkt im Timebutler integriert.
Das Timebutler ZeiterfassungsterminalStartbildschirm, Anmeldung am Terminal und Stempeluhr im Terminal
Zeiterfassungsterminal einrichten
Lesen Sie hier, wie Sie das
Zeiterfassungsterminal einrichten
Zeiterfassungsterminal aktivieren
Wenn Sie das Zeiterfassungsterminal auf einem Tablet einmalig aktivieren, dann bleibt es auf dem Tablet dauerhaft aktiviert und Sie müssen es kein zweites Mal aktivieren.
Gehen Sie einfach wie folgt vor:
Auf dem Tablet öffnen Sie einen Internetbrowser und rufen die Seite "
www.timebutler.de/stempeluhr" auf. Folgen Sie den Erläuterungen auf der Webseite, um das Zeiterfassungsterminal auf dem Gerät zu aktivieren. Dazu müssen Sie sich mit einem Admin Nutzer anmelden.
Sobald die Aktivierung abgeschlossen ist, wird der Admin-Nutzer auf dem Gerät automatisch wieder vollständig abgemeldet. Das ist wichtig, damit kein anderer Mitarbeiter auf dem Gerät in das Nutzerkonto des Admins gelangen kann.
Nun ist das Zeiterfassungsterminal dauerhaft aktiviert. Wenn Sie das Tablet beispielsweise neu starten, dann brauchen Sie nur wieder www.timebutler.de/stempeluhr aufrufen und das Zeiterfassungsterminal ist sofort startklar, ohne erneute Aktivierung oder Anmeldung. Am besten stellen Sie den Link also als Startseite im Browser ein.
Wichtig: Cookies nicht löschen
Damit die Aktivierung dauerhaft beibehalten bleibt, müssen in dem Browser des Tablets die Cookies aktiviert sein und dürfen nicht gelöscht werden. Prüfen Sie bitte, ob die Cookies aktiviert sind und stellen sicher, dass die Cookies nicht automatisch gelöscht werden, beispielsweise beim Schließen des Browsers oder beim Neustart des Tablets.
Wenn sichergestellt ist, dass die Cookies dauerhaft beibehalten werden, dann bleibt auch das Zeiterfassungsterminal dauerhaft aktiv, auch nach einem Neustart des Tablets.
Mehrere ZeiterfassungsterminalsEs ist möglich, mehrere Zeiterfassungsterminals auf mehreren Tablets zu aktivieren. Damit können Sie beispielsweise ein Zeiterfassungsterminal am Büroeingang bereitstellen und ein Zeiterfassungsterminal vor der Kantine. Die Terminals sind automatisch miteinander synchronisiert und die Mitarbeiter können sich an beliebigen Terminals ein- oder ausstempeln.
Ebenso können Sie mehrere
Zeiterfassungsterminals für verschiedene Standorte bereitstellen.
Zeiterfassungsterminal aktivieren - Schritt 1
Zeiterfassungsterminal aktivieren - Schritt 2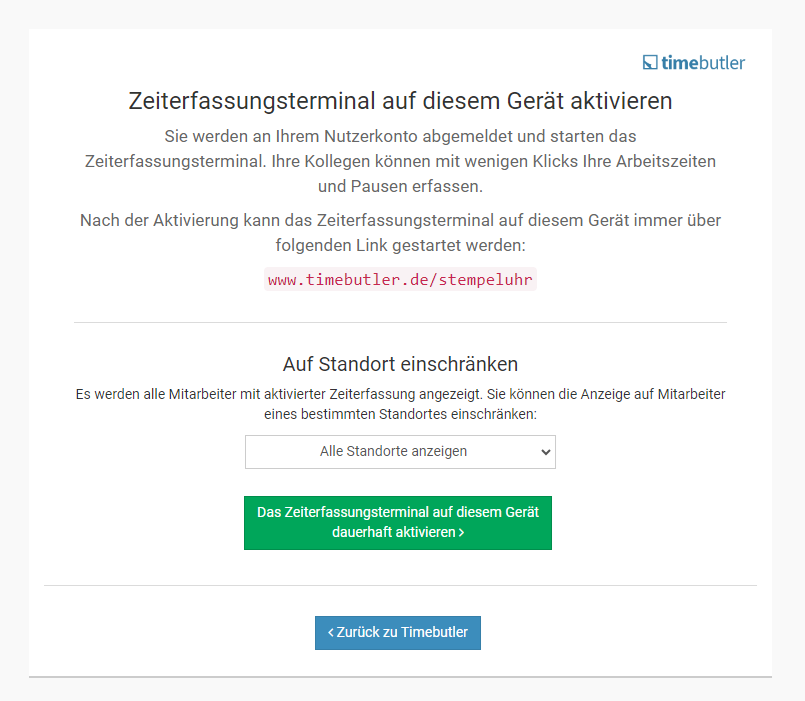
Zeiterfassungsterminal auf Standort beschränken
Auf dem
Timebutler Zeiterfassungsterminal wird für jeden Mitarbeiter, bei dem die Zeiterfassung aktiviert ist, eine Kachel angezeigt. Damit kann der Mitarbeiter die Stempeluhr verwenden.
Wenn Sie mehrere Zeiterfassungsterminals an mehreren Standorten einsetzen, dann möchten Sie vielleicht an jedem Standort nur die Mitarbeiter des Standortes angezeigt bekommen. Sie können für jedes Zeiterfassungsterminal einstellen, ob alle Mitarbeiter oder nur die Mitarbeiter eines bestimmten Standortes angezeigt werden sollen.
Standort eingrenzen bei einem neuen Zeiterfassungsterminal
Wenn Sie das Zeiterfassungsterminal aktivieren, dann bekommen Sie automatisch auch die Möglichkeit angezeigt, die Anzeige auf einen Standort einzugrenzen (nur wenn Sie mindestens einen
Standort erstellt haben).
Einschränkung auf Standort aufheben bei einem bestehenden Zeiterfassungsterminal
Um bei einem bestehenden Zeiterfassungsterminal die Einschränkung auf einen Standort aufzuheben,
deaktivieren Sie das Zeiterfassungsterminal und aktivieren es danach wieder - bei der Aktivierung bekommen Sie die Auswahl des Standortes angeboten.
So
deaktivieren Sie das Zeiterfassungsterminal.
Standort eingrenzen oder ändern bei einem bestehenden Zeiterfassungsterminal
Um bei einem bestehenden Zeiterfassungsterminal nachträglich einen Standort festzulegen oder den bestehenden Standort zu ändern,
deaktivieren Sie das Zeiterfassungsterminal und aktivieren es danach wieder - bei der Aktivierung bekommen Sie die Auswahl des Standortes angeboten.
Voraussetzung: Standorte eingestelltDie Auswahl zur Einschränkung nach Standort wird Ihnen beim Aktivieren des Zeiterfassungsterminals nur angezeigt, wenn Sie mindestens einen Standort erstellt haben. Lesen Sie hier, wie Sie
Standorte erstellen oder ändern.
Mitarbeiter pendeln zwischen StandortenWenn Sie Mitarbeiter haben, die nicht immer am gleichen Standort eingesetzt werden, sondern (manchmal) zwischen den Standorten pendeln, dann ist die Einschränkung auf den Standort möglicherweise unerwünscht: der Mitarbeiter könnte sich nur am Zeiterfassungsterminal in seinem "Heimatstandort" einstempeln, nicht am Zeiterfassungsterminal des anderen Standortes. In diesem Fall sollten Sie vielleicht doch an beiden Standorten alle Mitarbeiter anzeigen.
Alternativ erlauben Sie dem Mitarbeiter, auch über die
Stempeluhr im Nutzerkonto zu stempeln. Wenn Sie eingestellt haben, dass bestimmte Nutzer
nur am Zeiterfassungsterminal stempeln dürfen, entfernen Sie für den pendelnden Mitarbeiter auch diese Einschränkung.
Screenshot: Zeiterfassungsterminal auf Standort einschränken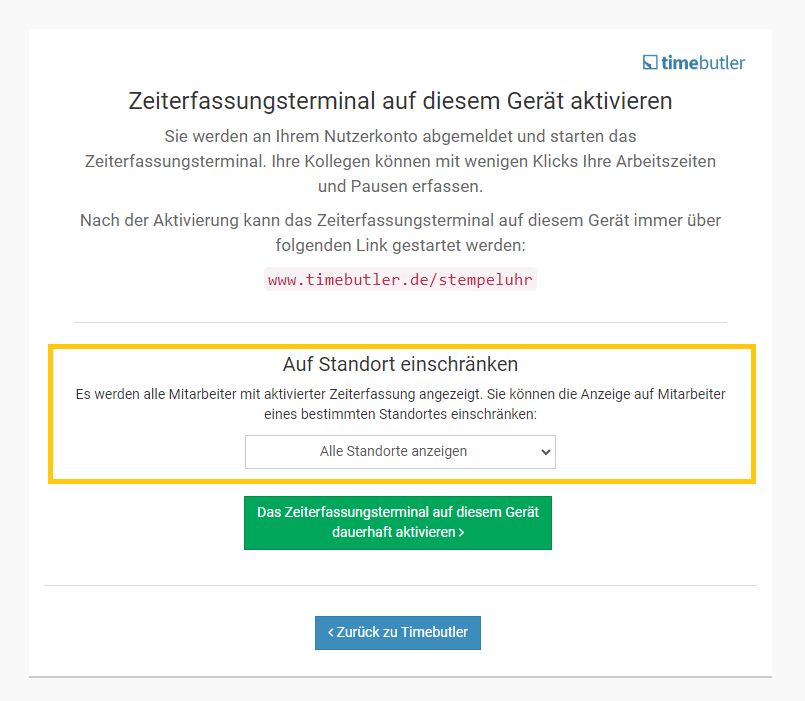
Zeiterfassungsterminal deaktivieren
Wenn das Zeiterfassungsterminal auf einem Tablet aktiviert wurde, dann ist es dort dauerhaft aktiviert. Das Zeiterfassungsterminal kann manuell wieder deaktiviert werden.
Zeiterfassungsterminal auf einem bestimmten Tablet deaktivieren
Um das Zeiterfassungsterminal auf einem bestimmten Tablet zu deaktivieren, öffnen Sie auf dem Tablet einen Internetbrowser und rufen "www.timebutler.de" auf. Melden Sie sich als Admin am Timebutler an. Klicken Sie links unten auf "Einstellungen > Weitere..", dann rechts auf "Zeiterfassungsterminal" (nicht auf "Zeiterfassung"). Hier finden Sie einen Kasten mit der Überschrift "Zeiterfassungsterminal auf diesem Gerät" und darin klicken Sie auf den Link "Auf diesem Gerät deaktivieren"Alle Zeiterfassungsterminals deaktivieren
Um alle Zeiterfassungsterminals zu deaktivieren, melden Sie sich an einem beliebigen PC, Laptop, Tablet oder Smartphone als Admin am Timebutler an, klicken links unten auf "Einstellungen > Weitere..", dann rechts auf "Zeiterfassungsterminal" (nicht auf "Zeiterfassung"). Klicken Sie auf der Seite unten auf den Link "Auf allen Geräten deaktivieren"
Nur das Zeiterfassungsterminal erlauben
Sie können festlegen, dass Mitarbeiter nur am
Zeiterfassungsterminal die Stempeluhr starten dürfen (und wenn gewünscht auch nur dort stoppen und pausieren dürfen).
Ebenso können Sie festlegen, dass bestimmte Mitarbeiter dennoch die Stempeluhr auch im persönlichen Nutzerkonto starten/stoppen dürfen, nicht bloß am Zeiterfassungsterminal. Das ist beispielsweise notwendig für Mitarbeiter, die im Homeoffice oder im Außendienst arbeiten und an manchen Tagen keinen Zugang zum Zeiterfassungsterminal haben.
Mit der Einschränkung auf das Zeiterfassungsterminal können Sie sicherstellen, dass bestimmte Mitarbeiter die Arbeitszeiten nur stempeln können, wenn sie sich vor Ort im Büro bzw. im Unternehmen befinden. Mitarbeiter im Homeoffice oder Außendienst können hingegen auch zu Hause oder unterwegs über das Smartphone oder einen Laptop/PC die Stempeluhr bedienen .
Einschränkung auf das Zeiterfassungsterminal aktivieren
Wenn manche Mitarbeiter von der Pflicht, das Zeiterfassungsterminal zu verwenden, ausgenommen werden sollen, dann erstellen Sie zunächst eine Nutzergruppe, wie folgt:
Melden Sie sich als Admin am Timebutler an und klicken links unten auf "
Einstellungen > Nutzergruppe". Klicken Sie auf den Button "
Neue Nutzergruppe erstellen" und erstellen dann eine neue
gemeinsame Nutzergruppe mit dem Namen "
Stempeluhr erlaubt" (oder ähnlich). Fügen Sie dabei dieser neuen Nutzergruppe alle Mitarbeiter hinzu, die
nicht nur über das Zeiterfassungsterminal stempeln sollen, sondern auch über die virtuelle Stempeluhr stempeln sollen.
Klicken Sie dann links unten auf "
Einstellungen > Weitere..", dann rechts auf "
Zeiterfassung", dann auf den Reiter "
Zeiterfassungsterminal". Aktivieren Sie die Option "
Start nur im Zeiterfassungsterminal". Daraufhin erscheinen die Optionen, um auch das Stoppen und das Pausieren nur im Zeiterfassungsterminal zu erlauben. Stellen Sie diese zwei Optionen nach Ihren Wünschen ein.
Ebenso erscheint die Option "
Ausnahme für Start und Ende im Zeiterfassungsterminal". Hier wählen Sie die vorhin erstellte Nutzergruppe "
Stempeluhr erlaubt" aus (falls gewünscht).
Klicken Sie unten auf den Button "
Speichern".
Damit die Mitarbeiter die Stempeluhr in eigenen Nutzerkonto verwenden können, muss die Stempeluhr aktiviert sein. Klicken Sie dazu als Admin im Timebutler links unten auf "
Einstellungen > Weitere..", dann rechts auf "
Zeiterfassung". Stellen Sie sicher, dass die Option "
Stempeluhr" aktiviert ist. Wenn nötig, speichern Sie die Änderung per Klick auf den blauen Button "
Speichern" am Ende der Seite.
Stempeluhr wird immer angezeigt
Die Stempeluhr im Nutzerkonto ist immer für alle Nutzer mit aktivierter Zeiterfassung sichtbar, auch für Nutzer, die nur das Zeiterfassungsterminal zum Starten / Stoppen / Pausieren verwenden dürfen. Wenn ein Nutzer, der nur am Zeiterfassungsterminal stempeln darf, versucht die Stempeluhr im Nutzerkonto zu starten/stoppen/pausieren, dann bekommt er eine entsprechende Fehlermeldung angezeigt und wird auf das Zeiterfassungsterminal verwiesen.
Tipp zu zukünftigen Nutzerkonten:
Sollten Sie die neu erstellte Nutzergruppe nicht zur Auswahl angezeigt bekommen, dann weil Sie die Nutzergruppe als persönliche Nutzergruppe gespeichert haben, nicht als gemeinsame Nutzergruppe. Gehen Sie dann nochmal in die Bearbeitungsmaske für die Nutzergruppen (links unten auf "Einstellungen > Nutzergruppen"), bearbeiten die Nutzergruppe und ändern diese auf "Gemeinsame Nutzergruppe".
Screenshot zur Einstellung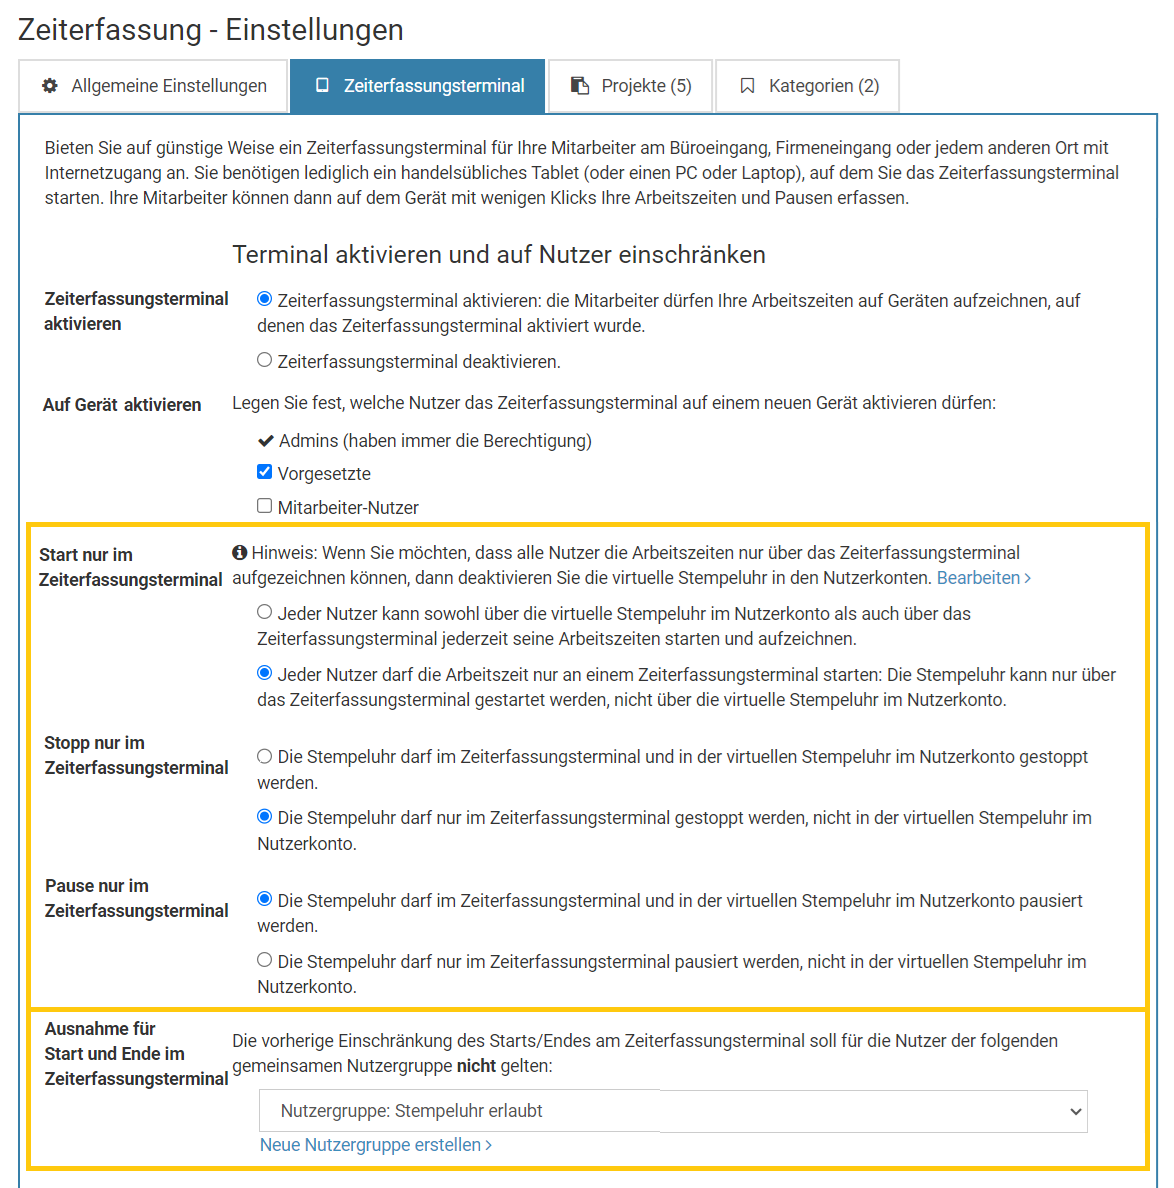
Hardware Zeiterfassungsterminals anbinden
Wenn Sie bereits Geräte zur Zeiterfassung im Einsatz haben oder ein Zeiterfassungsterminal anschaffen wollen, dann haben Sie folgende Möglichkeiten:
Zeiterfassungsgerät bei einem Timebutler kompatiblen Anbieter erwerben
Es gibt Anbieter von Zeiterfassungsgeräten, die Ihre Geräte für Zusammenarbeit mit Timebutler angepasst haben. Sie können sich ein unverbindliches Angebot für die Geräte zusenden lassen. Die Geräte sind in wenigen Minuten eingerichtet und voll im Timebutler integriert. Es werden verschiedene Geräte mit RFID-Chip, Pin-Eingabe, Chipkarten und vieles mehr angeboten.
Gerne teilen wir Ihnen
auf Anfrage mit, von welchen Anbietern Sie passende Angebote einholen können.
Zeiterfassungsgeräte eines Drittanbieters anbinden
Timebutler bietet eine offene
Schnittstelle zum Import von Arbeitszeiteinträgen an. Die Hersteller von Zeiterfassungsgeräten können die Arbeitszeitdaten automatisch an die Timebutler Schnittstelle senden und sogar in Echtzeit die Stempeluhr im Timebutler synchron steuern. Die Hersteller müssen jedoch das Gerät so anpassen, dass es die Daten an die Timebutler Schnittstelle sendet.
Um das Gerät an Timebutler anzubinden, muss es in der Lage sein, sogenannte HTTP-Requests abzusetzen. Ob das von Ihnen gewünschte Gerät diese Möglichkeit bietet, erfragen Sie bitte bei dem Hersteller Ihres Zeiterfassungsgeräts. Damit der Hersteller die Anfrage besser bearbeiten kann:
Unsere Schnittstelle stellt zwei verschiedene Möglichkeiten der Anbindung bereit. Die Informationen dazu findet der Hersteller im Endpunkt "timeclock" und im Endpunkt "timeimportbyevents" in unserer Dokumentation:
www.timebutler.de/go/api-dokumentationTimebutler Zeiterfassungsterminal
Statt eine hardwarebasierte Zeiterfassung eines Drittanbieters einzusetzen, können Sie auch das Zeiterfassungsterminal verwenden, das im Timebutler integriert ist.
Sie können das Zeiterfassungsterminal auf einem handelsüblichen Tablet aktivieren. Das Tablet stellen Sie am Büro- oder Firmeneingang bereit (es gibt professionelle Halterungen für Tablets) und jeder Mitarbeiter kann dann morgens am Zeiterfassungsterminal seine Zeiten stempeln, mit wenigen Klicks. Sie erhalten also ein vollwertiges Zeiterfassungsterminal für den günstigen Preis eines Tablets - und haben die Zeiten automatisch direkt im Timebutler integriert.
Das Zeiterfassungsterminal ist kostenlos in der Timebutler Flatrate beinhaltet. Sie können es also ganz ohne Mehrkosten aktivieren. Sie finden hier
weitere Informationen zum Zeiterfassungsterminal.
Weitere Informationen erhalten Sie, wenn Sie sich als Admin am Timebutler anmelden, dann links unten auf "
Einstellungen > Weitere.." klicken, dann rechts auf "
Zeiterfassung" und dann auf der Seite auf den Reiter "
Zeiterfassungsterminal".
PIN für das Zeiterfassungsterminal abrufen
Wenn Sie das
Zeiterfassungsterminal auf einem Tablet für Ihre Mitarbeiter bereitstellen, dann können die Mitarbeiter bequem Ihre Arbeitszeiten erfassen. Für die Anmeldung am Zeiterfassungsterminal muss der Mitarbeiter seine 4-stellige PIN eingeben.
Wo findet der Mitarbeiter die PIN?
Die PIN kann jeder Mitarbeiter abrufen, indem er sich an seinem Nutzerkonto im Timebutler anmeldet und anschließend links unten auf "
Einstellungen" > "
Sicherheit" klickt.
Beachten Sie bitte: die PIN wird wird nur angezeigt, wenn die Zeiterfassung für den Mitarbeiter aktiviert ist.

Ändern der PIN
Jeder Nutzer kann seine eigene Wunsch PIN festlegen. Dazu ruft er die Seite für die Anzeige der PIN gemäß dem Kapitel oben auf und klickt dort auf den Button "
Pin ändern".
Auch hier gilt: die PIN wird wird nur angezeigt, wenn die Zeiterfassung für den Mitarbeiter aktiviert ist.
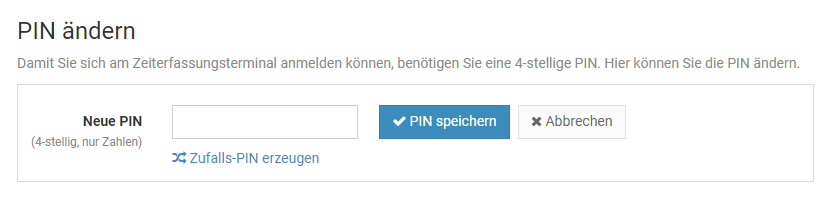
Regeln für die PIN
Ein Admin kann einstellen, dass bestimmte Regeln für die PIN gelten sollen, damit die Mitarbeiter nicht beispielsweise eine einfache Zahlenfolge als PIN festlegen können. Die Einstellung können Sie ändern, indem Sie sich als Admin am Timebutler anmelden, dann links unten auf "Einstellungen" klicken, dann darunter auf "Weitere..", dann rechts auf "Globale Einstellungen". Hier finden Sie die Option "Regeln für die PIN am Zeiterfassungsterminal"
Mitarbeiter ohne E-Mail-Adresse
Um die PIN abzurufen, muss sich der Mitarbeiter an seinem Timebutler Nutzerkonto anmelden. Dazu benötigt er die Zugangsdaten, die er zu Beginn per E-Mail erhalten hat. Für manche Mitarbeiter wurde keine E-Mail-Adresse im Nutzerkonto hinterlegt und diese können sich nicht am Nutzerkonto anmelden. Lesen Sie hier, wie Sie bei
Mitarbeitern ohne E-Mail-Adresse vorgehen.
Eingaberechte für Mitarbeiter
Für Mitarbeiter kann die Eingabe von Arbeitszeiteinträgen über das
Eingabeformular eingeschränkt werden, so dass nur das Aufzeichnen über die Stempeluhr im Nutzerkonto oder über das
Zeiterfassungsterminal möglich ist.
Weiterhin besteht auch die Möglichkeit, Änderungen an Arbeitszeiteinträgen genehmigungspflichtig zu machen oder die Eingabe zeitlich einzuschränken beispielsweise mit dem
Start frühstestens ab einer bestimmten Uhrzeit oder die Eingabe in der Vergangenheit zeitlich einzuschränken. Sie können auch festlegen, dass bestimmte Mitarbeiter
nur am Zeiterfassungsterminal die Stempeluhr starten dürfen (und wenn gewünscht auch nur dort stoppen dürfen).
Lesen Sie hier, wie Sie die
Einstellungen zu den Eingaberechten für Mitarbeiter ändern.
Einstellungen zum Zeiterfassungsterminal
Einstellungen zum Zeiterfassungsterminal
Die Einstellungen für das
Zeiterfassungsterminal rufen Sie auf, indem Sie sich als Admin am Timebutler anmelden, dann links unten auf "
Einstellungen > Weitere.." klicken, dann rechts auf "
Zeiterfassung", anschließend auf den Reiter "
Zeiterfassungsterminal".
Aktivierung und Status
Eine Übersicht über den Aktivierungsstatus und die Möglichkeit, das Zeiterfassungsterminal auf allen Geräten zu deaktivieren, erhalten Sie, indem Sie sich als Admin am Timebutler anmelden, dann links unten auf "
Einstellungen > Weitere.." klicken, dann rechts auf "
Zeiterfassungsterminal".
Einstellungen zur Zeiterfassung
Die Zeiterfassung bietet umfangreiche Einstellungsmöglichkeiten, um sie an die Bedürfnisse in Ihrem Unternehmen optimal anzupassen.
Einstellungen bearbeiten
Die Einstellungen für die Zeiterfassung rufen Sie auf, indem Sie sich als Admin am Timebutler anmelden, dann links unten auf "
Einstellungen > Weitere.." klicken, dann rechts auf "
Zeiterfassung".
Ausgewählte Einstellungen
Eingabe über das Eingabeformular erlauben
Sie können einstellen, dass die Mitarbeiter die Arbeitszeiten nur über die virtuelle Stempeluhr oder das Zeiterfassungsterminal aufzeichnen dürfen und nicht über das Eingabeformular direkt eingeben dürfen. Dazu entfernen Sie bei der Option "
Einträge eingeben" die Häkchen bei "
Vorgesetzter" und/oder "
Mitarbeiter".
Die Stempeluhr aktivieren Sie über die Option "
Stempeluhr".
Änderungen an Arbeitszeiteinträgen genehmigungspflichtig
Sie können festlegen ob neue Arbeitszeiteinträge, die über das Eingabeformular eingegeben werden, vom Vorgesetzten genehmigt werden müssen. Dazu finden Sie die Option "
Eigene Einträge eingeben".
Mit Hilfe der Optionen "
Eigene Einträge bearbeiten" und "
Eigene Einträge löschen" können Sie einstellen, ob Mitarbeiter-Nutzer die Arbeitszeiteinträge selbständig ändern oder löschen dürfen, oder ob zunächst ein Änderungs-/Storno-Antrag an den Vorgesetzten verschickt wird und der Vorgesetzte die Änderung zunächst genehmigen muss.
Mit der nächsten Option "
Fremde Einträge bearbeiten" können Sie weiterhin einstellen, ob die Genehmigung durch den Vorgesetzten oder durch einen Admin erfolgen soll.
Benachrichtigung bei AnträgenWenn Sie einstellen, dass nur Admins die Änderungsanträge genehmigen, dann verschickt Timebutler die Email mit der Benachrichtigung über einen neuen Antrag wie folgt:
- wenn der Vorgesetzte des Mitarbeiters ein Admin-Nutzerkonto hat, dann wird die Email nur an diesen Admin verschickt
- wenn der Vorgesetzte des Mitarbeiters nicht ein Admin-Nutzerkonto hat (sondern ein Vorgesetzten-Nutzerkonto), dann wird die Email an alle Admins verschickt. Jeder der Admins kann die Genehmigung erteilen.
Zeitliche Einschränkungen
Es gibt verschiedene Optionen, mit denen Sie die Eingabe von Arbeitszeiten zeitlich einschränken können. Prüfen Sie die Optionen "
Eingabe in der Zukunft", "
Eingabe in der Vergangenheit", "
Früheste Start-Uhrzeit" und auch "
Arbeitszeiten-Sperre für Vormonate".
Projekte
Für die Zeiterfassung können beliebige Projekte erstellt werden. Die Mitarbeiter können dann die Arbeitszeiten auf die Projekte buchen. Am Monatsende, Quartalsende oder auch jederzeit können die Arbeitszeiten nach Projekt ausgewertet und gruppiert werden.
Projekte bearbeiten
Um die Liste der Projekte zu bearbeiten, meldet sich ein Admin am Timebutler an, klickt links unten auf "
Einstellungen > Weitere..", dann rechts auf "
Zeiterfassung", anschließend auf den Reiter "
Projekte".
Bearbeiten der Kategorien durch Vorgesetzte
In den
Einstellungen für die Zeiterfassung gibt es die Option "
Projekte und Kategorien", mit der ein Admin festlegen kann, ob nur Admins oder sowohl Admins als auch Vorgesetzte die Liste der Projekte und Kategorien bearbeiten dürfen.
Projekt Pflichtangabe
In den
Einstellungen für die Zeiterfassung gibt es die Option "
Projekt Pflichtangabe" mit der festgelegt wird, ob bei Eingabe von Arbeitszeiteinträgen immer ein Projekt gewählt werden muss.
Projekte zu Mitarbeitern zuordnen
Die Projekte können absichtlich
nicht auf bestimmte Mitarbeiter oder Abteilungen eingegrenzt oder zugeordnet werden. Stattdessen kann jeder Mitarbeiter selbst seine Projektfavoriten wählen, sodass er seine Arbeitszeit schnell und bequem auf das richtige Projekt buchen kann. Erfahren Sie hier mehr zu den
Projektfavoriten.
Projekte über die Schnittstelle pflegen
Die Projekte können auch automatisiert über die
Timebutler Schnittstelle (API) abgerufen und geändert werden.
Screenshot: Projekt bearbeiten
Kategorien
Für die Zeiterfassung können beliebige Kategorien erstellt werden. Die Mitarbeiter können dann die Arbeitszeiten auf die Kategorien buchen. Am Monatsende, Quartalsende oder auch jederzeit können die Arbeitszeiten nach Kategorie ausgewertet und gruppiert werden.
Kategorien bearbeiten
Um die Liste der Kategorien zu bearbeiten, meldet sich ein Admin am Timebutler an, klickt links unten auf "
Einstellungen > Weitere..", dann rechts auf "
Zeiterfassung", anschließend auf den Reiter "
Kategorien".
Bearbeiten der Kategorien durch Vorgesetzte
In den
Einstellungen für die Zeiterfassung gibt es die Option "
Projekte und Kategorien", mit der ein Admin festlegen kann, ob nur Admins oder sowohl Admins als auch Vorgesetzte die Liste der Projekte und Kategorien bearbeiten dürfen.
Kategorie Pflichtangabe
In den
Einstellungen für die Zeiterfassung gibt es die Option "
Kategorie Pflichtangabe" mit der festgelegt wird, ob bei Eingabe von Arbeitszeiteinträgen immer eine Kategorie gewählt werden muss.
Kategorien über die Schnittstelle pflegen
Die Kategorien können auch automatisiert über die
Timebutler Schnittstelle (API) abgerufen und geändert werden.
Screenshot: Kategorien bearbeiten
Auswerten und Herunterladen der Arbeitszeiten
Arbeitszeiteinträge und Abwesenheiten tageweise herunterladen
Im Auslastungsbericht mit der Listenansicht auf Tagesbasis bekommen Sie für jeden Kalendertag die Arbeitszeit, Pausen, Soll-Arbeitszeit, Abwesenheiten und weitere Informationen angezeigt. Die Informationen können Sie dort mit einem Mausklick herunterladen.
Lesen Sie hier
mehr zum Auslastungsbericht.
Arbeitszeiteinträge herunterladen
Admins und Vorgesetzte können die Arbeitszeiteinträge als Excel- oder CSV-Datei herunterladen.
Über die ListenansichtMelden Sie sich am Timebutler an und klicken links oben auf "
Mitarbeiter > Zeiterfassung > Listenansicht". Die Ansicht können Sie wenn gewünscht über den grünen Button "
Filter anzeigen" rechts oben filtern, wenn gewünscht. Klicken Sie dann auf den Button "
Herunterladen".
Siehe Screenshot unten.
Über das DownloadcenterLesen Sie hier, wie Sie
Arbeitszeiteinträge über das Downloadcenter herunterladenindem Sie die Listenansicht der Arbeitszeiteinträge aufrufen und oberhalb der Liste auf
Arbeitszeitkonten herunterladen
Im Arbeitszeitkonto können Sie sich die Arbeitszeit im Zeitraum oder das Überstundenguthaben zum Stichtag anzeigen lassen. Dort gibt es auch einen Button "
Herunterladen", um die Informationen als Excel-Datei herunterzuladen.
Lesen Sie hier mehr zum Arbeitszeitkonto in den Ausprägungen
Arbeitszeit im Zeitraum und
Überstundenguthaben zum Stichtag.
Pausen Start- und Ende-Uhrzeit einsehen und herunterladen
Sofern die Aufzeichnung der Pausenzeiten aktiviert wurde, werden die detaillierten Pausen-Uhrzeiten für einen Arbeitszeiteintrag in der
Bearbeitungshistorie des Arbeitszeiteintrags angezeigt. Sie können auch die
Pausen-Uhrzeiten für mehrere Arbeitszeiteinträge abrufen.
Screenshot: Listenansicht der Arbeitszeiteinträge
Bearbeitungshistorie der Arbeitszeiteinträge
In der Detailansicht zu einem Arbeitszeiteintrag wird unter "
Bearbeitungshistorie" angezeigt, welcher Nutzer den Eintrag zu welchem Zeitpunkt eingegeben, geändert, genehmigt, abgelehnt, usw. hat. Die Detailansicht zu einem Arbeitszeiteintrag können Sie wie folgt aufrufen:
Mitarbeiter-Nutzer
Melden Sie sich an Ihrem Nutzerkonto im Timebutler an und klicken links auf "
Zeiterfassung > Listenansicht". Klicken Sie bei dem gewünschten Eintrag auf das blaue Symbol mit der Lupe, um zu der Detailansicht zu gelangen.
Vorgesetzter und Admin
Melden Sie sich an Ihrem Nutzerkonto im Timebutler an und klicken links oben auf "
Mitarbeiter > Zeiterfassung > Listenansicht". Klicken Sie bei dem gewünschten Eintrag auf das blaue Symbol mit der Lupe, um zu der Detailansicht zu gelangen.
Sonderfall gelöschte Einträge
Gelöschte Arbeitszeiteinträge werden in der Listenansicht nicht angezeigt. Timebutler führt aber auch Protokoll über die gelöschten Arbitszeiteinträge und zeichnet auf, wer den Eintrag zu welchem Zeitpunkt gelöscht hat.
Lesen Sie hier, wie Sie
gelöschte Arbeitszeiteinträge einsehen.
Pausen Start- und Ende-Uhrzeit einsehen und herunterladen
Sofern die Aufzeichnung der Pausenzeiten aktiviert wurde, werden die detaillierten Pausen-Uhrzeiten für einen Arbeitszeiteintrag ebenfalls in der Änderungshistorie in der Detailansicht zu dem Arbeitszeiteintrag angezeigt.
Es ist aber auch möglich, die Informationen für mehrere Arbeitszeiteinträge abzurufen und herunterzuladen. Lesen Sie hier, wie Sie die
Pausen-Uhrzeiten für mehrere Arbeitszeiteinträge abrufen können.
Unterscheidung der Eingabeart
Aus der Bearbeitungshistorie ergibt sich auch die Information, welche Eingabeart für die Eingabe oder Aufzeichnung des Arbeitszeiteintrages gewählt wurde, beispielsweise die Stempeluhr im Nutzerkonto oder das Eingabeformular. Lesen Sie hier mehr zur
Historie der Eingabeart der Arbeitszeiteinträge.
Bearbeitungshistorie der ZeitsaldenÄnderungen an den Zeitsalden (Arbeitszeitsaldo zum Start der Zeiterfassung, Übertragung von Überstundensalden ins nächste Jahr) werden ebenfalls protokolliert in der
Bearbeitungshistorie der Anspruchdaten.

Historie der Eingabeart von Arbeitszeiteinträgen
Für jeden Arbeitszeiteintrag wird eine detaillierte
Bearbeitungshistorie aufgezeichnet. Damit lässt sich im Nachhinein ermitteln, wer den Eintrag eingegeben oder bearbeitet hat oder von wem der
Arbeitszeiteintrag gelöscht wurde.
Die Bearbeitungshistorie gibt auch Auskunft darüber, wie der Arbeitszeiteintrag eingegeben oder aufgezeichnet wurde, wie folgt:
Über das Eingabeformular
Wenn in der Bearbeitungshistorie "
Über das Eingabeformular eingegeben von [...]" angegeben ist, dann wurde der Arbeitszeiteintrag
über das Eingabeformular eingegeben.
Über die Stempeluhr aufgezeichnet
Folgende Übersicht zeigt, wie ein Arbeitszeiteintrag eingegeben wurde gemäß der Angabe in der Bearbeitungshistorie:
Gültig für Einträge in der Bearbeitungshistorie bis zum 21.7.2023:"
Aufgezeichnet von": Aufzeichnung über die
Stempeluhr im Nutzerkonto, das
Zeiterfassungsterminal,
automatisiert gestartet/gestoppt oder per
Schnittstelle (API) aufgezeichnet. Eine Unterscheidung nach der genauen Eingabeart ist nicht möglich.
Gültig für Einträge in der Bearbeitungshistorie ab dem 22.7.2023:"
Mit der Stempeluhr im Nutzerkonto gestartet / gestoppt": Aufzeichnung über die
Stempeluhr im Nutzerkonto"
Im Zeiterfassungsterminal gestartet / gestoppt": Aufzeichnung über das
Zeiterfassungsterminal"
Automatisiert gestartet / gestoppt": Aufzeichnung um Mitternacht von Timebutler
automatisch ausgeführt"
Per Schnittstelle gestartet / gestoppt": Über die
Schnittstelle (API) von einem Drittsystem gesteuert
Screenshot: Bearbeitungshistorie eines Arbeitszeiteintrages
Früheste Startuhrzeit bei der Zeiterfassung
Ein Admin kann die früheste Startuhrzeit bei der Zeiterfassung einstellen.
Früheste Startuhrzeit einstellen
Melden Sie sich als Admin am Timebutler an und klicken links unten auf "
Einstellungen > Weitere..", dann rechts auf "
Zeiterfassung". Nehmen Sie die Einstellung an der Option "
Früheste Start-Uhrzeit" vor und klicken unten auf den blauen Button "
Speichern".
Früheste Startuhrzeit für Mitarbeiter individuell einstellen
Mit der oben genannten Einstellung legen Sie die früheste Startuhrzeit fest, die für alle Mitarbeiter gelten soll. Dennoch können Sie die Einstellungen zur frühesten Startuhrzeit für Mitarbeiter individuell einstellen. Melden Sie sich dazu als Admin am Timebutler an und klicken links oben auf "
Mitarbeiter > Mitarbeiter > Übersicht". Bei dem gewünschten Mitarbeiter klicken Sie auf den grünen Button mit dem Bleistift (=Bearbeiten). Stellen Sie die Option "
Früheste Start-Uhrzeit (Zeiterfassung)" ein und klicken unten auf den blauen Button "
Speichern".
Auswirkung der frühesten Startuhrzeit bei der Zeiterfassung
Eingabe von ArbeitszeiteinträgenDie Mitarbeiter können über das Eingabeformular für neue Arbeitszeiteinträge keine Arbeitszeit mehr eingeben, die eine Start-Uhrzeit vor der frühesten Startuhrzeit hat.
StempeluhrWenn ein Mitarbeiter vor der frühesten Startuhrzeit die Stempeluhr startet, dann bekommt er angezeigt, dass der Start der Stempeluhr vorgemerkt ist. Es erscheint ein Countdown, so dass der Mitarbeiter informiert ist, ab wann die Stempeluhr starten wird. Pünktlich zu der früheste Startuhrzeit wird die Stempeluhr dann automatisch gestartet.
Wenn ein Mitarbeiter also vor der frühesten Startuhrzeit eintrifft, dann kann er sich bereits einstempeln und braucht später, zu der Startuhrzeit nicht erneut die Stempeluhr aufrufen.
In der Stempeluhr wird dem Mitarbeiter angezeigt, wann die Stempeluhr automatisch starten wird:
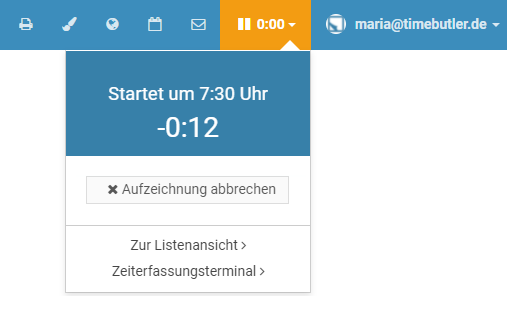
Übergehen der Einschränkung zur frühesten Startuhrzeit erlauben
Admins können Arbeitszeiteinträge eingeben, die gegen die früheste Startuhrzeit verstoßen, werden aber zuvor darüber informiert.
Für Mitarbeiter-Nutzer und Vorgesetzte kann eingestellt werden, dass diese unter bestimmten Bedingungen auch die Einschränkung zur frühesten Startuhrzeit übergehen dürfen. Melden Sie sich dazu als Admin am Timebutler an und klicken links unten auf "
Einstellungen > Weitere..", dann rechts auf "
Zeiterfassung". Nehmen Sie die Einstellung an der Option "
Früheste Start-Uhrzeit übergehen" vor und klicken unten auf den blauen Button "
Speichern".
Auswirkung der frühesten Startuhrzeit auf bestehende Arbeitszeiteinträge
Eine Änderung der frühesten Startuhrzeit wirkt sich
nicht auf bestehende Arbeitszeiteinträge aus. Die bestehenden Arbeitszeiteinträge bleiben also unabhängig von der Änderung der frühesten Startuhrzeit gleich und werden nicht geändert.
Wenn Sie die früheste Startuhrzeit ändern, dann wirkt sich diese Änderung also nur auf Arbeitszeiteinträge aus, die
nach dem Zeitpunkt der Änderung eingegeben oder aufgezeichnet werden.
Kernarbeitszeit und späteste Ende-Uhrzeit
Es ist nicht notwendig oder möglich, im Timebutler die Kernarbeitszeit der Mitarbeiter einzutragen.
Stattdessen können Sie die
früheste Startuhrzeit für die Zeiterfassung einstellen, sowohl für alle Mitarbeiter also auch individuell je Mitarbeiter.
Eine späteste Ende-Uhrzeit kann hingegen nicht festgelegt werden, da erfahrungsgemäß eine solche Einschränkung in der Praxis häufig zu Problemen führt. Wenn ein späteste Ende-Uhrzeit gesetzt wäre und ein Mitarbeiter ausnahmsweise später am Arbeitsplatz eintrifft als üblich, dann bleibt ihm unter Umständen nicht ausreichend Zeit, um seine Soll-Arbeitszeit erfüllen zu können.
Überstundeninformationen ausblenden
Mit der Zeiterfassung führt Timebutler für jeden Mitarbeiter ein Arbeitszeitkonto und berechnet die Überstunden auf Basis der eingegebenen Arbeitszeiten, der Soll-Arbeitszeit, der individuellen Feiertage, den Einstellungen zur Rundung, Kappung von Überstunden und Rüstzeiten und weiteren Einstellungen.
In manchen Unternehmen ist es nicht erwünscht, dass der Mitarbeitende oder auch die Vorgesetzten oder Admins sich über die angesammelten Überstunden informieren können, beispielsweise weil im Unternehmen Vertrauensarbeitszeit vereinbart ist.
In diesem Fall haben Sie im Timebutler viele Möglichkeiten, die Anzeige der Überstunden individuell einzuschränken, wie folgt:
Kappen aller Überstunden einstellen
Sie können einstellen, dass alle Überstunden abgegolten sind. Dann wird Timebutler zwar weiterhin die Überstunden im Arbeitszeitkonto berechnen und ausweisen, zum Monatsanfang werden aber alle Überstunden gekappt und nicht in den nächsten Monat übertragen, ebenso Minusstunden.
Stellen Sie die Überstundenkappung auf die Option "
Alle Überstunden sind abgegolten, weder Überstunden noch Minusstunden in den nächsten Monat übertragen" ein. Lesen Sie hier, wie Sie die
Kappung von Überstunden aktivieren.
Anzeige von Arbeitszeitkonto, Überstundenkalender und Überstundenstand deaktivieren
Sie können für jeden Nutzertyp Admin, Vorgesetzter und Mitarbeiter-Nutzer einstellen, ob die Anzeige des
Arbeitszeitkontos, der
Kalenderansicht der Überstunden und der sekundenaktuelle Überstundenstand auf dem Dashboard angezeigt werden soll.
Melden Sie sich dazu als Admin am Timebutler an, klicken links unten auf "
Einstellungen", dann darunter auf "
Weitere..". Klicken Sie dann auf der Seite auf die Überschrift "
Zeiterfassung". Auf dieser Seite der Einstellungen zur Zeiterfassung finden Sie im unteren Bereich die Überschrift "
Anzeige von Informationen zu Überstunden". Hier können Sie die Sichtrechte auf die Überstundeninformationen individuell einstellen.
Eingabe von Überstundenabbau deaktivieren
Wenn die Überstunden nicht ausgewiesen werden sollen, dann sollte es auch nicht möglich sein, Überstundenabbau einzutragen. Sie können die Eintragung von Überstundenabbau für alle Nutzer vollständig deaktivieren. In den Einstellungen zur Zeiterfassung (siehe vorheriger Abschnitt auf dieser Seite) finden Sie dazu die Option "
Eingabe von Überstundenabbau".
Automatisch gestoppte Einträge im Arbeitszeitkonto
Um Mitternacht prüft Timebutler automatisch, ob es Stempeluhren gibt, bei denen der Mitarbeiter vergessen hat, diese zu stoppen. Diese Stempeluhren werden automatisch gestoppt und die Ende-Uhrzeit wird so gesetzt, dass sich die
Soll-Arbeitszeit des Wochentages und Mitarbeiters ergibt, unter Beachtung der
Pausenregelung des Mitarbeiters.
Lesen Sie hier alle Details zu
automatisch gestoppten Arbeitszeiteinträgen.
Der Arbeitszeiteintrag wird also mit der Soll-Arbeitszeit des Mitarbeiters gespeichert. Diese entspricht aber in nahezu jedem Fall nicht der tatsächlich geleisteten Arbeitszeit. Deswegen wird der Mitarbeiter aufgefordert, die Ende-Uhrzeit zu korrigieren (auch per E-Mail).
Ein Admin kann einstellen, ob dieser automatisch gestoppte Arbeitszeiteintrag sofort im Arbeitszeitkonto angerechnet werden soll oder ob der Eintrag erst dann im Arbeitszeitkonto angerechnet werden soll, wenn der Mitarbeiter die Ende-Uhrzeit korrigiert hat. Letztere Option hat den Vorteil, dass dem Mitarbeiter nicht sofort die Soll-Arbeitszeit angerechnet wird, bevor er die Ende-Uhrzeit bearbeitet hat - schließlich hat er wahrscheinlich nicht exakt die Soll-Arbeitszeit geleistet.
Einstellung zur Anrechnung im Arbeitszeitkonto
Die Einstellung können Sie wie folgt vornehmen: melden Sie sich als Admin an Ihrem Timebutler Nutzerkonto an, klicken links unten auf "
Einstellungen", dann darunter auf "
Weitere..". Klicken Sie rechts auf die Überschrift "
Zeiterfassung". Hier finden Sie die Einstellung "
Status beim automatischen Stoppen der Stempeluhr". Sie können eine der zwei Optionen wählen:
Option 1: Bei automatisch gestoppten Arbeitszeiteinträgen den Status auf "In Bearbeitung" setzen. Die Arbeitszeit wird erst angerechnet, wenn die Ende-Uhrzeit korrigiert wurde.
Wenn die Stempeluhr gestoppt wird und der Arbeitszeiteintrag gespeichert, dann wird der Status auf "In Bearbeitung" gesetzt. Der Arbeitszeiteintrag wird damit noch nicht in dem Arbeitszeitkonto eingerechnet.
Der Mitarbeiter kann den Arbeitszeiteintrag bearbeiten und die Ende-Uhrzeit korrigieren. Erst danach wird der Arbeitszeiteintrag im Arbeitszeitkonto eingerechnet
Beispiel:Ein Mitarbeiter startet die Stempeluhr um 9:00 Uhr und vergisst diese zu stoppen. Um Mitternacht wird die Stempeluhr automatisch gestoppt. Die Soll-Arbeitszeit für den Mitarbeiter beträgt 8 h und die Mindestpause bei der Arbeitszeit beträgt 30 Minuten. Der Arbeitszeiteintrag wird dann mit einer Ende-Uhrzeit 17:30 Uhr und 30 Minuten Pausen gespeichert, somit also mit 8 h Arbeitszeit. Da der Status auf "In Bearbeitung" gesetzt wird, werden die 8 h Arbeitszeit noch nicht im Arbeitszeitkonto berücksichtigt.
Wenn der Mitarbeiter die Ende-Uhrzeit später korrigiert, wird der Status auf "Bearbeitung abgeschlossen" geändert (falls die Änderung genehmigungspflichtig ist, wird der Status zunächst auf "Beantragt" geändert) und dann wird die neue Arbeitszeit angerechnet.
Option 2: Bei automatisch gestoppten Arbeitszeiteinträgen die Arbeitszeit sofort anwenden, noch bevor der Mitarbeiter die Ende-Uhrzeit korrigiert hat.
Wenn die Stempeluhr gestoppt wird und der Arbeitszeiteintrag gespeichert, dann wird der Status auf "Bearbeitung abgeschlossen" gesetzt. Der Arbeitszeiteintrag wird sofort im Arbeitszeitkonto eingerechnet.
Beispiel:Ein Mitarbeiter startet die Stempeluhr um 9:00 Uhr und vergisst diese zu stoppen. Um Mitternacht wird die Stempeluhr automatisch gestoppt. Die Soll-Arbeitszeit für den Mitarbeiter beträgt 8 h und die Mindestpause bei der Arbeitszeit beträgt 30 Minuten. Der Arbeitszeiteintrag wird dann mit einer Ende-Uhrzeit 17:30 Uhr und 30 Minuten Pausen gespeichert, somit also mit 8 h Arbeitszeit. Diese 8 h Arbeitszeit werden sofort im Arbeitszeitkonto berücksichtigt.
Wenn der Mitarbeiter die Ende-Uhrzeit später korrigiert, wird die neue Arbeitszeit angerechnet (falls die Änderung genehmigungspflichtig ist, wird der Status zunächst auf "Beantragt" geändert).
Hinweis:Sie können einstellen, dass Änderungen an bestehenden Arbeitszeiteinträgen vom Vorgesetzten genehmigt werden müssen. Die Option finden Sie in den
Einstellungen zur Zeiterfassung.
Einstellung sollte bei automatischer Aufzeichnung nicht aktiviert werdenWenn Sie die Arbeitszeiteinträge automatisiert aufzeichnen lassen möchten, dann sollten Sie die hier genannte Option deaktivieren: die automatisch gestoppten Abreitszeiteinträge sollten dann sofort im Arbeitszeitkonto eingerechnet werden, da ja nicht erwartet wird, dass der Mitarbeiter die Ende-Uhrzeit bearbeitet.
Lesen Sie hier alle Details zum
automatisierten Erstellen der Arbeitszeiten
Mitarbeiter mit sehr hohem Minusstand im Arbeitszeitkonto
Wenn Sie das Arbeitszeitkonto in der Ansicht
Überstundenguthaben zum Stichtag aufrufen und dort für einen oder mehrere Mitarbeiter in der Spalte "
Überstundenguthaben am tt.mm.jjjj" eine sehr hohe, negative Zahl angezeigt wird, dann kann das folgende Ursachen haben:
Startdatum der Zeiterfassung nicht eingestellt
Ein Admin kann das Startdatum der Zeiterfassung einstellen. Wenn das nicht geschehen ist, dann kann es zu einem hohen negativen Überstundenstand kommen. Wenn Sie beispielsweise am 1. Mai mit der Zeiterfassung beginnen, aber kein Startdatum der Zeiterfassung eingetragen haben, dann erwartet Timebutler, dass für alle Tage von Januar bis April die Arbeitszeiten erfasst wurden. Da aber kein Mitarbeiter Arbeitszeiten vor dem 1. Mai eingetragen hat, ergeben sich sehr viele Minusstunden.
Um das Startdatum der Zeiterfassung zu prüfen oder einzustellen, melden Sie sich mit einem Admin am Timebutler an und klicken links unten auf "
Einstellungen > Weitere..", dann rechts auf "
Zeiterfassung". Ändern Sie die Option "
Start der Zeiterfassung" und klicken dann unten auf der Seite auf den blauen Button "
Speichern". Timebutler berechnet das Arbeitszeitkonto sofort neu.
Startdatum bei einem neuen Mitarbeiter nicht korrekt eingestellt
Wenn ein Mitarbeiter neu in das Unternehmen eintritt und Sie ein Nutzerkonto für den Mitarbeiter erstellen, dann können Sie neben dem Eintrittsdatum auch das Startdatum der Zeiterfassung für diesen Mitarbeiter individuell einstellen. Wenn das Startdatum der Zeiterfassung nicht angegeben wurde, dann kommt es zu dem gleichen Problem wie in dem Abschnitt oben auf dieser Seite beschrieben.
Um das Startdatum der Zeiterfassung für den Mitarbeiter zu prüfen oder einzustellen, melden Sie sich mit einem Admin am Timebutler an und klicken links oben auf "
Mitarbeiter > Mitarbeiter > Übersicht", dann bei dem gewünschten Mitarbeiter auf das grüne Symbol mit dem Bleistift (=Bearbeiten). Ändern Sie die Option "
Start der Zeiterfassung" und klicken dann unten auf der Seite auf den blauen Button "
Speichern". Timebutler berechnet das Arbeitszeitkonto für den Mitarbeiter sofort neu.
Abwesenheiten wie Urlaub, Krankheit, Elternzeit, ... nicht eingetragen
Wenn ein Mitarbeiter eine längere Abwesenheit Urlaub, Krankheit, Elternzeit, usw. nicht einträgt, dann erfolgt im Arbeitszeitkonto keine Berücksichtigung bei der Soll-Arbeitszeit. Ein Mitarbeitr, der beispielsweise einen 8-wöchig Elternzeit nicht einträgt, wird in den 8 Wochen keine Arbeitszeiten eintragen und bekommt dann für 8 Wochen Überstunden abgezogen.
Sie können das prüfen, indem Sie die
Kalenderansicht der Arbeitszeiteinträge aufrufen. Wenn über mehrere Tage die Kalendertage dunkelrot markiert sind, dann sind hier viele Minusstunden angefallen und wahrscheinlich liegt das Problem vor, dass ein Urlaubsantrag, Krankheitseintrag oder andere Abwesenheit vergessen wurde einzutragen. Tragen Sie den Urlaubs oder die Abwesenheit ein, dann wird das Arbeitszeitkonto sofort neu berechnet.
Abwesenheit im falschen Status
In manchen Fällen wurde der Urlaubsantrag oder Krankheitseintrag zwar eingegeben, dann aber nicht beantragt, noch nicht genehmigt oder im Status "In Bearbeitung" eingegeben. In diesem Fall muss der Eintrag beantragt und genehmigt oder in den Status "Bearbeitung abgeschlossen" gestellt werden, damit er im Arbeitszeitkonto mit eingerechnet wird.
Arbeitszeiteinträge nicht eingetragen
Wenn ein Mitarbeiter seine Arbeitszeiteinträge nicht einträgt, dann wird Timebutler bei jedem fehlenden Tag die Soll-Arbeitszeit vom Überstundenguthaben abziehen. Bei der Zeiterfassung ist es also notwendig,
alle Arbeitszeiten einzutragen.
Sie können das prüfen, indem Sie die
Kalenderansicht der Arbeitszeiteinträge aufrufen. Wenn über mehrere Tage die Kalendertage dunkelrot markiert sind, dann sind hier viele Minusstunden angefallen und möglicherweise liegt das Problem vor, dass vergessen wurde, für die Tage Arbeitszeiteinträge einzugeben. Klicken Sie auf einen der Tage, dann bekommen Sie angezeigt, ob und welche Arbeitszeiten eingetragen sind. Der Mitarbeiter kann die Arbeitszeiten dann einfach nachtragen, dann wird das Arbeitszeitkonto automatisch neu berechnet.
Falsches Arbeitszeitsaldo zum Start der Zeiterfassung
Sie können für jeden Mitarbeiter einstellen, mit welchem Überstundenguthaben der Mitarbeiter zum Start der Zeiterfassung beginnt (=Arbeitszeitsaldo zum Start der Zeiterfassung).
Wenn ein Mitarbeiter beispielsweise zum Start der Zeiterfassung 42 Überstunden Saldo hatte, im Timebutler jedoch beispielsweise 10 Stunden Startsaldo eingetragen sind, dann wird im Timebutler nicht der korrekte Überstundenstand angezeigt werden können. Prüfen und korrigieren Sie das Arbeitszeitsaldo zum Start der Zeiterfassung, wie folgt:
Melden Sie sich als Admin am Timebutler an und klicken links unten auf "
Einstellungen", dann darunter auf "
Arbeitszeitsaldo". Falsl notwendig, wechseln Sie über die Buttons oberhalb der Liste in das Kalenderjahr, in dem Sie mit der Zeiterfassung begonnen haben. Prüfen Sie die die Überstundenstände in der Spalte "
Arbeitszeitsaldo zum Start der Zeiterfassung" und korrigieren diese, falls notwendig.
Abwesenheit verringert die Soll-Arbeitszeit nicht (beispielsweise Elternzeit, Mutterschutz, unbezahlter Urlaub, ...)
Urlaub und Krankheit wird automatisch im Arbeitszeitkonto abgezogen. Bei allen anderen Abwesenheitstypen kann eingestellt werden, ob diese auch im Arbeitszeitkonto eingerechnet werden sollen oder nicht.
Wenn beispielsweise ein Mitarbeiter 8 Wochen Elternzeit eingetragen hat und für den Abwesenheitstyp "Elternzeit" eingestellt ist, dass dieser Abwesenheitstyp nicht im Arbeitszeitkonto angerechnet werden soll, dann wird Timebutler für die 8 Wochen Überstunden im Arbeitszeitkonto abziehen.
Sie können das Problem beheben, in dem Sie einstellen, welche Abwesenheiten die Soll-Arbeitszeit im Arbeitszeitkonto verringern sollen. Lesen Sie hier, wie Sie einstellen, dass
Abwesenheiten die Soll-Arbeitszeit verringern.
Arbeitszeitsaldo am 1.1. falsch oder entspricht nicht Arbeitszeitsaldo 31.12.
In manchen Fällen kann es dazu kommen, das das Arbeitszeitsaldo am 1.1. eine sehr hohe negative Zahl aufweist oder dass es nicht mit dem Arbeitszeitsaldo vom 31.12. des Vorjahres übereinstimmt. Wenn das Startsaldo am 1.1. also zu gering ist, dann ergibt sich auch für die nachfolgenden Tage in dem Jahr ein zu niedriges Überstundenguthaben.
Das Problem können Sie mit wenigen Mausklicks beheben. Lesen Sie hier, wie Sie vorgehen, wenn das
Arbeitszeitsaldo am 1.1. falsch ist.
Überstundenabbau wird im Arbeitszeitkonto nicht abgezogen
Wenn ein Mitarbeiter Überstundenabbau eingibt, dann kann er die Anzahl Überstunden angeben, die abgebaut werden sollen. Es ist ein häufiger "Denkfehler", dass sich diese Stunden aus dem Überstundenabbau-Antrag auf das Arbeitszeitkonto auswirken müssten. Das ist aber nicht so, weil dann die Stunden doppelt abgezogen werden würden.
Beispiel
Ein Mitarbeiter hat für einen Mittwoch 8 h Soll-Arbeitszeit eingetragen. Er entscheidet sich, Überstunden abzubauen und gibt einen Überstundenabbau über 8 h für einen Mittwoch ein, der auch genehmigt wird. Am Freitag ruft er sein Arbeitszeitkonto auf.
1) Wenn der Überstundenabbau abgezogen werden würde (was absichtlich nicht der Fall ist):
Für den Mittwoch würde Timebutler 8 h Soll-Arbeitszeit ermitteln. Der Mitarbeiter hat 0 h Arbeitszeit eingetragen (da er ja nicht gearbeitet hat). Somit ergibt sich ein Saldo von -8 h. Nun wird auch noch der Überstundenabbau über 8 h abgezogen. Timebutler würde also ein Saldo von -16 h berechnen.
2) Wenn der Überstundenabbau im Arbeitszeitkonto ignoriert wird (so ist es eingestellt):
Für den Mittwoch würde Timebutler 8 h Soll-Arbeitszeit ermitteln. Der Mitarbeiter hat 0 h Arbeitszeit eingetragen (da er ja nicht gearbeitet hat). Somit ergibt sich ein Saldo von -8 h. Der Überstundenabbau wird dabei ignoriert, er hat keinen Einfluss auf die Berechnung.
Das heißt also:
Durch die Gegenüberstellung von Soll- und Ist-Zeit ergibt sich automatisch das Saldo und automatisch der Abzug von 8 h. Da der Mitarbeiter an dem Mittwoch keine Arbeitszeit eingibt, folgt daraus automatisch der Abzug.
Der Überstundenabbau dient somit nur zur Information und hat auch den Zweck, den freien Tag beim Vorgesetzten zu beantragen und genehmigt zu bekommen. Der Mitarbeiter könnte auch ohne Überstundenabbau an dem Mittwoch nicht arbeiten und es würden ebenso 8 h Überstundenabbau im Arbeitszeitkonto abgezogen werden.
Arbeitszeitsaldo 1.1. entspricht nicht Arbeitszeitsaldo 31.12.
Das Überstundenguthaben wird absichtlich
nicht automatisch in das nächste Jahr übertragen (ein Admin kann die Übertragung mit wenigen Mausklicks durchführen). Es ist also möglich, dass bei einem oder mehreren Mitarbeitern der Überstundenstand zum 31.12. nicht identisch ist mit der Anzahl Überstunden, die zum 1.1. des nächsten Jahres übertragen wurden. Auf dieser Seite erfahren Sie, wie es zu dem Unterschied kommen kann und wie Sie das korrigieren.
Wenn ein Mitarbeiter im Arbeitszeitkonto einen
Überstundenstand zum Stichtag am 31.12. hat, der nicht mit dem Wert im Arbeitszeitkonto des nächsten Jahres zum 1.1. übereinstimmt, dann kann das zwei Gründe haben:
Übertragung hat noch nicht stattgefundenMöglicherweise wurden die Überstunden vom Vorjahr noch nicht in das Folgejahr übertragen.
Änderungen seit der letzten ÜbertragungMöglicherweise wurden die Überstunden vom Vorjahr zwar bereits auf das Folgejahr übertragen, jedoch haben sich seit dem Datum dieser Übertragung Änderungen an den Arbeitszeiteinträgen, Soll-Arbeitstagen, Feiertagen, usw. des Mitarbeiters im letzten Jahr ergeben. Dadurch hat sich der Überstundenstand zum 31.12. geändert und weicht nun vom Stand am 1.1. ab.
Korrektur der Werte 31.12. und 1.1.
Möglichkeit 1: Automatische ÜbertragungDas Überstundensaldo vom 31.12. kann von einem Admin einfach in das nächste Jahr zu übertragen werden. Lesen Sie hier, wie Sie das
Überstundenguthaben ins nächste Jahr übertragen.
Möglichkeit 2: Manuelle KorrekturDer Wert "
Arbeitszeitsaldo vom Vorjahr" kann auch manuell geändert werden. Melden Sie sich dazu als Admin am Timebutler an und klicken links unten auf "
Einstellungen > Arbeitszeitsaldo". Ändern Sie den Wert in der Spalte "
Saldo vom Vorjahr" und speichern die Änderung. Der neue Wert wird automatisch und sofort im
Arbeitszeitkonto (Ansicht "Überstundenguthaben zum Stichtag") angezeigt und eingerechnet.
Übertragene Überstunden zum Folgejahr prüfen
Es ist möglich, dass bei einem oder mehreren Mitarbeitern der Überstundenstand zum 31.12. nicht identisch ist mit der Anzahl Überstunden, die zum 1.1. des nächsten Jahres übertragen wurden. Sie können wie folgt prüfen, ob der Überstundenstand vom 31.12. von den übertragenen Überstunden ins nächste Jahr abweicht:
1) Arbeitszeitkonto für das Vorjahr aufrufenMelden Sie sich am Timebutler an und klicken links oben auf "
Mitarbeiter > Zeiterfassung > Arbeitszeitkonten". Mitarbeiter-Nutzer klicken links auf "
Zeiterfassung > Arbeitszeitkonten". Klicken Sie nun auf den Button "
Überstundenguthaben zum Stichtag" und stellen den 31.12. des Vorjahres ein. Klicken Sie auf den Button "
Anzeigen".
Sie bekommen die Tabelle mit den Angaben zum Arbeitszeitkonto angezeigt. In der Spalte ganz rechts "
Überstundenguthaben am 31.12." sehen Sie nun das Überstundenguthaben zum 31.12. des Jahres.
Hinweis: Sie können die Daten auch per Klick auf den Button "
Herunterladen" als Excel-Datei herunterladen.
2) Saldo vom Vorjahr abrufenAuf der gleichen Seite klicken Sie nun nochmal auf den Button "
Überstundenguthaben zum Stichtag" und stellen den 1.1. des
nächsten Jahres ein. Klicken Sie auf den Button "
Anzeigen".
Sie bekommen die Tabelle mit den Angaben zum Arbeitszeitkonto des nächsten Jahres angezeigt. In der Spalte "
Saldo vom Vorjahr" sehen Sie nun, wie viele Überstunden vom letzten Jahr in das nächste Jahr übernommen wurden.
3) Vergleich der ZahlenVergleichen Sie nun die Zahl aus Punkt 1), Spalte "
Überstundenguthaben am 31.12." mit der Zahl aus Punkt 2), Spalte "
Saldo vom Vorjahr". Wenn die Zahlen gleich sind, ist der richtige Wert übertragen. Wenn die Zahlen unterschiedlich sind, dann können Sie die Zahlen
korrigieren, wie hier beschrieben.
Industrieminuten versus Stundenformat im Excel Download
In den
Einstellungen für die Zeiterfassung können Sie einstellen, in welchem Anzeigeformat die Arbeitszeiten ausgegeben werden sollen:
- Im Industrieminuten-Format, beispielsweise "5,75 h"
- Im Format h m, beispielsweise "5 h 45 m"
Die Arbeitszeiteinträge und die Arbeitszeitkonten können Sie mit einem Mausklick als Excel-Datei herunterladen. In der Excel-Datei werden die Zeiten unabhängig von der oben genannten Einstellung immer im Industrieminuten-Format (5,75 h) angezeigt.
Der Grund dafür ist, dass Excel mit dem Format 5 h 45 m nicht korrekt rechnen kann, im Gegensatz zum Industrieminutenformat.
Eine Angabe 6 h 49 m + 7 h 37 m kann Excel nicht berechnen - und auch für eine Person ist es schwieriger, das auszurechnen, im Gegensatz zur Summe im Industrieminuten-Format. Da der Download nach Excel in der Regel für die weitere Verarbeitung und Berechnung der Arbeitszeiten eingesetzt wird, sind im Excel die Zeiten immer im Format der Industrieminuten angegeben.
Nur das Zeiterfassungsterminal erlauben
Sie können einstellen, dass bestimmte Mitarbeiter die Stempeluhr nicht im eigenen Nutzerkonto starten und stoppen dürfen, sondern nur über das Zeiterfassungsterminal an einem Tablet, bei dem Sie selbst bestimmen, wo das Tablet bereitgestellt wird. Damit können Sie sicherstellen, dass Mitarbeiter die Arbeitszeiten nur Stempeln können, wenn sie sich vor Ort im Büro oder der Firma befinden.
Lesen Sie hier, wie Sie für manche Mitarbeiter das Stempeln der Arbeitszeit
nur am Zeiterfassungsterminal erlauben.
Initialen doppelt im Zeiterfassungsterminal
Bei den
Einstellungen für das Zeiterfassungsterminal kann eingestellt werden, dass nicht der gesamte Name der Mitarbeiter im Zeiterfassungsterminal angezeigt wird, sondern nur die Initialen. Insbesondere wenn das Tablet mit dem Zeiterfassungsterminal am Büroeingang aufgestellt wird und dort starker Kunden- oder Lieferantenverkehr herrscht, bietet es sich aus Datenschutzgründen an, die Namen mit den Initialen zu ersetzen.
Häufig kommt es vor, dass zwei oder mehr Mitarbeiter gleiche Initialen haben. Es ist in der Regel aber nicht notwendig, bei Mitarbeitern mit gleichen Initialen eine Änderung durchzuführen, aus zwei Gründen:
Kachel immer an der gleichen StelleDie Sortierung der Kacheln auf dem Zeitrfassungsterminal ist immer die gleiche. Das bedeutet, wenn ein Mitarbeiter mal herausgefunden hat, welche der beiden gleichlautenden Kacheln seine Kachel ist, dann wird er auch zukünftig immer die gleiche Kachel wählen. Ob er die richtige Kachel hat findet er einfach heraus, indem er auf die Kachel klickt und seine PIN ausprobiert.
Die Kacheln sind zudem farblich unterschiedlich gestaltet, was den Wiedererkennungswert sehr erhöht.
Initialen werden automatisch ergänztDarüber hinaus ergänzt Timebutler die Initialen automatisch um den zweiten Buchstaben des Vornamens, wenn es zwei Kacheln mit gleichen Initialen gibt. In en meisten Fällen werden die Initialen dadurch eindeutig.
Starten der Stempeluhr vergessen
Wenn ein Mitarbeiter mit der Arbeit beginnt und erst später bemerkt, dass er die Stempeluhr nicht gestartet hat, dann hat er folgende Möglichkeiten:
1) Arbeitszeit über das Eingabeformular eingeben
Sofern der Admin den Mitarbeitern oder Vorgesetzten die Eingabe von
Arbeitszeiteinträgen über das Eingabeformular erlaubt hat, Arbeitszeiteinträge über das Eingabeformular einzugeben, kann der Nutzer die
Arbeitszeit eintragen.
2) Stempeluhr später starten
1. Stempeluhr später startenWenn der Mitarbeiter bemerkt hat, dass er den Start der Stempeluhr vergessen hat, kann er das sofort nachholen und die Stempeluhr starten. Am Nachmittag zum Ende des Arbeitstages stoppt er die Stempeluhr. Mit dem Stoppen der Stempeluhr wird der Arbeitszeiteintrag gespeichert, mit einer Startuhrzeit, die später als die tatsächliche Startuhrzeit ist.
2. Eintrag bearbeitenIn dem Fenster für die Stempeluhr wird ein Link "
Zur Listenansicht" angezeigt. Der Mitarbeiter kann auf den Link klicken und gelangt zur Listenansicht der Arbeitszeiteinträge. Der neue Eintrag steht oben in der Liste. Bei dem Eintrag klickt er auf den grünen Button mit dem Bleistift (=Bearbeiten). Nun kann er die Startuhrzeit bearbeiten.
3. Änderung wird genehmigtIn den
Einstellungen für die Zeiterfassung ist festgelegt, ob Änderungen am Arbeitszeiteintrag sofort übernommen werden oder ob diese vom Vorgesetzten genehmigt werden müssen. Falls die Änderung genehmigungspflichtig ist, wird der Vorgesetzte per Email informiert und kann die Änderung mit einem Mausklick erlauben oder ablehnen.
Stoppen der Stempeluhr vergessen
Wenn ein Mitarbeiter die Stempeluhr zum Arbeitsbeginn gestartet hat, am Ende des Arbeitstages jedoch vergisst, die Stempeluhr zu stoppen, dann geschieht folgendes:
1. Automatischer Stopp um MitternachtUm Mitternacht prüft Timebutler, ob die Stempeluhr noch läuft. Timebutler prüft dann die Stempeluhr und setzt die Ende-Uhrzeit so, dass die individuelle Soll-Arbeitszeit des Mitarbeiters für den Wochentag erfüllt ist. Falls auch eine
Pausenregelung für den Mitarbeiter eingestellt ist, ergänzt Timebutler den Arbeitszeiteintrag um die notwendige Mindestpause und setzt die Ende-Uhrzeit entsprechend weiter nach hinten.
Der Arbeitszeiteintrag wird mit dem Zusatz "
Automatisch gestoppt" gespeichert.
2. Benachrichtigung an den MitarbeiterDer Mitarbeiter erhält eine Email von Timebutler mit dem Hinweis über den automatisch gestoppten Arbeitszeiteintrag und weiteren Details, wie die Ende-Uhrzeit berechnet wurde. In der Email gibt es einen Button "
Zeiteintrag korrigieren", auf den der Nutzer klicken kann.
3. Ende-Uhrzeit korrigierenDer Mitarbeiter gelangt nach dem Klick auf den Button "
Zeiteintrag korrigieren" aus der Email zu der Bearbeitungsmaske für den Arbeitszeiteintrag und kann die Ende-Uhrzeit ändern.
In den
Einstellungen für die Zeiterfassung ist festlegt, ob Änderungen am Arbeitszeiteintrag sofort übernommen werden oder ob diese vom Vorgesetzten genehmigt werden müssen. Falls die Änderung genehmigungspflichtig ist, wird der Vorgesetzte per Email informiert und kann die Änderung mit einem Mausklick erlauben oder ablehnen.
4. Markierung wird entferntNach der Änderung der Ende-Uhrzeit wird auch der Zusatz "
Automatisch gestoppt" entfernt. Damit ist sichergestellt, dass nur Arbeitszeiteinträge markiert sind, die um Mitternacht gestoppt wurden und vom Mitarbeiter noch nicht korrigiert wurden. Der Vorgesetzte und der Mitarbeiter erkennt im Timebutler damit sofort, welche Einträge noch überarbeitet werden sollten.
Kein Stopp bei NachtschichtenDas Stoppen der Stempeluhr findet nicht statt, wenn ein Admin die Option für
Nachtschichten aktiviert hat und die Stempeluhr nach 14:00 Uhr gestartet wurde. Damit ist sichergestellt, dass bei einem Mitarbeiter mit Nachtschicht, der beispielsweise um 21:00 Uhr mit der Arbeit beginnt, nicht schon um Mitternacht die Stempeluhr automatisch gestoppt wird.
Stempeln der Arbeitszeit vergessen
Wenn ein Mitarbeiter vergisst, die Arbeitszeit zu stempeln und das erst am nächsten Tag oder später bemerkt, dann hat er folgende Möglichkeiten:
1) Arbeitszeit über das Eingabeformular eingeben
Wenn der Admin den Mitarbeitern oder Vorgesetzten die Eingabe von
Arbeitszeiteinträgen über das Eingabeformular erlaubt hat, kann der Nutzer die
Arbeitszeit eintragen.
Wenn der Admin den Mitarbeitern oder Vorgesetzten die Eingabe von
Arbeitszeiteinträgen über das Eingabeformular nicht erlaubt hat, gibt es die folgenden zwei Möglichkeiten.
2) Eintrag über die Stempeluhr erzeugen
1. Arbeitszeiteintrag erstellenDer Mitarbeiter startet die Stempeluhr und nach einer Minute stoppt er die Stempeluhr wieder (Arbeitszeiteinträge müssen mindestens 1 Minute enthalten, ansonsten können sie nicht gespeichert werden). Damit wird ein Arbeitszeiteintrag über 1 Minute erstellt.
2. Änderung vornehmenIn dem Fenster für die Stempeluhr wird ein Link "
Zur Listenansicht" angezeigt. Der Mitarbeiter kann auf den Link klicken und gelangt zur Listenansicht der Arbeitszeiteinträge. Der neue Eintrag über 1 Minute steht oben in der Liste. Bei dem Eintrag klickt er auf den grünen Button mit dem Bleistift (=Bearbeiten). Nun kann er das gewünschte Datum einstellen, beispielsweise den Vortag und die gewünschte Start- und Ende-Uhrzeit. Im Feld Bemerkung kann er "Nachtrag, da gestern vergessen zu stempeln" eingeben, wenn gewünscht.
3. Änderung wird genehmigtIn den
Einstellungen für die Zeiterfassung ist festgelegt, ob Änderungen am Arbeitszeiteintrag sofort übernommen werden oder ob diese vom Vorgesetzten genehmigt werden müssen. Falls die Änderung genehmigungspflichtig ist, wird der Vorgesetzte per Email informiert und kann die Änderung mit einem Mausklick erlauben oder ablehnen.
Im Ergebnis wurde damit der Arbeitszeiteintrag für den gewünschten Tag mit den gewünschten Start- / Ende-Uhrzeiten erstellt.
3) Mitarbeiter informiert Vorgesetzten oder Admin
Der Mitarbeiter informiert seinen Vorgesetzten oder Admin über den fehlenden Arbeitszeiteintrag. Dieser kann für den Mitarbeiter die
Arbeitszeit eintragen.
Pausenregelung rechnet falsch
Die Anwendung der Pausenregelungen sind etwas komplizierter, als es auf den ersten Blick erscheint. Es gibt mehrere Gründe, wieso manchmal der Eindruck entsteht, als hätte Timebutler die Pausenregelungen falsch angewendet.
Pausen zwischen mehreren Arbeitszeiteinträgen
Bei mehreren Arbeitszeiteinträgen werden die Zeiträume zwischen den Einträgen als Pausen interpretiert.
Wenn ein Mitarbeiter beispielsweise einen Arbeitszeiteintrag von 8:00 - 12:00 Uhr (=4 h) eingibt und einen weiteren von 13:00 Uhr - 18:00 Uhr (=5 h) und dabei
keine Pause eingegeben hat, so wird Timebutler dennoch bei den Arbeitszeiteinträgen die Pausen bei 0 min belassen. Die Zeit von 12:00 - 13:00 Uhr gilt dann als Pause, und diese war ja auch tatsächlich arbeitsfrei, so dass zwar 9 h gearbeitet wurde, darin aber 1 h Pause gemacht wurde.
Anwesenheitszeit versus Arbeitszeit
Für einen Mitarbeiter ist folgende Pausenregelung eingestellt:
- Bis 6 h Arbeitszeit: keine Mindestpause
- Ab 6 h bis 9 h Arbeitszeit: mindestens 30 Minuten Pause
- Mehr als 9 h Arbeitszeit: mindestens 45 Minuten Pause
Fall 1)Der Mitarbeiter zeichnet über die Stempeluhr einen Arbeitszeiteintrag ohne Pause auf mit Start um 8:00 Uhr und Ende um 14:17 Uhr, somit also 6 Stunden und 17 Minuten (oder er gibt den Eintrag über das Eingabeformular ein).
Oftmals wird nun fälschlicherweise angenommen, dass bei diesem Arbeitszeiteintrag 30 Minuten Pause hinzugefügt werden müssen, da mehr als 6 h erbracht wurden. Das ist nicht korrekt. Wenn von den 6 h 17 min Anwesenheitszeit insgesamt 30 min in eine Pause gewandelt werden, dann ergibt sich eine Arbeitszeit von nur 5 h 47 min. Bei einer Arbeitszeit von 5 h 47 min gilt aber die Regel, dass
keine Mindestpause erforderlich ist.
Stattdessen dürfen nur 17 min Arbeitszeit in eine Pause gewandelt werden. Damit ergibt sich als korrekte Anpassung: 6 h Arbeitszeit und 17 min Pause - und damit ist die Pausenregelung erfüllt.
Fall 2)Der Mitarbeiter zeichnet über die Stempeluhr einen Arbeitszeiteintrag ohne Pause auf mit Start um 8:00 Uhr und Ende um 17:10 Uhr, somit also 9 Stunden und 10 Minuten (oder er gibt den Eintrag über das Eingabeformular ein).
Oftmals wird nun fälschlicherweise angenommen, dass bei diesem Arbeitszeiteintrag 45 Minuten Pause hinzugefügt werden müssen, da mehr als 9 Stunden erbracht wurden. Das ist nicht korrekt. Wenn von den 9 h 10 min Anwesenheitszeit insgesamt 45 min in eine Pause gewandelt werden, dann ergibt sich eine Arbeitszeit von nur 8 h 25 min. Bei einer Arbeitszeit von 8 h 25 min gilt aber die Regel, dass nur 30 Minuten Mindestpause erforderlich sind (da weniger als 9 h Arbeitszeit).
Stattdessen dürfen nur 30 min Arbeitszeit in eine Pause gewandelt werden. Damit ergibt sich als korrekte Anpassung: 8 h 40 m Arbeitszeit und 30 min Pause - und damit ist die Pausenregelung erfüllt.
Grund für die falsche AnnahmeDer "Denkfehler" in den beiden Fällen ist, dass die Zeit von Eintreffen im Büro bis zum Verlassen des Büros als Arbeitszeit interpretiert wird und darauf die Pausenregelung angewendet wird. Sobald aber die Pausenregelung angewendet wurde ergibt sich oftmals, dass eine andere Vorgabe aus der Pausenregelung angewendet werden muss, da sich die Arbeitszeit geändert hat. Die Zeit vom Eintreffen im Büro und dem Verlassen ist also nicht die Arbeitszeit, sondern es ist die Anwesenheitszeit, innerhalb der die Arbeitszeit und die Pausenzeit so enthalten sein muss, dass die richtige Pausenregelung erfüllt ist.
Rundung auf Minuten
In seltenen Fällen kann es durch die Rundung der Sekunden zu dem Eindruck kommen, dass die Pausenregelung nicht korrekt angewendet wurde.
Folgendes Beispiel mit absichtlich einfachen Zeiten verdeutlichen das Problem:
Ein Mitarbeiter zeichnet an einem Kalendertag über die Stempeluhr 6 Arbeitszeiteinträge zu jeweils 1 h auf. Dabei stoppt er die Stempeluhr und kurz danach startet er die Stempeluhr wieder, so dass die Arbeitszeiteinträge nahezu nahtlos aufeinander folgen. Nach dem 6. Arbeitszeiteintrag stoppt und startet er die Stempeluhr wieder und stoppt die Stempeluhr dann nach 2 Minuten. Er hat dann also 6 Arbeitszeiteinträge über je 1 h aufgezeichnet und einen Arbeitszeiteintrag über 2 Minuten.
In der Listenansicht der Arbeitszeiteinträge werden für den Mitarbeiter beispielsweise die Uhrzeiten "8:00 - 9:00 Uhr" und "9:00 - 10:00 Uhr" und "10:00 - 11:00 Uhr" usw. bis "13:00 - 14:00 Uhr" angezeigt (die ersten 6 Arbeitszeiteinträge) und ebenso ein Arbeitszeiteintrag "14:00 - 14:02 Uhr". In Summe ergeben sich aus dieser Ansicht 6 h und 2 Minuten.
Unter der Annahme, dass die Pausenregelung "Ab 6 h Arbeitszeit: mindestens 30 Minuten Pause" gilt, müssten nun für diesen Kalendertag mit den 6 h 2 m somit 2 Minuten in eine Pause gewandelt werden (nicht 30 Minuten, sondern 2 Minuten: den Grund dafür lesen Sie oben auf dieser Seite unter der Überschrift "Abwesenheitszeit versus Arbeitszeit"). In manchen Fällen wird aber
keine Pause gewandelt, das heißt es bleibt bei der Summe von 6 h 2m und die Pause ist mit 0 Minuten angegeben.
Daraus erwächst der Verdacht, dass die Pausenregelung nicht korrekt angewendet wurde und eigentlich die 2 Minuten Pause hätten abgezogen werden müssen. Das ist jedoch nicht so, aus folgendem Grund:
In der Listenansicht werden die Uhrzeiten "8:00 - 9:00 Uhr" und "9:00 - 10:00 Uhr" usw. angezeigt, jedoch sind diese auf Minuten gerundet. Sie sind nicht sekundengenau, weil das unleserlich wäre. Intern rechnet Timebutler aber sekundengenau. Der erste Eintrag von 8:00 - 9:00 Uhr umfasst also nur in den seltensten Fällen exakt 60 Minuten. Wenn der Eintrag beispielsweise um 8:00 Uhr und 55 Sekunden startet und um 9:00 Uhr und 3 Sekunden endet, dann umfasst er nicht 60 Minuten, sondern nur 59 Minuten und 8 Sekunden. In der Listenansicht wird aber dennoch der Einfachheit halber "8:00 - 9:00 Uhr" angezeigt (statt des unüblichen "8:00:55 - 9:00:03").
Das heißt also: zwischen den 6 Arbeitszeiteinträge können mehrere Minuten Lücken enstanden sein - das ist sogar sehr wahrscheinlich, denn in den seltensten Fällen wird der Nutzer innerhalb einer Sekunde die Stempeluhr stoppen und wieder starten können. Bei der Anwendung der Pausenregelung berechnet Timebutler die Arbeitszeit
sekundengenau. Die Lücken zwischen zwei Arbeitszeiteinträge gelten immer als Pause, deswegen werden die Sekunden-Lücken als Pause aufsummiert. Bei 6 Lücken kann es sehr wahrscheinlich dazu kommen, dass sich die Lücken auf 2 Minuten oder mehr aufsummieren. Somit ist die Bedingung "Mindestens 2 Minuten Pause" erfüllt oder genauer: von den 6 h 2 m sind mehr als 2 Minuten Pause und deswegen liegt die Arbeitszeit unterhalb der 6 h und es muss keine Pause hinzugefügt werden.
Deswegen wird in der Listenansicht in Summe 6 h 2 m Arbeitszeit ausgewiesen, aber 0 m Pause: die echte, sekundengenaue Arbeitszeit beträgt nur 5h 59m und die 6h 2m kommt nur durch die Rundung der Anzeige auf Sekunden zustande.
Hinweis:
Das Problem kann nur bei Aufzeichnung der Zeiten über die Stempeluhr auftreten und auch nur, wenn die Stempeluhr gestoppt und danach wieder gestartet wird und auch nur, wenn es an einem Tag ausreichend viele Arbeitszeiteinträge mit der Sekunden-Abweichung gibt.
Keine Auswirkung auf ÜberstundenDa in dem Beispiel 6 h 2 m ausgewiesen werden, aber tatsächlich nur 5 h 59 m gearbeitet wurden, könnte der Verdacht aufkommen, dass dem Mitarbeiter 2 Minuten zu viel Arbeitszeit angerechnet werden. Das ist aber
nicht so: im
Arbeitszeitkonto wird die Summe der Arbeitszeit über den gesamten Monat/Zeitraum sekundengenau berechnet. Dort werden für den einen Tag also korrekt nur 5 h 59 m angerechnet (bzw. noch genauer: es werden nur beispielsweise "5 h 59 m 17 s" angerechnet) und nicht 6 h 2 m. Die 6 h 2 m ist also lediglich die Summe der angezeigten Arbeitszeiteinträge in der Listenansicht und weicht nur deswegen ab, weil die Uhrzeiten dort auf Minuten gerundet angezeigt werden.
Timebutler rechnet korrekt
Timebutler beachtet alle diese Vorgaben und berechnet die notwendigen Anpassungen an den Arbeitszeiteinträgen. Sie brauchen lediglich die richtige
Pausenregelungen zu aktivieren und überlassen Timebutler den Rest.
Pausenzeiten erfassen und ausgeben
Ein Admin kann einstellen, dass auch die Start- und Ende-Uhrzeiten der Pausen aufgezeichnet werden, wenn die Arbeitszeit über die
Stempeluhr im Nutzerkonto oder das
Zeiterfassungsterminal aufgezeichnet wird. Auch bei der
Eingabe der Arbeitszeiten über das Eingabeformular kann die Möglichkeit aktiviert werden, die Start- und Ende-Uhrzeiten der Pausen einzutragen.
Aufzeichnung der Pausen-Uhrzeiten aktivieren
Damit die Pausen-Uhrzeiten aufgezeichnet und eingegeben werden, stellen Sie sicher, dass die entsprechenden Optionen aktiviert sind:
Pausenzeiten bei der Stempeluhr und dem ZeiterfassungsterminalMelden Sie sich als Admin am Timebutler an, klicken links unten auf "
Einstellungen", dann darunter auf "
Weitere..". Klicken Sie rechts auf die Überschrift "
Zeiterfassung". Prüfen oder ändern Sie die Option "
Pausen mit Uhrzeit aufzeichnen" und klicken dann unten auf den blauen Button "
Speichern".
Pausenzeiten bei der Eingabe der Arbeitszeit über das EingebeformularMelden Sie sich als Admin am Timebutler an, klicken links unten auf "
Einstellungen", dann darunter auf "
Weitere..". Klicken Sie rechts auf die Überschrift "
Zeiterfassung". Prüfen oder ändern Sie die Option "
Pausenzeiten eingeben" und klicken dann unten auf den blauen Button "
Speichern".
Die Option "Pausenzeiten eingeben" wird nur angeboten, wenn Sie bei der Option "Eingabeart" eine der zwei unteren Einstellungen auswählen.
Pausen-Uhrzeiten eines Arbeitszeiteintrages abrufen
Die detaillierten Pausen-Uhrzeiten für einen Arbeitszeiteintrag werden in der Bearbeitungshistorie in der
Detailansicht zu einem Arbeitszeiteintrag angezeigt.
Pausen-Uhrzeiten für mehrere Arbeitszeiteinträge abrufen
Die Pausen-Uhrzeiten für mehrere Arbeitszeiteinträge werden in dem
Auslastungsbericht ausgewiesen.
Melden Sie sich als Admin am Timebutler an und klicken links auf "
Berichte > Auslastungsbericht". Wählen Sie die Option "
Berichtstyp: Listenansicht auf Tagesbasis". Bei der Option "
Listenansicht" aktivieren Sie die Auswahl "
Auch Arbeitszeiten ausgeben" und darunter die Auswahl "
Details zu jedem Arbeitszeiteintrag ausgeben". Klicken Sie dann auf den blauen Button "
Anzeigen".
Die Details zu jedem Arbeitszeiteintrag (Start/Ende des Arbeitszeiteintrages, Start/Ende der Pausen) werden in den letzten Spalten rechts in dem Bericht angezeigt.
Sie können den Bericht auch per Klick auf den entsprechenden Button als Excel-Datei oder CSV-Datei herunterladen.
HinweisStart und Ende der Arbeitszeiteinträge und Start und Ende der Pausen werden nur ausgegeben, wenn die Optionen zur Eingabe/Aufzeichnung dieser Uhrzeiten aktiviert ist. Dazu müssen in den
Einstellungen für die Zeiterfassung die Optionen "
Eingabeart", "
Pausenzeiten eingeben" und "
Pausen mit Uhrzeit aufzeichnen" entsprechend eingestellt sein.
Arbeitszeiteintrag ohne Endeuhrzeit
Wenn ein
Arbeitszeiteintrag über das Eingabeformular eingegeben wird, dann kann die Startuhrzeit und die Endeuhrzeit eingetragen werden.
Zum Arbeitsbeginn kommt manchmal der Wunsch auf, einen Arbeitszeiteintrag einzugeben und dabei erst mal nur die Startuhrzeit einzutragen und die Endeuhrzeit später nachzutragen. Es ist jedoch nicht möglich, einen Arbeitszeiteintrag einzugeben, ohne die Endeuhrzeit einzutragen. Dafür gibt es mehrere Gründe:
Wenn es möglich wäre, Arbeitszeiteintrag ohne Endeuhrzeit einzugeben, dann würden diese Arbeitszeiteinträge keine Arbeitszeitdauer haben. In der Liste der Arbeitszeiteinträge würden also Einträge gelistet sein, die keine Arbeitszeit ausweisen. Die Ansicht würde unübersichtlich werden und es wäre unverständlich, wieso einzelne Arbeitszeiteinträge nicht im Arbeitszeitkonto berücksichtigt werden.
Erfahrungsgemäß würden viele der Arbeitszeiteinträge vergessen werden und auch am Nachmittag die Endeuhrzeit nicht nachgetragen werden. Im Verlauf der Zeit würden sich Dutzende oder Hunderte Arbeitszeiteinträge ohne Endeuhrzeit und ohne Arbeitszeitdauer anhäufen, bei denen die Mitarbeiter im Nachhinein nicht mehr die korrekte Endeuhrzeit kennen.
Stattdessen gibt es folgende Alternativen:
Aufzeichnung über die Stempeluhr
Erlauben Sie die
Erfassung der Arbeitszeit über die Stempeluhr. Die Mitarbeiter können dann bequem zum Arbeitsbeginn die Stempeluhr mit einem Mausklick starten und am Nachmittag stoppen.
Aufzeichnung über das Zeiterfassungsterminal
Stellen Sie für Ihre Mitarbeiter das
Zeiterfassungsterminal auf einem Tablet bereit, damit sich die Mitarbeiter beim Eintreffen im Unternehmen bequem einstempeln können.
Geschätzte Endeuhrzeit eintragen
Die Mitarbeiter können morgens einen Arbeitszeiteintrag eingeben mit Startuhrzeit und ungefährer Endeuhrzeit. Zum Feierabend kann der Arbeitszeiteintrag bearbeitet werden und die Endeuhrzeit korrigiert werden.
Eingabe der Arbeitszeitdauer statt der Uhrzeiten erlauben
Ein Admin kann in den
Einstellungen für die Zeiterfassung bei der Option "
Eingabeart" einstellen, ob die Mitarbeiter bei Eintragung eines Arbeitszeiteintrages die Start- und Ende-Uhrzeit eingeben oder ob es möglich ist, nur die Dauer einzutragen. Wenn Sie nicht die Uhrzeiten benötigen, können Sie erlauben, dass nur die Dauer eingetragen wird.
Arbeitszeiten automatisiert erstellen
Manche Unternehmen möchten die Zeiterfassung aktivieren und dabei jedoch vermeiden, dass die Mitarbeiter die Arbeitszeiten eingeben oder aufzeichnen müssen. Stattdessen sollen die Arbeitszeiteinträge automatisch generiert werden, für jeden Arbeitstag und mit der eingestellten Soll-Arbeitszeit für jeden Mitarbeiter.
Eine solche vollautomatische Erstellung von Arbeitszeiteinträgen findet absichtlich nicht statt: der Zweck einer Zeiterfassung ist es, die tatsächliche Arbeitszeit zu erfassen. Auch die gesetzlichen Vorschriften haben das Ziel, dass die Arbeitszeiten durch die Mitarbeiter erfasst werden und korrekt und vollständig sind. Eine Zeiterfassung, bei der automatisiert Arbeitszeiteinträge erstellt werden, erfüllt somit nicht die Anforderungen an eine Zeiterfassung.
Sie haben dennoch mehrere Möglichkeiten, die automatisierte Zeiterfassung fast vollständig zu aktivieren und dabei die Vorgaben auch zu erfüllen:
Automatische Aufzeichnung per Stempeluhr
Sie können die Erfassung dennoch für die Mitarbeiter stark vereinfachen. Aktivieren Sie die
Stempeluhr und legen Sie eine
Pausenregelung fest.
Damit sind Sie fertig.
Die Mitarbeiter müssen nun lediglich an den Tagen, an denen sie arbeiten, die Stempeluhr starten und brauchen sich um nichts weiter kümmern. Timebutler wird die Stempeluhr automatisch um Mitternacht stoppen, die Mindestpause gemäß Pausenregelung hinzufügen und die Ende-Uhrzeit so setzen, dass sich eine Arbeitszeit gemäß der Soll-Arbeitszeit des Mitarbeiters an dem Wochentag ergibt.
Timebutler versendet beim automatischen Stoppen der Stempeluhr eine Benachrichtigungs-Email an den Mitarbeiter, damit dieser den Eintrag nachträglich korrigieren kann. Sie können diese Benachrichtigungs-Email deaktivieren. Melden Sie sich dazu als Admin am Timebutler an, klicken links unten auf "
Einstellungen", dann darunter auf "
Weitere..". Klicken Sie rechts auf die Überschrift "
Zeiterfassung". Hier finden Sie die Option "
Email Benachrichtigung beim Stoppen der Stempeluhr".
Hinweis
Auch wenn diese Möglichkeit des automatischen Stoppens der Stempeluhr besteht, empfiehlt es sich im Sinne einer vollständigen Zeiterfassung, dass die Mitarbeiter auch die Ende-Uhrzeit und die Pausenzeiten stempeln.
ZeiterfassungsterminalSie können (zusätzlich) auch das
Zeiterfassungsterminal auf einem Tablet aktivieren, um den Mitarbeitern eine weitere, bequeme Möglichkeit zu bieten, die Arbeitszeiten zu stempeln.
Mehrere Arbeitszeiteinträge eingeben
Die Mitarbeiter können mehrere Arbeitszeiteinträge vorab eintragen, beispielsweise am Monatsanfang für den gesamten Monat oder am Wochenbeginn für den Rest der Woche.
Über das
Eingabeformular von Arbeitszeiteinträgen können mehrere Arbeitszeiteinträge gleichzeitig erstellt werden. Darin kann auch der Arbeitszeiteintrag für den ersten Tag eingetragen werden und dieser Eintrag für die anderen Tage in der Woche/Monat mit wenigen Mausklicks kopiert werden.
Alternative: Überstundenfeature
Wenn Sie die täglichen Arbeitszeiten nicht erfassen möchten, dann ist das
Überstundenfeature vielleicht die bessere Alternative für Ihr Unternehmen.
Beim Überstundenfeature brauchen die Mitarbeiter nicht die gesamte Arbeitszeit einzugeben, sondern nur Überstunden und Überstundenabbau.
Minusstunden bei der Überstundenkappung
Für jeden Mitarbeiter kann das
Kappen von Überstunden eingestellt werden.
Beispielsweise kann festgelegt werden, dass eine bestimmte Anzahl Überstunden im Monat mit dem Gehalt abgegolten sind. Je nachdem, wie viele Überstunden der Mitarbeiter leistet, wird eine bestimmte Anzahl Überstunden gekappt, also nicht in den nächsten Monat übertragen:
- Wenn der Mitarbeiter in einem Monat nicht mehr als die eingestellte Überstundengrenze leistet, dann werden die Überstunden gekappt und keine Überstunden übertragen.
- Wenn der Mitarbeiter in einem Monat mehr als die eingestellte Überstundengrenze leistet, dann werden nur die Anzahl Überstunden oberhalb der Grenze in den nächsten Monat übertragen.
Keine Ausnahme bei negativem Überstundenstand
Wenn ein Mitarbeiter in einen Monat mit einem negativen Überstundenstand startet, dann wird das Kappen der Überstunden im nächsten Monat dennoch angewendet.
Ein Beispiel:Ein Mitarbeiter hat eine Kappung von bis zu 5 Überstunden je Monat eingestellt. Der Mitarbeiter hat zum Ende April einen negativen Überstundenstand von -3 Stunden. Wenn der Mitarbeiter im Mai 4 Überstunden erarbeitet, dann wird er zum Ende Mai
nicht ein Überstundenstand von 1 h haben, sondern weiterhin ein Stand von -3 Stunden.
Der Grund dafür lautet: mit der Kappung ist festgelegt, dass je Monat bis zu 5 Überstunden mit dem Gehalt abgegolten sind und nur darüber hinaus gehende Überstunden angerechnet werden. Deswegen werden die 4 geleisteten Überstunden im Mai gekappt und 0 Stunden werden angerechnet.
Damit der Mitarbeiter die 3 Minusstunden ausgleichen kann, muss er in einem Monat 8 Überstunden leisten: die ersten 5 Überstunden werden gekappt und 3 Überstunden werden angerechnet.
Korrekte Vorgehensweise
Diese Berechnung erscheint auf den ersten Blick möglicherweise falsch oder nicht sinnvoll. Bei näherer Betrachtung ist es jedoch die richtige Vorgehensweise: Für den Mitarbeiter ist beispielsweise im Arbeitsvertrag vereinbart, dass mit seinem Monatsgehalt die 40h-Woche abgegolten ist und ebenso bis zu 5 Überstunden je Monat. Anders gesagt: mit dem Gehalt zahlt das Unternehmen eine Leistungsspanne von 40 je Woche plus 0 bis 5 Überstunden je Monat aus. Die 5 Überstunden sind also mit dem Gehalt abgegolten.
Wenn diese 5 Überstunden im Falle eines negativen Überstundenstandes ausnahmsweise doch angerechnet werden würden, dann wären die 5 Überstunden zum einen mit dem Gehalt abgegolten und dennoch zusätzlich als Überstunden verbucht. Die Überstunden würden also fälschlicherweise doppelt angerechnet werden.
Mehr noch:
Ein Mitarbeiter könnte es schaffen, durch geschickte, abwechselnde Mehr- und Minder-Arbeit nie mehr als die Untergrenze von nur 40 h zu leisten, aber dennoch immer einen Stand von 0 Überstunden im Arbeitszeitkonto zu haben. In einem Monat arbeitet er 5 Stunden zu wenig, im nächsten Monat leistet er 5 Überstunden, usw.
Features der Überstundenverwaltung
Timebutler bietet eine vollwertige Überstundenverwaltung. Jeder Mitarbeiter kann seine Überstunden und Überstundenabbau erfassen und Timebutler führt automatisch das Überstundenkonto. Es kann festgelegt werden, dass
Überstunden genehmigungspflichtig sind. Mit Hilfe der
Begrenzungen kann das maximale Überstundenguthaben limitiert werden.
Hier erhalten Sie einen
Überblick über die Features der Überstundenverwaltung.
Überstundenfeature oder Zeiterfassung
Es gibt im Timebutler das Überstundenfeature und das Zeiterfassungsfeature. Es ist nicht möglich, beide Features gleichzeitig zu aktivieren.
Lesen Sie hier,
wieso das Zeiterfassungsfeature und das Überstundenfeature nicht gleichzeitig aktiviert werden können.
Überstundenverwaltung aktivieren
Die Überstundenverwaltung können Sie im Timebutler mit wenigen Mausklicks aktivieren. Dabei ist es sinnvoll, die Mitarbeiter vor der Aktivierung zu informieren, damit die Überstunden und Überstundenabbau dann auch korrekt erfasst werden.
Überstundenfeature aktivieren
Melden Sie sich als Admin am Timebutler an und klicken links unten auf "
Einstellungen", dann darunter auf "
Weitere..", dann rechts auf "
Überstundenfeature". Klicken Sie auf den Button "
Überstundenfeature aktivieren". Auf der Seite haben Sie verschiedene Optionen zur Überstundenverwaltung, die Sie nach Ihren Wünschen einstellen können. Anschließend klicken Sie zur Bestätigung auf den Button "
Überstundenfeature aktivieren"
Damit ist das Überstundenfeature für alle Mitarbeiter aktiviert und ab sofort stehen in der linken Navigationsleiste die Links zum Eintragen von Überstunden und Überstundenabbau zur Verfügung, ebenso der Link zum Überstundenkonto.
Überstunden Start-Guthaben einstellen
Klicken Sie links unten auf "
Einstellungen > Urlaubsanspruch". Hier können Sie in der Spalte "
Überstundenguthaben vom Vorjahr" das Überstunden Start-Guthaben der Mitarbeiter einstellen (wird nur angezeigt, wenn das Überstundenfeature aktiviert ist).
Überstunden genehmigungspflichtig
Lesen Sie hier, wie Sie einstellen können, dass
Überstunden genehmigungspflichtig sind.
Überstunden eingeben
Bei Überstundenfeature geben die Mitarbeiter lediglich die Überstunden und den
Überstundenabbau ein, nicht die vollständigen Arbeitszeiten. Wenn also ein Mitarbeiter seine Soll-Arbeitszeit von beispielsweise 8 h geleistet hat, braucht er keine Eingabe tätigen. Timebutler führt für jeden Mitarbeiter ein
Überstundenkonto und rechnet darin die Überstunden und den Überstundenabbau automatisch ein, zusammen mit dem Überstundenstand vom Vorjahr.
Um Überstunden einzutragen, gehen Sie wie folgt vor:
Mitarbeiter-Nutzer melden sich am Timebutler an und klicken links auf "
Überstunden > Überstunden eintragen". Alternativ können die Überstunden wie die anderen Abwesenheitseinträge
über die Kalenderansicht eingegeben werden.
Vorgesetzte und Admins melden sich am Timebutler an und klicken links oben auf "
Mitarbeiter > Überstunden > Überstunden eintragen". Alternativ können die Überstunden wie die anderen Abwesenheitseinträge
über die Kalenderansicht eingegeben werden. Um eigene Überstunden einzugeben kann links oben auf "
Eigene Daten > Überstunden > Überstunden eintragen" geklickt werden.
Genehmigung von Überstunden
Überstundeneinträge sind standardmäßig nicht genehmigungspflichtig. Sie können einstellen, dass
Überstundeneinträge genehmigungspflichtig sind.

Überstundenabbau
Bei Überstundenfeature geben die Mitarbeiter lediglich die
Überstunden und den Überstundenabbau ein, nicht die vollständigen Arbeitszeiten. Wenn also ein Mitarbeiter seine Soll-Arbeitszeit von beispielsweise 8 h geleistet hat, braucht er keine Eingabe tätigen. Timebutler führt für jeden Mitarbeiter ein
Überstundenkonto und rechnet darin die Überstunden und den Überstundenabbau automatisch ein, zusammen mit dem Überstundenstand vom Vorjahr.
Um Überstundabbau zu beantragen, gehen Sie wie folgt vor:
Mitarbeiter-Nutzer melden sich am Timebutler an und klicken links auf "
Überstunden > Überstundenabbau". Alternativ kann der Überstundenabbau wie die anderen Abwesenheitseinträge
über die Kalenderansicht eingegeben werden.
Vorgesetzte und Admins melden sich am Timebutler an und klicken links oben auf "
Mitarbeiter > Überstunden > Überstundenabbau". Alternativ kann der Überstundenabbau wie die anderen Abwesenheitseinträge
über die Kalenderansicht eingegeben werden. Um eigenen Überstundenabbau einzugeben kann links oben auf "
Eigene Daten > Überstunden > Überstundenabbau" geklickt werden.
Genehmigung von Überstundenabbau
Ein Admin kann festlegen, ob Überstundenabbau genehmigungspflichtig ist, oder ob die Mitarbeiter Überstundenabbau ohne Genehmigung eintragen können. Lesen Sie hier, wie Sie festlegen, ob ein
Abwesenheitstyp genehmigungspflichtig ist.
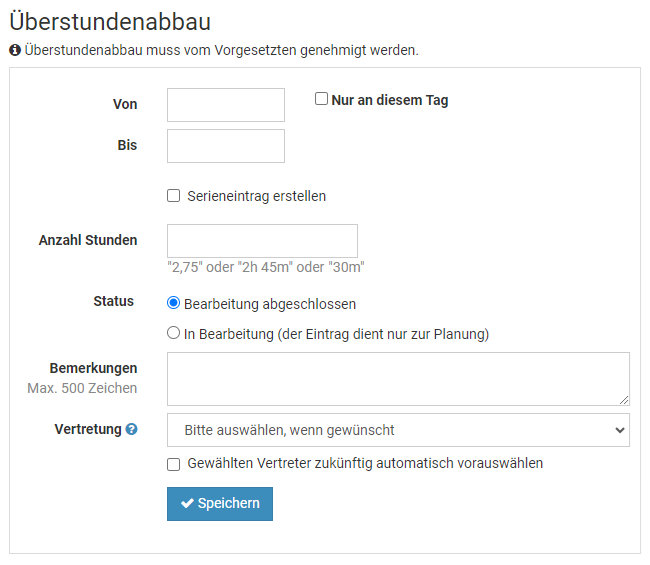
Überstunden genehmigungspflichtig
Sie können einstellen, ob die Mitarbeiter Überstunden eingeben können und diese sofort im Überstundenkonto eingerechnet werden oder ob Überstundeneinträge zunächst vom Vorgesetzten genehmigt werden müssen.
Auch für andere Abwesenheitstypen kann eingestellt werden, ob diese genehmigungspflichtig sind oder nicht, beispielsweise für Homeoffice oder Dienstreise. Um also Überstunden als genehmigungspflichtig einzustellen, gilt die gleiche Vorgehensweise wie bei allen anderen Abwsenheitstypen. Lesen Sie hier, wie Sie
Überstunden als genehmigungspflichtig festlegen.
Nicht für die Zeiterfassung gültigBeachten Sie bitte, dass die hier beschriebene Genehmigungspflicht von Überstunden nur für das
Überstundenfeature gilt, nicht für das
Zeiterfassungsfeature. Im Zeiterfassungsfeature geben die Mitarbeiter die Arbeitszeiten vollständig ein und Timebutler berechnet die Überstunden automatisch, so dass die Mitarbeiter keine Überstundeneinträge eingeben.
Überstunden und Überstundenabbau löschen
Um Überstundeneinträge oder Überstundenabbau-Anträge zu löschen, gehen Sie wie folgt vor:
Mitarbeiter-Nutzer melden sich am Timebutler an und klicken links auf "Abwesenheiten > Listenansicht". Bei dem gewünschten Eintrag klickt er auf den roten Button mit dem Papierkorb. Es startet ein Countdown, um das Löschen zu bestätigen. Der Nutzer klickt innerhalb des Countdowns ein zweites Mal auf den Löschen-Button, um das Löschen zu bestätigen.
Vorgesetzte und Admins melden sich am Timebutler an und klicken links oben auf "Mitarbeiter > Abwesenheiten > Listenansicht". Bei dem gewünschten Eintrag klickt er auf den roten Button mit dem Papierkorb. Der Nutzer klickt innerhalb des Countdowns ein zweites Mal auf den Löschen-Button, um das Löschen zu bestätigen.
Nur Admins oder Vorgesetzte können Überstundeneinträge oder Überstundenabbau-Anträge löschen. Wenn ein Mitarbeiter-Nutzer einen Überstundeneintrag oder Überstundenabbau-Antrag löschen möchte, dann wird stattdessen eine Storno-Anfrage an den Vorgesetzten verschickt. Der Vorgesetzte kann den Storno-Antrag genehmigen (=Eintrag wird gelöscht) oder ablehnen.
Überstundenkonto anzeigen
Bei Überstundenfeature geben die Mitarbeiter lediglich die
Überstunden und den
Überstundenabbau ein, nicht die vollständigen Arbeitszeiten. Wenn also ein Mitarbeiter seine Soll-Arbeitszeit von beispielsweise 8 h geleistet hat, braucht er keine Eingabe tätigen. Timebutler führt für jeden Mitarbeiter ein Überstundenkonto und rechnet darin die Überstunden und den Überstundenabbau automatisch ein, zusammen mit dem Überstundenstand vom Vorjahr.
Überstundenkonto aufrufen
Um das Überstundenkonto aufzurufen, gehen Sie wie folgt vor:
Mitarbeiter-Nutzer melden sich am Timebutler an und klicken links auf "
Überstunden > Überstundenkonto".
Vorgesetzte und Admins melden sich am Timebutler an und klicken links oben auf "
Mitarbeiter > Überstunden > Überstundenkonten". Um das eigene Überstundenkonto aufzurufen kann links oben auf "
Eigene Daten > Überstunden > Überstundenkonto" geklickt werden. Mit einem Klick auf den Button "
Herunterladen" kann die Ansicht als Excel-Datei heruntergeladen und weiterverarbeitet oder versendet werden.
Übertrag von Überstunden ins nächste Jahr
Im Überstundenkonto wird unter "
Überstundenguthaben vom Vorjahr" das Überstundensaldo zum 31.12. des Vorjahres angezeigt und somit das Überstundenguthaben aus dem Vorjahr in das Urlaubskonto des nächsten Jahres übertragen. Das Überstundenguthaben (und der Resturlaub) werden absichtlich nicht vollautomatisch in das nächste Jahr übertragen. Lesen Sie hier, wie Sie
Überstunden ins Folgejahr übertragen.
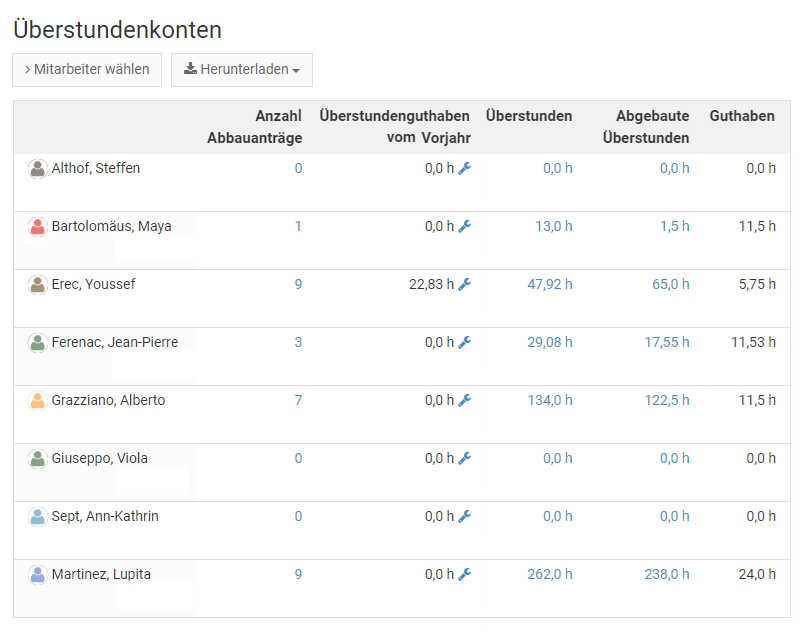
Überstundenkonto herunterladen
Um das Überstundenkonto als Excel- oder CSV-Datei herunterzuladen, gehen Sie wie folgt vor:
Melden Sie sich als Admin am Timebutler an und klicken links oben auf "
Mitarbeiter > Überstunden > Überstundenkonten". Um das eigene Überstundenkonto aufzurufen kann links oben auf "
Eigene Daten > Überstunden > Überstundenkonto" geklickt werden.
Mit einem Klick auf den Button "
Herunterladen" kann die Ansicht als Excel-Datei heruntergeladen und weiterverarbeitet oder versendet werden.
Ausbezahlte Überstunden (Überstundenfeature)
Wenn für einen Mitarbeiter Überstunden ausbezahlt wurden, dann können Sie das im Timebutler wie folgt eintragen:
Erstellen Sie für den Mitarbeiter einen Überstundenabbau-Antrag und genehmigen diesen sofort. Die Überstunden werden umgehend vom Überstundenkonto abgezogen und reduzieren den Überstundenstand des Mitarbeiters.
In dem Überstundenabbau-Antrag tragen Sie die Anzahl Überstunden ein, die ausbezahlt wurden. Im Feld "
Bemerkung" können Sie eine entsprechende Anmerkung eingeben, beispielsweise "
Ausbezahlt am tt.mm.jjjj". Damit auch für die Kollegen zusätzlich erkennbar ist, dass es sich nicht um freie Zeit handelt, sondern um ausbezahlte Überstunden, können Sie ein markantes Datum einstellen, beispielsweise immer den 1. Januar des Jahres.
Einstellung für die Begrenzung
Mit den Begrenzungen kann bei aktiviertem Überstundenfeature eine Überstunden-Grenze und eine Fehlstunden-Grenze festgelegt werden.
Erfahren Sie
hier mehr zu den Begrenzungen.
Features der Personalakte
Mit Timebutler können Sie für jeden Mitarbeiter eine Personalakte führen. Sie können den
Aufbau und die Felder der Personalakte an Ihre Bedürfnisse anpassen und gestalten. Mit Hilfe der
Auswertungsmöglichkeiten können Sie in kürzester Zeit beliebige Informationen aus dem Personalstamm ermittelt und dank der
Suchfavoriten haben Sie noch schnelleren Zugriff auf die Informationen. Sie können auch
Dokumente in der Personalakte speichern, um beispielsweise die Arbeitsverträge an einem zentralen Ort und schnell abrufbar abzulegen.
Mit den
Lese- und Bearbeitungsrechten legen Sie fest, welche Nutzer auf welche Personalakten Zugriff erhalten und bearbeiten dürfen.
Hier erhalten Sie einen
Überblick über die Features der digitalen Personalakte.
Personalakte aktivieren
Ein Admin Nutzer kann einstellen, ob das Feature der Personalakten aktiviert wird.
Personalakten aktivieren
Melden Sie sich als Admin am Timebutler an und klicken links unten auf "
Einstellungen > Weitere..", dann rechts auf "
Digitale Personalakte". Aktivieren Sie die Option "
Personalakte aktivieren" und klicken dann unten auf den blauen Button "
Speichern". Wen die Personalakte aktiviert ist, wird auch die Option "
Gehälter und Bonuszahlungen" eingeblendet, mit der Sie festlegen können, ob Sie auch die Gehaltsinformationen und Angaben zu Bonuszahlungen im Timebutler führen möchten.
Personalakten deaktivieren
Um die Personalakte zu deaktivieren, verwenden Sie die gleiche Vorgehensweise und Optionen wie oben auf dieser Seite beschrieben.
Das Deaktivieren der Personalakte führt absichtlich nicht zum Löschen der Daten. Wenn Sie die Personalakte zu einem späteren Zeitpunkt wieder aktivieren, sind die Daten weiterhin vorhanden und werden wieder eingeblendet.
Gehaltsangaben und Bonuszahlungen
Neben der Personalakte können Sie für jeden Mitarbeiter auch Gehaltsangaben, variable Vergütungen und Bonuszahlungen verwalten.
Sie können die Gehaltsdaten für verschiedene Zeiträume erfassen, ebenso variable Zahlungen für verschiedene Zeiträume und auch mehrere Bonuszahlungen für verschiedene Termine.
Bei der Angabe des Bruttobetrages haben Sie die Wahl, ob Sie den Monatsbetrag oder den Jahresbetrag eingeben. In den Unternehmen wird in der Regel mit der Monatsangabe oder der Jahresangabe gearbeitet, deswegen ist es den Timebutler Nutzern überlassen, sich für eine der zwei Optionen zu entscheiden. Es sollte dann aber durchgängig bei allen Nutzern entweder immer der Monatsbetrag eingetragen werden oder immer der Jahresbetrag. Damit ist eine Vergleichbarkeit gewährleistet und die Möglichkeit gegeben, beim
Download der Gehaltsdaten nach Beträgen zu filtern und suchen.
Gehaltsdaten aktivieren oder deaktivieren
In den
Einstellungen zur Pesonalakte finden Sie die Option, um die Gehaltsdaten zu aktivieren oder zu deaktivieren.
Fremdwährungen
Für Ihre Mitarbeiter im Ausland stehen Dutzende Währungen bereit. Die Wechselkurse werden täglich mit den Kursdaten der Europäischen Zentralbank abgeglichen.
Dank der Wechselkurse ist es möglich, Gehälter und Bonuszahlungen beim
Download nach Beträgen zu filtern und zu vergleichen.
Beispiel
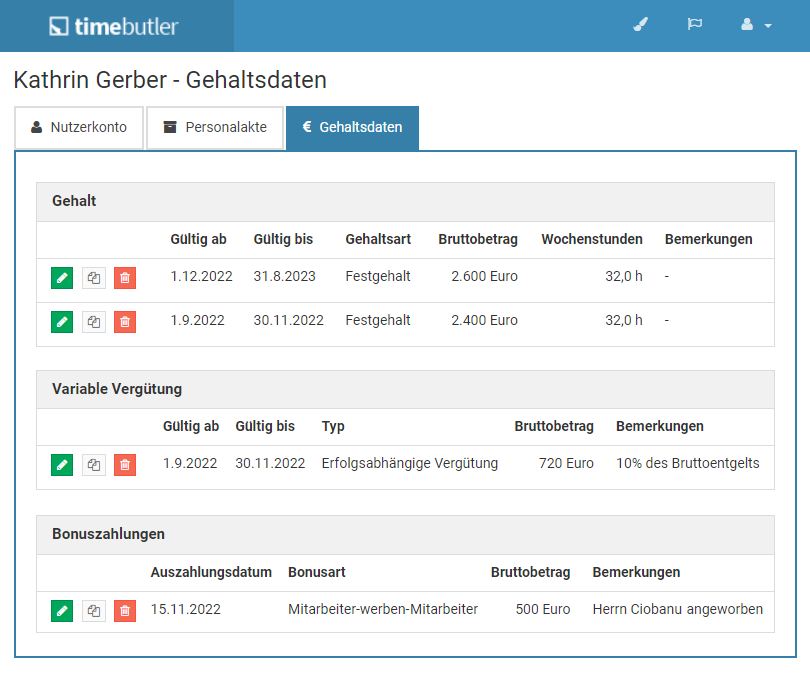
Eine Personalakte bearbeiten
Wenn Sie über entsprechende
Bearbeitungsrechte verfügen, dann können Sie die Angaben in der Personalakte und zu den Gehaltsdaten wie folgt bearbeiten:
Personalakte bearbeiten
Rufen Sie die Detailansicht zu einem Nutzerkonto auf. Melden Sie sich dazu als Admin am Timebutler an und klicken links oben auf "
Mitarbeiter", dann unterhalb des kleinen "
Mitarbeiter" auf "
Übersicht". Sie sehen die Liste der Nutzerkonten. Klicken Sie bei dem gewünschten Nutzerkonto auf das blaue Symbol mit der Lupe, um zur Detailansicht des Nutzerkontos zu gelangen.
Klicken Sie nun auf einen der zwei Reiter "
Personalakte" oder "
Gehaltsdaten", um zu der entsprechenden Ansicht zu gelangen.
Um die Angaben zu bearbeiten, finden Sie entsprechende Buttons mit der Beschriftung "
Bearbeiten" oder "
Eintrag hinzufügen" und Buttons zum Bearbeiten oder Löschen bestehender Gehaltsangaben.
Eigene Personalakte einsehen
Sofern Sie die notwendigen Sichtrechte freigeschaltet haben, können Sie Ihre eigene Personalakte aufrufen, indem Sie sich an Ihrem Nutzerkonto im Timebutler anmelden und links unten auf "
Einstellungen" klicken, dann darunter auf "
Ihr Nutzerkonto". Klicken Sie nun auf einen der zwei Reiter "
Personalakte" oder "
Gehaltsdaten".
Auch hier gilt:Wenn einer der Reiter oder beide nicht angezeigt werden, dann haben Sie entweder keine Sichtrechte auf die Daten oder ein Admin hat
die Personalakte oder die Gehaltsdaten deaktiviert.
Über die
Massenänderung können Sie eine Vielzahl an Personalakten bearbeiten.
Screenshot: Personalakte bearbeiten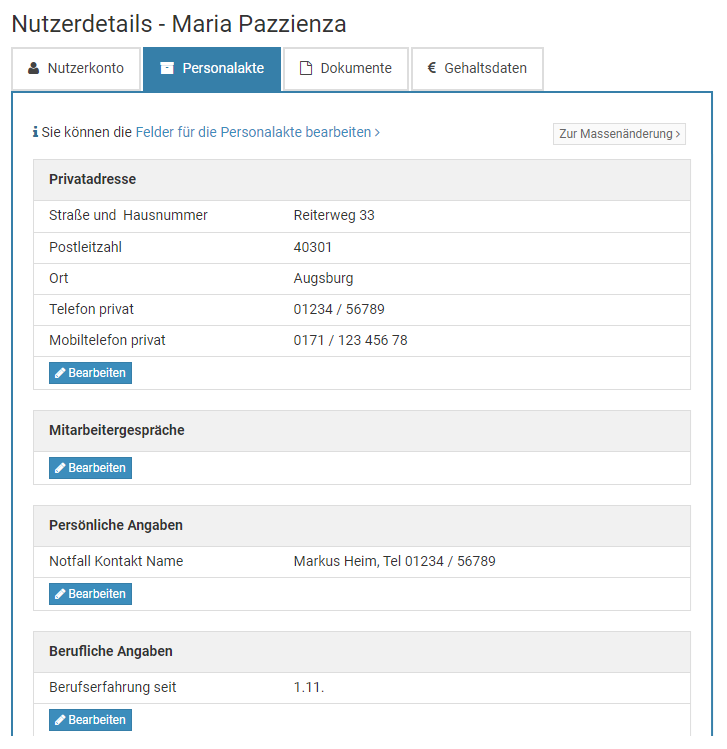
Massenänderung Personalakten
Sie können die Angaben zur
Personalakte einzelner Mitarbeiter bearbeiten. Wenn Sie die Personalakte Angaben einer Vielzahl an Mitarbeitern bearbeiten möchten, dann gehen Sie wie folgt vor:
Melden Sie sich als Admin am Timebutler an - nur Admins haben das Recht für die Massenänderung. Klicken Sie links unten auf "
Einstellungen", dann darunter auf "
Weitere..". Klicken Sie nun rechts auf der Seite auf "
Digitale Personalakte Massenänderung".
Schritt 1
Bei Schritt 1 können Sie eine Excel-Datei herunterladen, in der die Daten der digitalen Personalakten aller Mitarbeiter beinhaltet sind.
Schritt 2
Öffnen Sie die Excel-Datei, bearbeiten die Daten nach Ihren Wünschen und speichern die Änderung.
Schritt 3
Anschließend laden Sie die ausgefüllte Excel-Datei im Timebutler bei Schritt 3 hoch und die Angaben in den Personalakten werden überschrieben.
Beachten Sie:
Alle Angaben aller Personalakten im Timebutler werden mit den Werten in der Excel-Datei überschrieben. Nach dem Hochladen der Datei werden also nur noch diejenigen Daten in der digitalen Personalakte vorhanden sein, die in der hochgeladenen Excel-Datei enthalten waren.
Stellen Sie also sicher, dass in der Excel-Datei alle Daten enthalten sind, bevor Sie die Datei hochladen.
Sollten Sie versehentlich eine leere Datei oder eine falsche Datei hochladen, dann wird Timebutler eine Fehlermeldung ausgeben und die Daten in der digitalen Personalakte nicht löschen.
Screenshot: Massenänderung in der digitalen Personalakte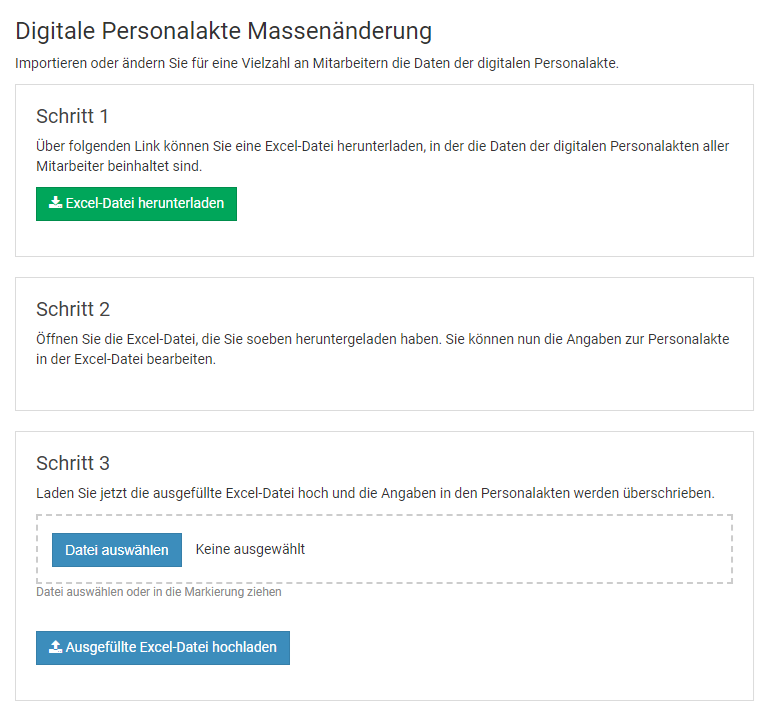
Gehaltsangaben bearbeiten
Wenn Sie über entsprechende
Bearbeitungsrechte verfügen, dann können Sie die Angaben zu den Gehaltsdaten wie folgt bearbeiten:
Gehaltsangaben bearbeiten
Rufen Sie die Detailansicht zu einem Nutzerkonto auf. Melden Sie sich dazu als Admin am Timebutler an und klicken links oben auf "
Mitarbeiter", dann unterhalb des kleinen "
Mitarbeiter" auf "
Übersicht". Sie sehen die Liste der Nutzerkonten. Klicken Sie bei dem gewünschten Nutzerkonto auf das blaue Symbol mit der Lupe, um zur Detailansicht des Nutzerkontos zu gelangen.
Klicken Sie nun auf einen den Reiter "
Gehaltsdaten". Um die Angaben zu bearbeiten, finden Sie entsprechende Buttons mit der Beschriftung "
Eintrag hinzufügen" und Buttons zum Bearbeiten oder Löschen bestehender Gehaltsangaben.
Wenn der Reiter "
Gehaltsdaten" nicht angezeigt wird, dann haben Sie entweder keine Sichtrechte auf die Daten oder ein Admin hat
die Gehaltsdaten deaktiviert.
Eigene Gehaltsangaben einsehen
Sofern Sie die notwendigen Sichtrechte freigeschaltet haben, können Sie Ihre eigenen Gehaltsdaten aufrufen, indem Sie sich an Ihrem Nutzerkonto im Timebutler anmelden und links unten auf "
Einstellungen" klicken, dann darunter auf "
Ihr Nutzerkonto". Klicken Sie nun auf den Reiter "
Gehaltsdaten".
Auch hier gilt:Wenn der Reiter "
Gehaltsdaten" nicht angezeigt wird, dann haben Sie entweder keine Sichtrechte auf die Daten oder ein Admin hat
die Gehaltsdaten deaktiviert.
Screenshot: Gehaltsdaten in der digitalen Personalakte bearbeiten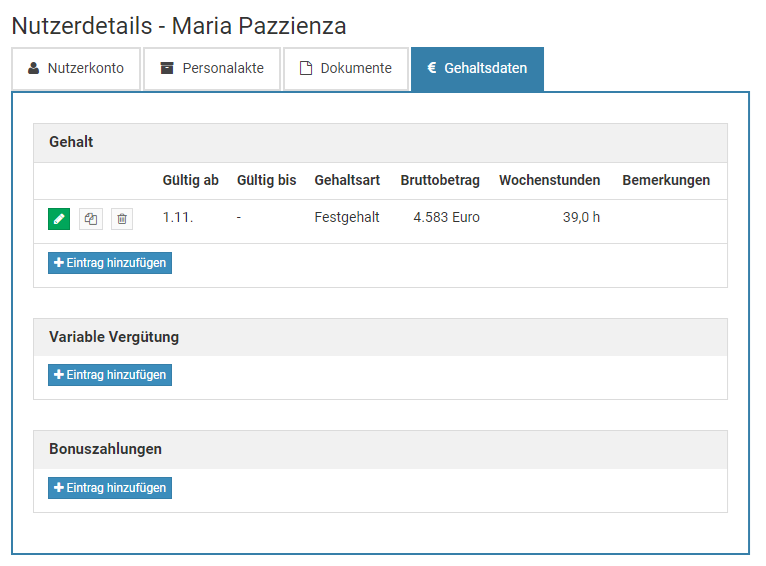
Dokumente für die Personalakte festlegen
Sie können die digitale Personalakte genau nach den Bedürfnissen Ihres Unternehmens anpassen und beliebige Gruppen und Felder festlegen. Damit erhalten Sie eine Personalakte in der Sie genau die Daten speichern und auswerten können, die für Ihr Unternehmen optimal sind.
Es ist auch möglich, bis zu 100 Dokumente in der Personalakte zu speichern. Damit haben Sie beispielsweise auch die Arbeitsverträge oder Zusatzvereinbarungen zur Anstellung in der Personalakte zentral zur Verfügung.
Um Dokumente in der Personalakte speichern zu können, legen Sie zunächst fest, welche Dokumente Sie speichern möchten.
Rufen Sie die
Bearbeitungsmaske für die Felder der Personalakte auf, erstellen ein neues Feld in der passenden Gruppe und wählen als Feldtyp "
Dokument / Datei" aus.
Screenshot: Dokument-Feld für den Arbeitsvertrag hinzufügen
Dokumente hochladen
Sie können die Personalakte nach Ihren Bedürfnissen anpassen und beliebige
Felder zum Hochladen von Dokumenten festlegen.
Um für die Mitarbeiter Dokumente hochzuladen, rufen Sie die
Bearbeitungsmaske für die Personalakte eines Mitarbeiters auf und klicken dort auf den Button "
Bearbeiten". Bei den Feldern vom Typ Dokument können Sie auf den Button "
Bearbeiten" klicken. Es öffnet sich ein kleines Fenster, in dem Sie auf "
Datei auswählen" (oder ähnlich) klicken können, um die Datei auszuwählen, die Sie hochladen möchten. Oder Sie ziehen die Datei in den markierten Bereich für das Auswahlfeld der Datei (Drag&Drop).
Hinweis:Die Buttons zum Bearbeiten werden nur angezeigt, wenn für Ihr Nutzerkonto die
Berechtigung zum Bearbeiten der Personalakte freigeschaltet ist.
Screenshot: Bearbeiten-Button zum Hochladen von Dokumenten
Screenshot: Auswahl der Datei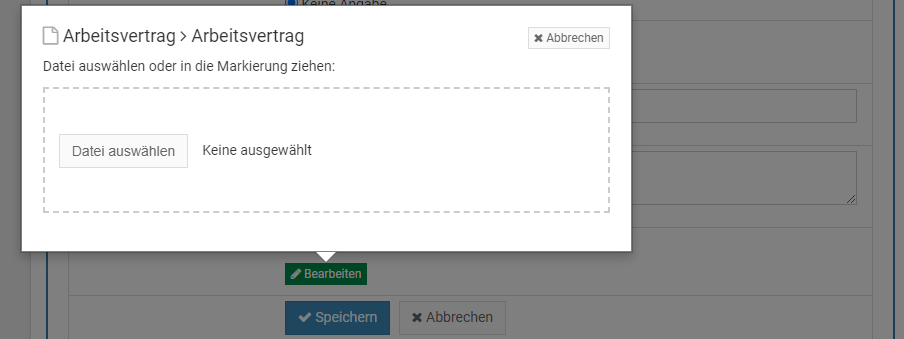
Dokumente herunterladen
Sie können die Personalakte nach Ihren Bedürfnissen anpassen und beliebige
Felder zum Hochladen von Dokumenten festlegen.
Ein Dokument herunterladen
Um ein bestimmtes Dokumente herunterzuladen, rufen Sie die
Detailansicht zur Personalakte eines Mitarbeiters auf und klicken bei dem gewünschten Dokument auf den Namen des Dokuments.
Alle Dokumente eines Mitarbeiters herunterladen
Um alle Dokumente eines Mitarbeiters mit einem Klick herunterzuladen statt die Dokumente einzeln herunterzuladen, rufen Sie die
Detailansicht zur Personalakte eines Mitarbeiters auf und klicken dann auf den Reiter "
Dokumente" (der Reiter wird nur angezeigt, wenn in der Personalakte mindestens ein Dokument-Feld konfiguriert ist). Sie sehen eine Übersicht über alle hochgeladenen Dokumente des Mitarbeiters und darunter klicken Sie auf den Button "
Alle herunterladen" (der Button wird nur angezeigt, wenn mindestens ein Dokument hochgeladen wurde).
Alle Dokumente mehrerer Mitarbeiter herunterladen
Um die Dokumente mehrerer Mitarbeiter mit einem Klick herunterzuladen, melden Sie sich als Admin am Timebutler an und klicken links auf "
Berichte", dann darunter auf "
Downloadcenter". Klicken Sie nun auf den Reiter "
Dokumente" (der Reiter wird nur angezeigt, wenn in der Personalakte mindestens ein Dokument-Feld konfiguriert ist). Sie können die Filterkriterien einstellen um die Mitarbeiter auszuwählen, für die Sie die Dokumente herunterladen möchten.
Das Herunterladen funktioniert nicht?
Bei Klick auf die Links oder Buttons zum Herunterladen eines Dokuments wird der Download in einem neuen Browserfenster geöffnet. In manchen Fällen wird das Dokument nicht im Browser geöffnet, sondern es wird im Hintergrund heruntergeladen. Sie finden das Dokument dann im Ordner, in dem Ihr Browser die heruntergeladenen Dateien ablegt.
Wenn Sie mehrere Dokumente herunterladen, dann erhalten Sie alle Dokumente in einer ZIP-Datei gepackt. Diese ZIP-Datei wird nicht im Browser geöffnet, sondern in dem Ordner gespeichert, in dem Ihr Browser die heruntergeladenen Dateien ablegt.
Dokument löschen
Sie können die Personalakte nach Ihren Bedürfnissen anpassen und beliebige
Felder zum Hochladen von Dokumenten festlegen.
Einzelne Dokumente löschen
Um ein Dokument, das in der Personalakte gespeichert wurde, wieder zu löschen, rufen Sie die
Bearbeitungsmaske für die Personalakte eines Mitarbeiters auf und klicken dort auf den Button "
Bearbeiten". Bei dem Dokument, das Sie löschen möchten, klicken Sie auf den Button "
Löschen". Danach klicken Sie zur Bestätigung auf den Button "
Jetzt löschen".
Hinweis:Das löschen ist unwiderruflich: das Dokument wird gelöscht und kann nicht wiederhergestellt werden.
Automatisches Löschen alter Dokumente einstellen
Sie können festlegen, dass nach einem bestimmten Zeitraum die
Dokumente in der Personalakte automatisch gelöscht werden.
Screenshot: Dokument in der Personalakte löschen
Sichtrechte und Bearbeitungsrechte
Über die Sicht- und Bearbeitungsrechte kann ein Admin einstellen, welche Mitarbeiter Einsicht auf welche Personalakten und Gehaltsdaten erhalten und welche Mitarbeiter die Angaben bearbeiten dürfen.
Um die Rechte zu ändern, melden Sie sich als Admin am Timebutler an und klicken links unten auf "
Einstellungen", dann darunter auf "
Weitere..". Klicken Sie nun rechts auf der Seite auf "
Digitale Personalakte".
Sie haben nun verschiedene Einstellungen zur Auswahl, um die Sichtrechte und Bearbeitungsrechte zu ändern.
Personalakte anpassenSie können den
Aufbau und die Felder der Personalakte anpassen und damit die Personalakte genau nach den Bedürfnisse und Anforderungen in Ihrem Unternehmen individualisieren.
Personalakte individualisieren
Sie entscheiden, wie die beste Personalakte für Ihr Unternehmen aufgebaut sein muss: Sie können den Aufbau und die Felder in der Personalakte ganz individuell nach Ihren Wünschen zusammenstellen, benennen, anordnen und damit die Personalakte individualisieren.
Um Den Aufbau und die Eingabefelder der Personalakte zu bearbeiten, melden Sie sich als Admin am Timebutler an und klicken links unten auf "
Einstellungen", dann darunter auf "
Weitere..". Klicken Sie nun rechts auf der Seite auf "
Digitale Personalakte". Klicken Sie nun auf den Reiter "
Eingabefelder".
Sie bekommen die Liste aller Gruppen und Eingabefelder der Personalakte angezeigt. Per Klick auf den blauen Button "
Bearbeiten" können Sie den Aufbau der Personalakte ändern:
- Beliebige neue Eingabefelder hinzufügen
- Bestehende Eingabefelder löschen (sofern noch keine Daten dazu eingegeben wurden) oder deaktivieren (wenn bereits Daten dazu eingegeben wurden).
- Gruppen mit Überschrift erstellen und löschen
- Eingabefelder in der Reihenfolge nach oben oder unten verschieben, auch in andere Gruppen
- Gruppen inklusive der Eingabefelder in der Reihenfolge nach oben oder unten verschieben
- Für jedes Eingabefeld kann der Name (Deutsch und Englisch) und der Datentyp eingestellt werden - es stehen mehrere Datentypen zur Verfügung, beispielsweise Textfeld, Datum, Ganzzahl, Ja/Nein-Auswahl, Dokumente/Dateien und andere
Sobald Sie die Änderung gespeichert haben, werden alle Ansichten zur Personalakte gemäß Ihren Einstellungen aktualisiert und angezeigt.
Im Downloadcenter
Die Daten zur Personalakte und die Gehaltsangaben können Sie wie folgt herunterladen:
Über das Download-Center
Über das
Download-Center können Sie die Personalakte- und Gehaltsdaten der Mitarbeiter herunterladen.
Daten einzelner Mitarbeiter
Über die
Mitarbeiterübersicht können Sie die Personalakte- und Gehaltsdaten der Mitarbeiter herunterladen.
Detaillierte Auswertung
Über die
Auswertungsfunktion haben Sie viele Möglichkeiten, um gezielt Personalakten mit bestimmten Kriterien zu suchen und herunterzuladen.
In der Mitarbeiter-Übersicht
Über die Mitarbeiterübersicht können Sie die Daten der Personalakten und Gehaltsangaben für eine Vielzahl an Mitarbeitern herunterladen. In der Detailansicht zu einem Nutzerkonto können Sie die Daten für einen Mitarbeiter herunterladen.
Daten für eine Vielzahl an Mitarbeitern herunterladen
Melden Sie sich dazu als Admin am Timebutler an und klicken links oben auf "
Mitarbeiter", dann unterhalb des kleinen "
Mitarbeiter" auf "
Übersicht". Sie sehen die Liste der Nutzerkonten.
Klicken Sie nun auf den Button "
Herunterladen". Es erscheint eine Liste mit verschiedenen Optionen. Wählen Sie aus, welche der Daten Sie herunterladen möchten.
Daten für einen Mitarbeiter herunterladen
Rufen Sie die Detailansicht zu einem Nutzerkonto auf. Melden Sie sich dazu als Admin am Timebutler an und klicken links oben auf "
Mitarbeiter", dann unterhalb des kleinen "
Mitarbeiter" auf "
Übersicht". Sie sehen die Liste der Nutzerkonten. Klicken Sie bei dem gewünschten Nutzerkonto auf das blaue Symbol mit der Lupe, um zur Detailansicht des Nutzerkontos zu gelangen.
Klicken Sie nun auf den Button "
Herunterladen". Es erscheint eine Liste mit verschiedenen Optionen. Wählen Sie aus, welche der Daten Sie herunterladen möchten.
Auswertung der Personalakten
Gespeicherte Suchen
Viele Auswertungen werden häufig oder regelmäßig benötigt. Lesen Sie hier, wie Sie
Suchen speichern können, um sie wiederverwenden zu können.
Noch schneller: FavoritenSie können gespeicherte
Suchen als Favorit markieren. Favoriten werden auf dem Dashboard angezeigt, so dass Sie direkt vom Dashboard aus mit einem Mausklick die Auswertung ausführen können.
Abwesenheitseinträge
Über das Downloadcenter können die Abwesenheitseinträge der Mitarbeiter bequem mit wenigen Mausklicks als Excel-Datei oder CSV-Datei heruntergeladen werden.
Um die Abwesenheitseinträge herunterzuladen, melden Sie sich als Admin oder Vorgesetzter am Timebutler an, klicken links auf "
Berichte", dann darunter auf "
Downloadcenter". Klicken Sie dann auf den Reiter "
Abwesenheitseinträge".
Beachten Sie:
Das Berichtscenter steht Admin-Nutzern immer zur Verfügung. Vorgesetzte können auf das Berichtscenter nur zugreifen, wenn Admins den Zugriff darauf freigeschaltet haben. Mitarbeiter-Nutzer haben hingegen keinen Zugriff auf das Berichtscenter.
Screenshot: Abwesenheitseinträge herunterladen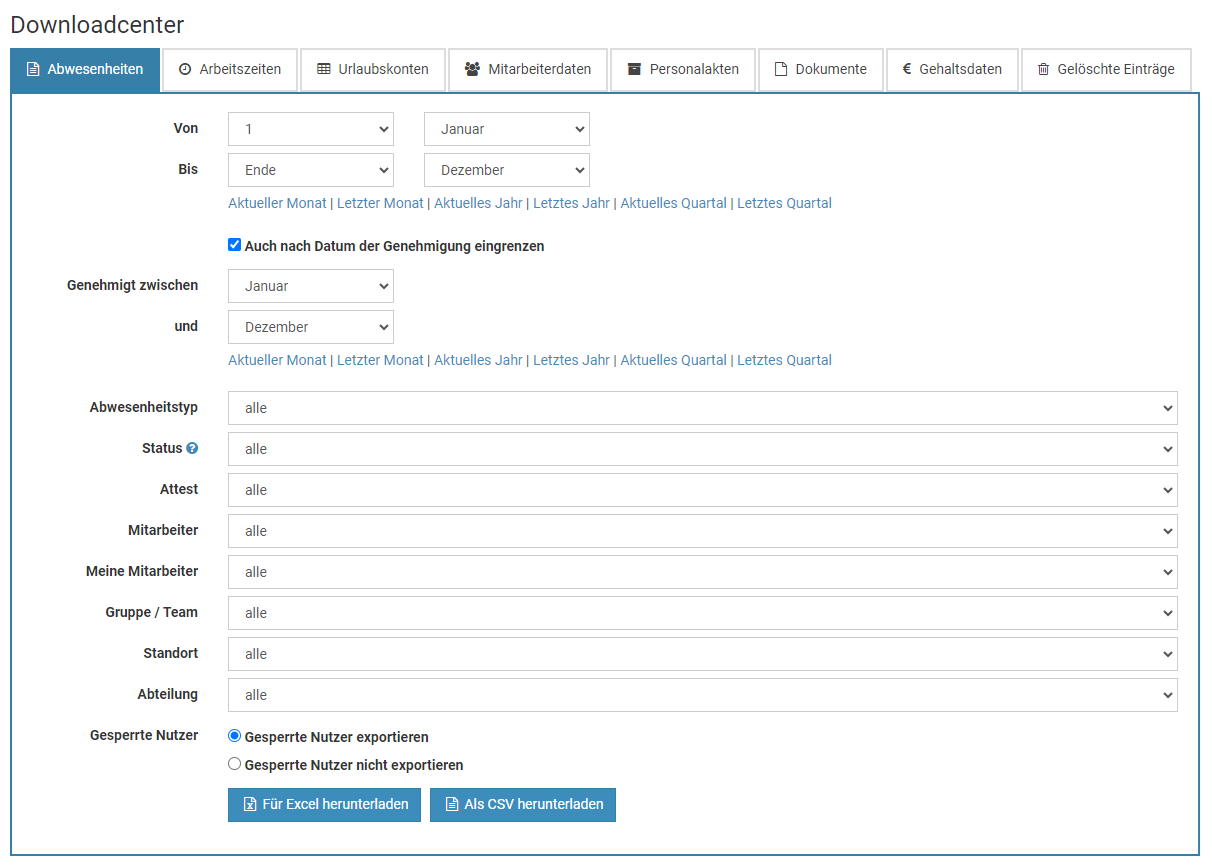
Arbeitszeiteinträge
Über das Downloadcenter können die Arbeitszeiteinträge der Mitarbeiter bequem mit wenigen Mausklicks als Excel-Datei oder CSV-Datei heruntergeladen werden.
Um die Arbeitszeiteinträge herunterzuladen, melden Sie sich als Admin oder Vorgesetzter am Timebutler an, klicken links auf "
Berichte", dann darunter auf "
Downloadcenter". Klicken Sie dann auf den Reiter "
Arbeitszeiten".
Beachten Sie:
Das Berichtscenter steht Admin-Nutzern immer zur Verfügung. Vorgesetzte können auf das Berichtscenter nur zugreifen, wenn Admins den Zugriff darauf freigeschaltet haben. Mitarbeiter-Nutzer haben hingegen keinen Zugriff auf das Berichtscenter.
Screenshot: Arbeitszeiteinträge herunterladen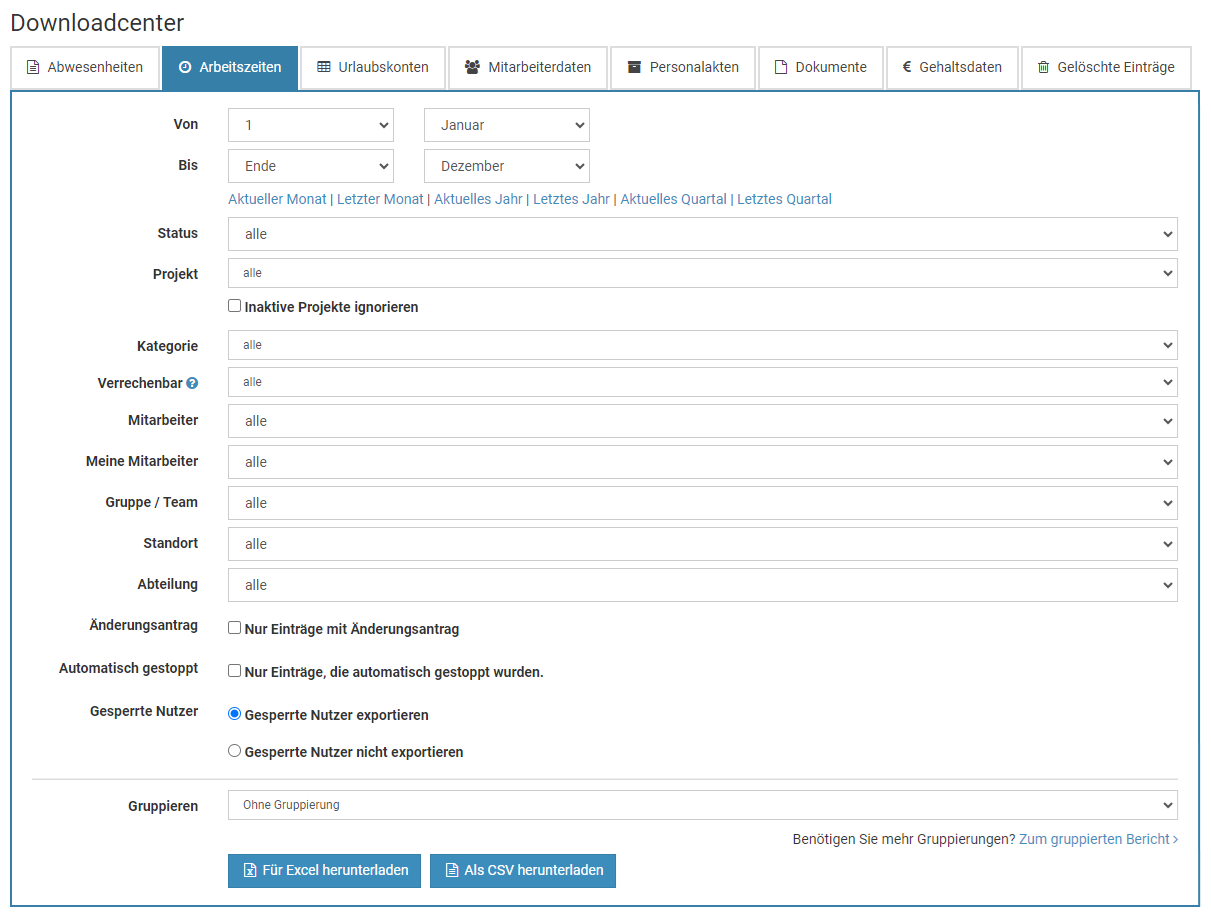
Urlaubskonten
Über das Downloadcenter können die Urlaubskonten der Mitarbeiter bequem mit wenigen Mausklicks als Excel-Datei oder CSV-Datei heruntergeladen werden.
Um die Urlaubskonten herunterzuladen, melden Sie sich als Admin oder Vorgesetzter am Timebutler an, klicken links auf "
Berichte", dann darunter auf "
Downloadcenter". Klicken Sie dann auf den Reiter "
Urlaubskonten".
Beachten Sie:
Das Berichtscenter steht Admin-Nutzern immer zur Verfügung. Vorgesetzte können auf das Berichtscenter nur zugreifen, wenn Admins den Zugriff darauf freigeschaltet haben. Mitarbeiter-Nutzer haben hingegen keinen Zugriff auf das Berichtscenter.
Screenshot: Urlaubskonten herunterladen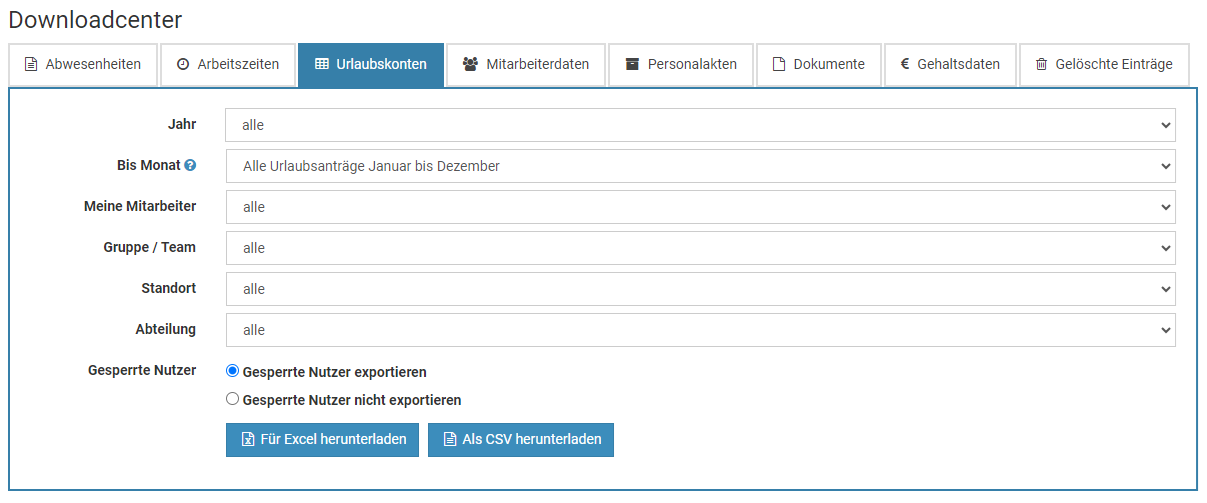
Mitarbeiterdaten
Über das Downloadcenter können die Daten der Mitarbeiter bequem mit wenigen Mausklicks als Excel-Datei oder CSV-Datei heruntergeladen werden.
Um die Mitarbeiterdaten herunterzuladen, melden Sie sich als Admin oder Vorgesetzter am Timebutler an, klicken links auf "
Berichte", dann darunter auf "
Downloadcenter". Klicken Sie dann auf den Reiter "
Mitarbeiterdaten".
Beachten Sie:
Das Berichtscenter steht Admin-Nutzern immer zur Verfügung. Vorgesetzte können auf das Berichtscenter nur zugreifen, wenn Admins den Zugriff darauf freigeschaltet haben. Mitarbeiter-Nutzer haben hingegen keinen Zugriff auf das Berichtscenter.
Screenshot: Mitarbeiterdaten herunterladen
Personalakten und Gehaltsdaten
Über das Downloadcenter können die Daten aus den Personalakten und die Gehaltsdaten der Mitarbeiter bequem mit wenigen Klicks als Excel-Datei oder CSV-Datei heruntergeladen werden.
Um die Daten herunterzuladen, melden Sie sich als Admin oder Vorgesetzter am Timebutler an, klicken links auf "
Berichte", dann darunter auf "
Downloadcenter". Klicken Sie dann auf den Reiter "
Personalakten" oder "
Gehaltsdaten".
DetailauswertungÜber das Downloadcenter können Sie die Personalakten der Mitarbeiter herunterladen. Über die
Auswertungsfunktion haben Sie noch viel mehr Möglichkeiten, um gezielt Personalakten mit bestimmten Kriterien zu suchen und herunterzuladen.
Beachten Sie:
Das Berichtscenter steht Admin-Nutzern immer zur Verfügung. Vorgesetzte können auf das Berichtscenter nur zugreifen, wenn Admins den Zugriff darauf freigeschaltet haben. Mitarbeiter-Nutzer haben hingegen keinen Zugriff auf das Berichtscenter.
Screenshot: Personalakten herunterladen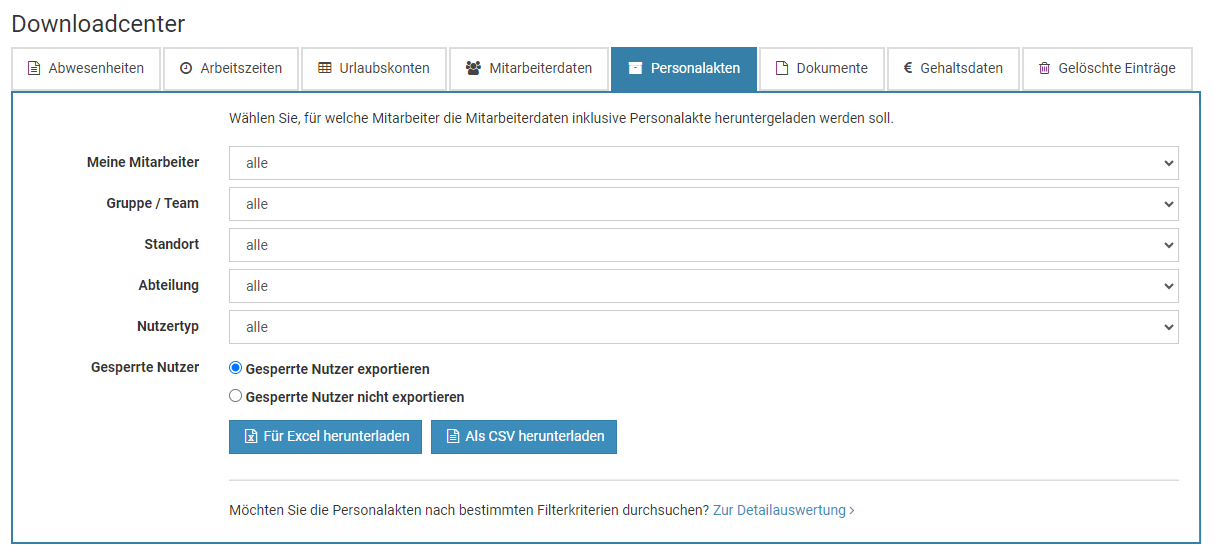
Screenshot: Gehaltsdaten herunterladen
Dokumente der Personalakte
Über das Downloadcenter können die Dokumente, die Sie in den Personalakten gespeichert haben, bequem herunterladen, auch für deine Vielzahl an Nutzern.
Um die Dokumente herunterzuladen, melden Sie sich als Admin oder Vorgesetzter am Timebutler an, klicken links auf "
Berichte", dann darunter auf "
Downloadcenter". Klicken Sie dann auf den Reiter "
Dokumente".
Beachten Sie:
Das Berichtscenter steht Admin-Nutzern immer zur Verfügung. Vorgesetzte können auf das Berichtscenter nur zugreifen, wenn Admins den Zugriff darauf freigeschaltet haben. Mitarbeiter-Nutzer haben hingegen keinen Zugriff auf das Berichtscenter.
Screenshot: Dokumente aus der Personalakte herunterladen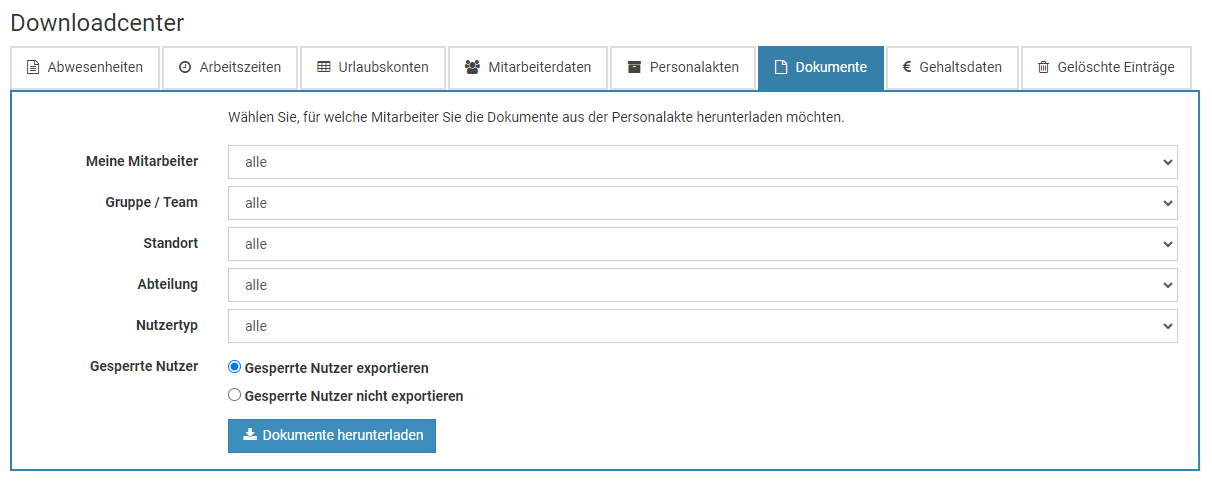
Gelöschte Abwesenheitseinträge
Timebutler protokolliert gelöschte Abwesenheitseinträge mit Zeitstempel und der Information, wer den Eintrag gelöscht hat. Über das Downloadcenter können die gelöschten Abwesenheitseinträge bequem mit wenigen Mausklicks als Excel-Datei oder CSV-Datei heruntergeladen werden.
Um die gelöschten Abwesenheitseinträge herunterzuladen, melden Sie sich als Admin oder Vorgesetzter am Timebutler an, klicken links auf "
Berichte", dann darunter auf "
Downloadcenter". Klicken Sie dann auf den Reiter "
Gelöschte Abwesenheitseinträge".
Hinweis:Timebutler protokolliert welcher Nutzer, wann welchen Abwesenheitseintrag gelöscht hat, damit die Bearbeitungshistorie lückenlos nachvollzogen werden kann. Auch für bestehende Abwesenheitseinträge wird die
Bearbeitungshistorie protokolliert, um die Änderungen nachvollziehen zu können.
Beachten Sie:
Das Berichtscenter steht Admin-Nutzern immer zur Verfügung. Vorgesetzte können auf das Berichtscenter nur zugreifen, wenn Admins den Zugriff darauf freigeschaltet haben. Mitarbeiter-Nutzer haben hingegen keinen Zugriff auf das Berichtscenter.
Screenshot: Gelöschte Abwesenheitseinträge herunterladen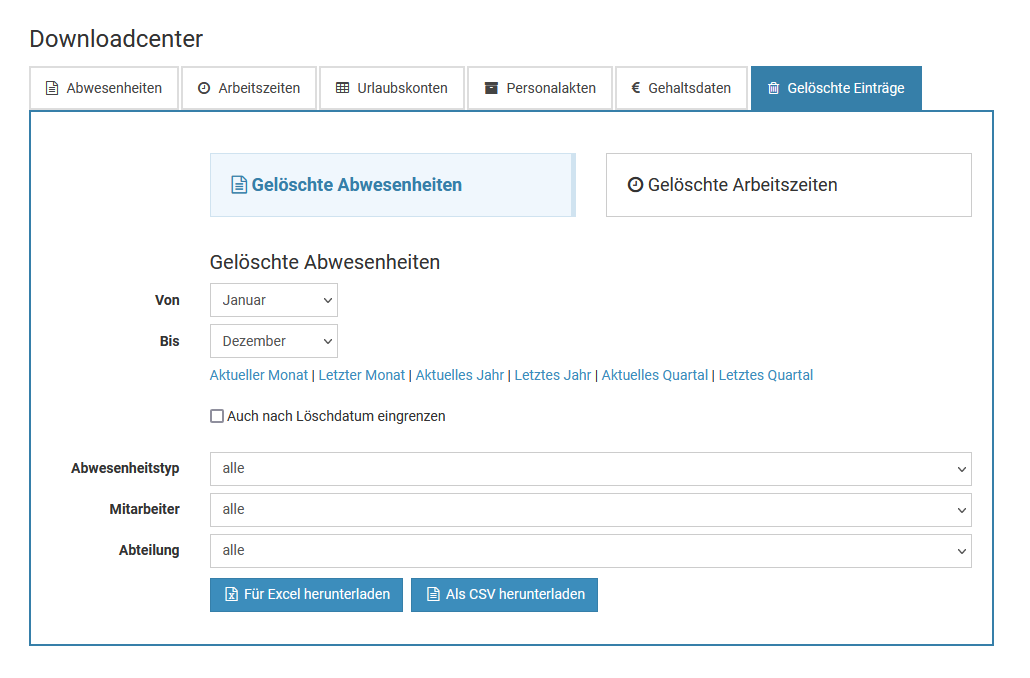
Gelöschte Arbeitszeiteinträge
Timebutler protokolliert gelöschte Arbeitszeiteinträge mit Zeitstempel und der Information, wer den Eintrag gelöscht hat. Über das Downloadcenter können die gelöschten Arbeitszeiteinträge bequem mit wenigen Mausklicks als Excel-Datei oder CSV-Datei heruntergeladen werden.
Um die gelöschten Arbeitszeiteinträge herunterzuladen, melden Sie sich als Admin oder Vorgesetzter am Timebutler an, klicken links auf "
Berichte", dann darunter auf "
Downloadcenter". Klicken Sie dann auf den Reiter "
Gelöschte Arbeitszeiteinträge".
Hinweis:Timebutler protokolliert welcher Nutzer, wann welchen Arbeitszeiteintrag gelöscht hat, damit die Bearbeitungshistorie lückenlos nachvollzogen werden kann. Auch für bestehende Arbeitszeiteinträge wird die
Bearbeitungshistorie protokolliert, um die Änderungen nachvollziehen zu können.
Beachten Sie:
Das Berichtscenter steht Admin-Nutzern immer zur Verfügung. Vorgesetzte können auf das Berichtscenter nur zugreifen, wenn Admins den Zugriff darauf freigeschaltet haben. Mitarbeiter-Nutzer haben hingegen keinen Zugriff auf das Berichtscenter.
Screenshot: Gelöschte Arbeitszeiteinträge herunterladen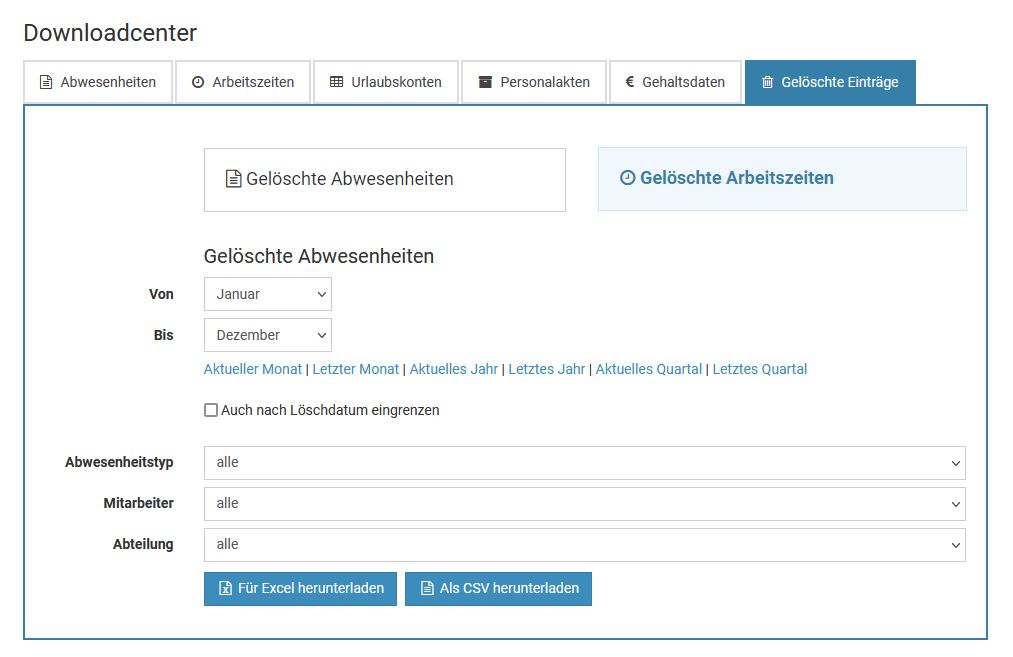
Berichtscenter aufrufen und auswerten
Im Berichtscenter können Sie Daten der Mitarbeiter auswerten und grafisch aufbereiten lassen. Melden Sie sich als Admin oder Vorgesetzter am Timebutler an, klicken links auf "
Berichte", dann darunter auf "
Berichtscenter". Nehmen Sie die gewünschten Einstellungen vor, um die Berichte anzeigen zu lassen.
Sie haben die Auswahl zwischen verschiedenen Berichtstypen:
- Diagramm (Summen)
- Diagramm (Durchschnitt je Mitarbeiter)
- Kumuliert
- Listenansicht
Zugriff für Vorgesetzte und Mitarbeiter
Das Berichtscenter steht Admin-Nutzern immer zur Verfügung. Vorgesetzte können auf das Berichtscenter nur zugreifen, wenn Admins den Zugriff darauf freigeschaltet haben. Mitarbeiter-Nutzer haben hingegen keinen Zugriff auf das Berichtscenter.
Um Vorgesetzten den Zugriff zum Berichtscenter freizuschalten, melden Sie sich als Admin am Timebutler an, klicken links unten auf "
Einstellungen > Weitere..", dann rechts auf "
Globale Einstellungen". Prüfen/ändern Sie die Option "
Vorgesetzter darf Berichte verwenden".
Screenshot: Abwesenheitseinträge herunterladen
Auslastungsbericht - Kumulierter Bericht
Der Auslastungsbericht in den vier Varianten kumulierte Abwesenheiten,
gruppierte Abwesenheiten,
Listenansicht auf Tagesbasis und
gruppierte Arbeitszeiten sind nützliche und häufig aufgerufene Auswertungen.
Kumulierten Bericht aufrufen
Melden Sie sich als Admin am Timebutler an und klicken links auf "
Berichte > Auslastungsbericht". Wählen Sie die Option "
Berichtstyp: Kumuliert" und klicken auf den blauen Button "
Anzeigen".
Sie können den Bericht auch per Klick auf den entsprechenden Button als Excel-Datei oder CSV-Datei herunterladen.
Im kumulierten Bericht erhalten Sie die Information über die Summe der Arbeitstage/Urlaubstage für alle Abwesenheiten in dem gewählten Zeitraum. Diese Zahlen sind monatsscharf berechnet. Wenn also ein Urlaubsantrag im Mai startet und in den Juni ragt, Sie den kumulierten Bericht für Mai aufrufen, dann werden nur die Urlaubstage des Urlaubsantrages in dem Bericht eingerechnet, die in den Mai fallen. Für die
Ermittlung der Rückstellungen ist es in manchen Fällen notwendig, eine monatssscharfe Auswertung zu erhalten.

Auslastungsbericht - Gruppierter Bericht
Der Auslastungsbericht in den vier Varianten
kumulierte Abwesenheiten, gruppierte Abwesenheiten,
Listenansicht auf Tagesbasis und
gruppierte Arbeitszeiten sind nützliche und häufig aufgerufene Auswertungen.
Gruppierten Bericht aufrufen
Melden Sie sich als Admin am Timebutler an und klicken links auf "
Berichte > Auslastungsbericht". Wählen Sie die Option "
Berichtstyp: Gruppiert" und klicken auf den blauen Button "
Anzeigen".
Sie können den Bericht auch per Klick auf den entsprechenden Button als Excel-Datei oder CSV-Datei herunterladen.
In diesem Auslastungsbericht erhalten Sie eine Übersicht über die Anzahl Mitarbeiter mit Abwesenheiten je Monat/Woche/Tag oder die Anzahl Arbeitstage je Monat/Woche/Tag (je nach Einstellung). Damit können Sie auf einen Blick erkennen, an welchen Tagen, Wochen oder Monaten viele Mitarbeiter abwesend sind, viel Krankheit angefallen ist, an Schulungen teilgenommen wurde, usw. Das vereinfacht die Einsatzplanung und das Finden von Zeiträumen mit Engpässen.
Auslastungsbericht - Listenansicht auf Tagesbasis
Der Auslastungsbericht in den vier Varianten
kumulierte Abwesenheiten,
gruppierte Abwesenheiten, Listenansicht auf Tagesbasis und
gruppierte Arbeitszeiten sind nützliche und häufig aufgerufene Auswertungen.
Bericht zur Listenansicht auf Tagesbasis aufrufen
Melden Sie sich als Admin am Timebutler an und klicken links auf "
Berichte > Auslastungsbericht". Wählen Sie die Option "
Berichtstyp: Listenansicht auf Tagesbasis" und klicken auf den blauen Button "
Anzeigen".
Sie können den Bericht auch per Klick auf den entsprechenden Button als Excel-Datei oder CSV-Datei herunterladen.
In diesem Auslastungsbericht erhalten Sie eine tageweise Auswertung für die gewählten Mitarbeiter der Arbeitstage und Abwesenheiten. Falls das Zeiterfassungsfeature aktiviert ist, dann werden hier auch die kumulierten Arbeitszeit-Informationen je Kalendertag angezeigt (Soll-Arbeitszeit, geleistete Arbeitszeit, Pausen, usw.).
Start- und Ende-Uhrzeit der Arbeitszeiteinträge
In diesem Bericht können Sie auch die Start- und Ende-Uhrzeiten der Arbeitszeiteinträge ausgegeben lassen.
Wählen Sie dazu die entsprechende Option bei der Auswahl "
Arbeitszeiten ausgeben"
Auslastungsbericht - Gruppierte Arbeitszeiten
Der Auslastungsbericht in den vier Varianten
kumulierte Abwesenheiten,
gruppierte Abwesenheiten,
Listenansicht auf Tagesbasis und gruppierte Arbeitszeiten sind nützliche und häufig aufgerufene Auswertungen.
Gruppierte Arbeitszeiten aufrufen
Melden Sie sich als Admin am Timebutler an und klicken links auf "
Berichte > Auslastungsbericht". Wählen Sie die Option "
Berichtstyp: Gruppierte Arbeitszeiten".
Bei der Auswahl "
Gruppierungen" können Sie die eine oder mehrere Gruppierungen einstellen. Sie können nach Jahr, Quartal, Monat, Woche, Mitarbeiter, Projekt und Kategorie gruppieren (die Gruppierung nach Projekt und Kategorie wird nur angeboten, wenn Sie mindestens ein Projekt / Kategorie konfiguriert haben). Klicken Sie auf den blauen Button "
Anzeigen".
Sie können den Bericht auch per Klick auf den entsprechenden Button als Excel-Datei oder CSV-Datei herunterladen.
Personalakten auswerten
Ein Admin kann die Daten aus der Personalakte nach beliebigen Filterkriterien auswerten.
Melden Sie sich dazu als Admin am Timebutler an und klicken links auf "
Berichte", dann darunter auf "
Personalakte". Sie haben nun die Möglichkeit, Filterkriterien für die Felder der Personalakte festzulegen und Filterkriterien für die Auswahl der Mitarbeiter.
Personalakte Filterkriterien
Im Bereich der Personalakte Filterkriterien können Sie ein neues Filterkriterium hinzufügen. Sie können dann ein beliebiges Datenfeld aus der Personalakte auswählen und je nach Datentyp stehen dann unterschiedliche Bedingungen zur Auswahl: bei einem Feld vom Typ Datum können Sie beispielsweise auf eine bestimmte Woche filtern, bei einem Feld vom Typ Text können Sie auf eine bestimmte Mindestlänge filtern.
Wenn notwendig, erstellen Sie mehrere Filterkriterien. Die Filterkriterien werden Und-verknüpft, das heißt, dass beim Ausführen der Auswertung nur diejenigen Personalakten und Mitarbeiter gefunden werden, bei denen
alle Filterkriterien zutreffen.
Mitarbeiter Filterkriterien
Über die Mitarbeiter Filterkriterien können Sie festlegen, welche Personalakten welcher Mitarbeiter ausgewertet werden sollen.
So können Sie beispielsweise nur die Personalakten der Mitarbeiter eines bestimmten Standortes oder einer bestimmten Abteilung durchsuchen lassen.
Auswertung ausführen
Wenn Sie die Auswertung per Klick auf den Button "
Anzeigen" ausführen, dann bekommen Sie die Mitarbeiter angezeigt, bei denen alle Filterkriterien zutreffen. Aus Platzgründen werden hier nur die Felder aus der Personalakte angezeigt, die in den Filterkriterien eingestellt wurden (jedoch nicht mehr als 7 Felder).
Über den Button "
Herunterladen" können Sie alle Daten aus der Personalakte herunterladen, beispielsweise als Excel-Datei. In der heruntergeladenen Datei sind dann alle Datenfelder der Digitalen Personalakte enthalten.
Damit Sie für Auswertungen, die Sie häufig benötigen, nicht jedes Mal die Filterkriterien neu einstellen müssen, können Sie die
Auwertungen und Suchen speichern.
Mit den
Suchfavoriten haben Sie sogar noch schnelleren Zugriff auf häufig benutzte Auswertungen. Die Favoriten werden auf dem Dashboard angezeigt und können mit einem Mausklick aufgerufen werden.
Beispiele
Auswertung: Bei welchen Mitarbeitern endet die Probezeit in den nächsten 30 Tagen?
Auswertung: Welche geringfügig Beschäftigten sind gesetzlich krankenversichert?
Auswertungen und Suchen speichern
Über die
Auswertung der Personalakten können Sie die Pesonalakten der Mitarbeiter bequem durchsuchen und auswerten.
Viele Auswertungen werden häufig oder regelmäßig benötigt, beispielsweise die Liste der Mitarbeiter, bei denen die Probezeit in Kürze endet oder auch die Liste der Mitarbeiter, bei denen in nächster Zeit eine medizinische Prüfung ansteht. Damit Sie für diese wiederkehrenden Auswertungen die Filterkriterien nicht mühselig erstellen müssen, können Sie beliebige Suchen speichern. Die gespeicherte Suche können Sie dann zukünftig mit einem Klick aufrufen und auswerten.
Suche speichern
Rufen Sie die
Auswertung der Personalakten auf, geben die gewünschten Filterkriterien ein und führen die Auswertung aus. Sie bekommen nun einen Button "
Suche speichern" angezeigt. Per Klick auf den Button erhalten Sie die Möglichkeit, einen Namen für die zu speichernde Suche einzutragen und können die Suche dann speichern.
Gespeicherte Suche ausführen
Rufen Sie die
Auswertung der Personalakten auf und klicken auf der Seite auf den Reiter "
Meine gespeicherten Suchen". Hier werden Ihre gespeicherten Suchen angezeigt. Klicken Sie auf eine der Suchen, um die dahinterliegende Auswertung auszuführen.
Um eine gespeicherte Suche zu löschen klicken Sie neben dem Kasten der gespeicherten Suche auf das Symbol mit dem Papierkorb.
Gespeicherte Suchen sind Ihre persönlichen Suchen: kein anderer Nutzer kann Ihre Suchen sehen.
Noch schneller: FavoritenSie können gespeicherte
Suchen als Favorit markieren. Favoriten werden auf dem Dashboard angezeigt, so dass Sie direkt vom Dashboard aus mit einem Mausklick die Auswertung ausführen können.
Beispiel
Such-Favoriten auf dem Dashboard
Ein Admin kann die
Suchen zur Auswertung der Personalakte speichern. Auf diese Weise kann jede Suche mit wenigen Mausklicks erneut aufgerufen werden.
Bei dem Speichern der Suchen kann gewählt werden, ob die Suche als Favorit gespeichert werden soll. Favoriten werden auf dem Dashboard, also auf der Seite nach der Anmeldung am Timebutler, angezeigt. Damit kann die Auswertung direkt aus dem Dashboard heraus mit einem Mausklick aufgerufen werden, ohne den Umweg zu der Übersicht der gespeicherten Suchen zu gehen.
Favorit speichern oder ändern
Suche als Favorit speichernBeim Speichern einer Suche kann über die Auswahl "
Als Favorit speichern" ausgewählt werden, ob die Suche als Favorit gespeichert werden soll.
Bestehende gespeicherte Suche zu Favoriten hinzufügen oder entfernenUm eine bestehende Suche zu den Favoriten hinzuzufügen oder aus den Favoriten zu entfernen, rufen Sie die Übersicht der gespeicherten Suchen auf und klicken bei der gewünschten Suche auf das Symbol mit dem Herz
.
Screenshot: Suchfavoriten der digitalen Personalakte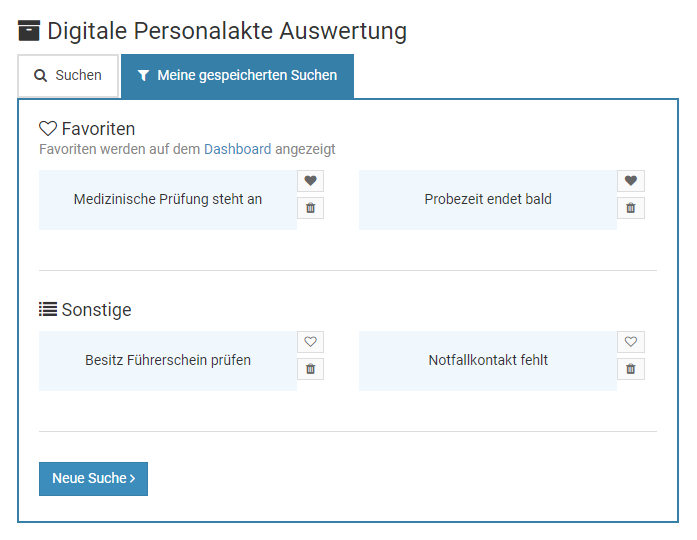
Anzeige der Favoriten auf dem Dashboard
Anzeige gespeicherter Suchen auf dem Dashboard ausblendenWenn die gespeicherten Suchen auf dem Dashboard nicht angezeigt werden sollen, dann klicken Sie im Dashboard bei den gespeicherten Suchen rechts auf das Symbol mit dem Kreuz
.
Anzeige gespeicherter Suchen auf dem Dashboard einblendenWenn Sie die Anzeige der gespeicherten Suchen auf dem Dashboard deaktiviert haben, diese nun aber doch wieder anzeigen möchten, dann melden Sie sich an Ihrem Timebutler Nutzerkonto an, klicken links unten auf "
Einstellungen", dann darunter auf "
Ihr Nutzerkonto". Auf der Seite finden Sie den Kasten "
Ihre persönlichen Einstellungen". Klicken Sie dort auf den Button "
Bearbeiten".
Screenshot: Suchfavoriten auf dem Dashboard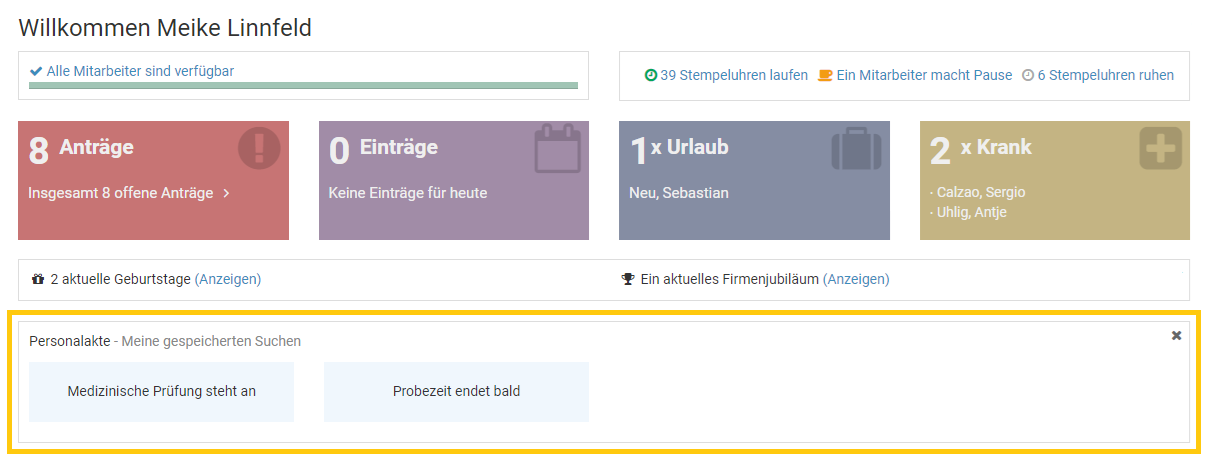
Mitarbeiter
Der Nutzertyp Mitarbeiter-Nutzer ist für die meisten Mitarbeiter im Unternehmen das passende Nutzerkonto. Mitarbeiter-Nutzer sehen immer die eigenen Urlaubs- und Abwesenheitseinträge sowie die eigenen Arbeitszeiteinträge, das eigene Urlaubskonto und das eigene Überstunden- oder Arbeitszeitkonto.
Sie haben keine Weisungsbefugnis und dürfen somit für
andere Mitarbeiter keine Einträge eingeben oder verändern und auch keine Urlaubsanträge oder
Abwesenheitsanträge genehmigen.
Im
Kalender sehen Mitarbeiter die Kollegen mit dem gleichen Vorgesetzten. Sie haben jedoch nur Einblick in die Kalenderansicht der Abwesenheiten, nicht auf fremde Urlaubskonten, Arbeitszeit- und Überstundenkonten oder Detailansichten fremder Einträge. Ebenso sehen Sie keine Stammdaten oder sonstige Details fremder Kollegen.
Ein Admin kann die Sichtrechte und Eingaberechte von allen Nutzern oder individuell von einzelnen Nutzern einschränken oder erweitern. Die Rechte eines bestimmten Nutzers werden in der
Detailansicht des Nutzerkontos angezeigt.
Vorgesetzte
Der Nutzertyp Vorgesetzter ist -dem Namen entsprechend- für Vorgesetzte im Unternehmen vorgesehen. Vorgesetzte haben Mitarbeiter zugeordnet und sehen deren Urlaubs- und Abwesenheitseinträge, Arbeitszeiteinträge, Urlaubskonten, Stammdaten und Überstunden- oder Arbeitszeitkonten.
Vorgesetzte sind weisungsbefugt und dürfen somit für die ihnen zugeordneten Mitarbeiter Einträge eingeben, bearbeiten und löschen und Urlaubsanträge und Abwesenheitsanträge genehmigen und ablehnen.
Im Kalender sehen Vorgesetzte die zugeordneten Mitarbeiter und haben Einblick in die Detailansicht der Einträge und auch der Stammdaten der Mitarbeiter.
Jeder Nutzer im Timebutler hat immer einen oder
mehrere Vorgesetzte zugeordnet, so auch ein Vorgesetzter. Die Anträge des Vorgesetzten werden also von seinem Vorgesetzten genehmigt.
Ein Admin kann die Sichtrechte und Eingaberechte von allen Nutzern oder individuell von einzelnen Nutzern einschränken oder erweitern. Die Rechte eines bestimmten Nutzers werden in der
Detailansicht des Nutzerkontos angezeigt.
Administratoren
Administratoren haben die gleichen Eigenschaften wie Vorgesetzte, können jedoch zusätzlich bestimmte Einstellungen vornehmen, die sich auf all Nutzer im Timebutler auswirken und die kein anderer Nutzer bearbeiten darf. Sie haben immer Sichtrechte, Bearbeitungsrechte und Genehmigungsrechte auf alle Nutzer, alle Einträge, alle Urlaubskonten, Arbeitszeitkonten, Stammdaten und sonstige Daten im Timebutler.
Viele Einstellungen können nur von Administratoren geändert werden, beispielsweise die Zuordnung von Mitarbeitern zu Vorgesetzten, Urlaubssperren, Feiertage, die Änderung der Rechte für andere Nutzerkonten, Abwesenheitstypen und deren Zusatzfelder, Globale Einstellungen und vieles mehr.
Dennoch haben Administratoren auch ein eigenes Urlaubskonto, Überstundenkonto oder Arbeitszeitkonto. Administratoren haben auch einen Vorgesetzten zugeordnet, der die Urlaubsanträge des Administrators genehmigt. Ebenso können einem Administrator Mitarbeiter zugeordnet sein, so dass er als Vorgesetzter für die Mitarbeiter gilt.
Üblicherweise erhalten die Mitarbeiter aus der Personalabteilung und die Geschäftsführer Admin-Rechte. In einem Unternehmen mit beispielsweise 230 Mitarbeitern werden in der Regel 3-5 Administrator-Konten erstellt, 10-20 Vorgesetzte und 200 Mitarbeiter-Nutzerkonten.
Mindestens zwei Administrator-Nutzerkonten erstellen
Da viele Einstellungen und Änderungen nur von Administratoren vorgenommen werden können, sollte stets mehr als ein Administrator vorhanden sein. Es können beliebig viele Administratoren erstellt werden.
Nutzertyp ändern
Sie können bei einem bestehenden Nutzerkonto den Nutzertyp ändern. Gehen Sie dazu wie folgt vor:
Nutzertyp ändern
Melden Sie sich als Admin am Timebutler an und klicken links oben auf "
Mitarbeiter", dann unterhalb des kleinen "
Mitarbeiter" auf "
Übersicht". Bei dem gewünschten Nutzerkonto klicken Sie auf den grünen Button mit dem Bleistift (=Bearbeiten). Ändern Sie oben bei "
Nutzertyp" die Auswahl auf den gewünschten Nutzertyp. Klicken Sie dann unten auf den blauen Button "
Speichern", um die Änderung zu speichern.
Fehlermeldung: Mitarbeiter zugeordnet
Wenn Sie einen Vorgesetzten oder Admin zum Mitarbeiter-Nutzer ändern möchten und dem Vorgesetzten / Admin noch Mitarbeiter zugeordnet sind, dann erhalten Sie eine Fehlermeldung. Sie müssen dann zunächst alle Mitarbeiter des Vorgesetzten / Admins einem
anderen Vorgesetzten zuordnen. Danach können Sie den Nutzertyp zum Mitarbeiter-Nutzer ändern.
Eigenes Admin-Nutzerkonto ändern
Es ist nicht möglich, dass ein Admin sein eigenes Admin-Nutzerkonto zu einem Vorgesetzten- oder Mitarbeiter-Nutzerkonto ändert. Damit wird sichergestellt, dass immer mindestens ein Nutzer mit Admin-Rechten vorhanden ist. Stattdessen meldet sich ein anderer Admin-Nutzer an und ändert das Nutzerkonto wie oben beschrieben.
Wenn der Nutzer gerade an seinem Timebutler Nutzerkonto angemeldet ist, während der Admin die Änderung durchführt, dann wirkt sich die Änderung erst nach der nächsten Ab- und Anmeldung des Nutzers aus.
Überblick in der Nutzerkonto-Detailansicht
In der Detailansicht zu einem Nutzerkonto erhält ein Admin oder Vorgesetzter alle Informationen zu dem Nutzerkonto im Überblick, darunter:
- Stammdaten
- Sichtrechte, Eingaberechte und Bearbeitungsrechte des Nutzers
- Zugeordnete Vorgesetzte
- Urlaubskonto Überblick
- Wochenarbeitstage
- Pausenregelung (nur bei aktivierter Zeiterfassung)
- Erstellungsdatum des Nutzerkontos und letzte Anmeldung
- Information über den Status und die Sprache des Email-Versands
Die Detailansicht zu einem Nutzerkonto können Sie aufrufen, indem Sie sich als Admin oder Vorgesetzter am Timebutler anmelden, dann links oben auf "
Mitarbeiter" klicken, dann unterhalb des kleinen "
Mitarbeiter" auf "
Übersicht". Klicken Sie nun bei dem gewünschten Nutzerkonto auf das blaue Symbol mit der Lupe.
Keine Sichtrechte für Mitarbeiter-Nutzer
Mitarbeiter-Nutzer können die Detailansicht zu einem Nutzerkonto nicht einsehen, mit Ausnahme des eigenen Nutzerkontos.
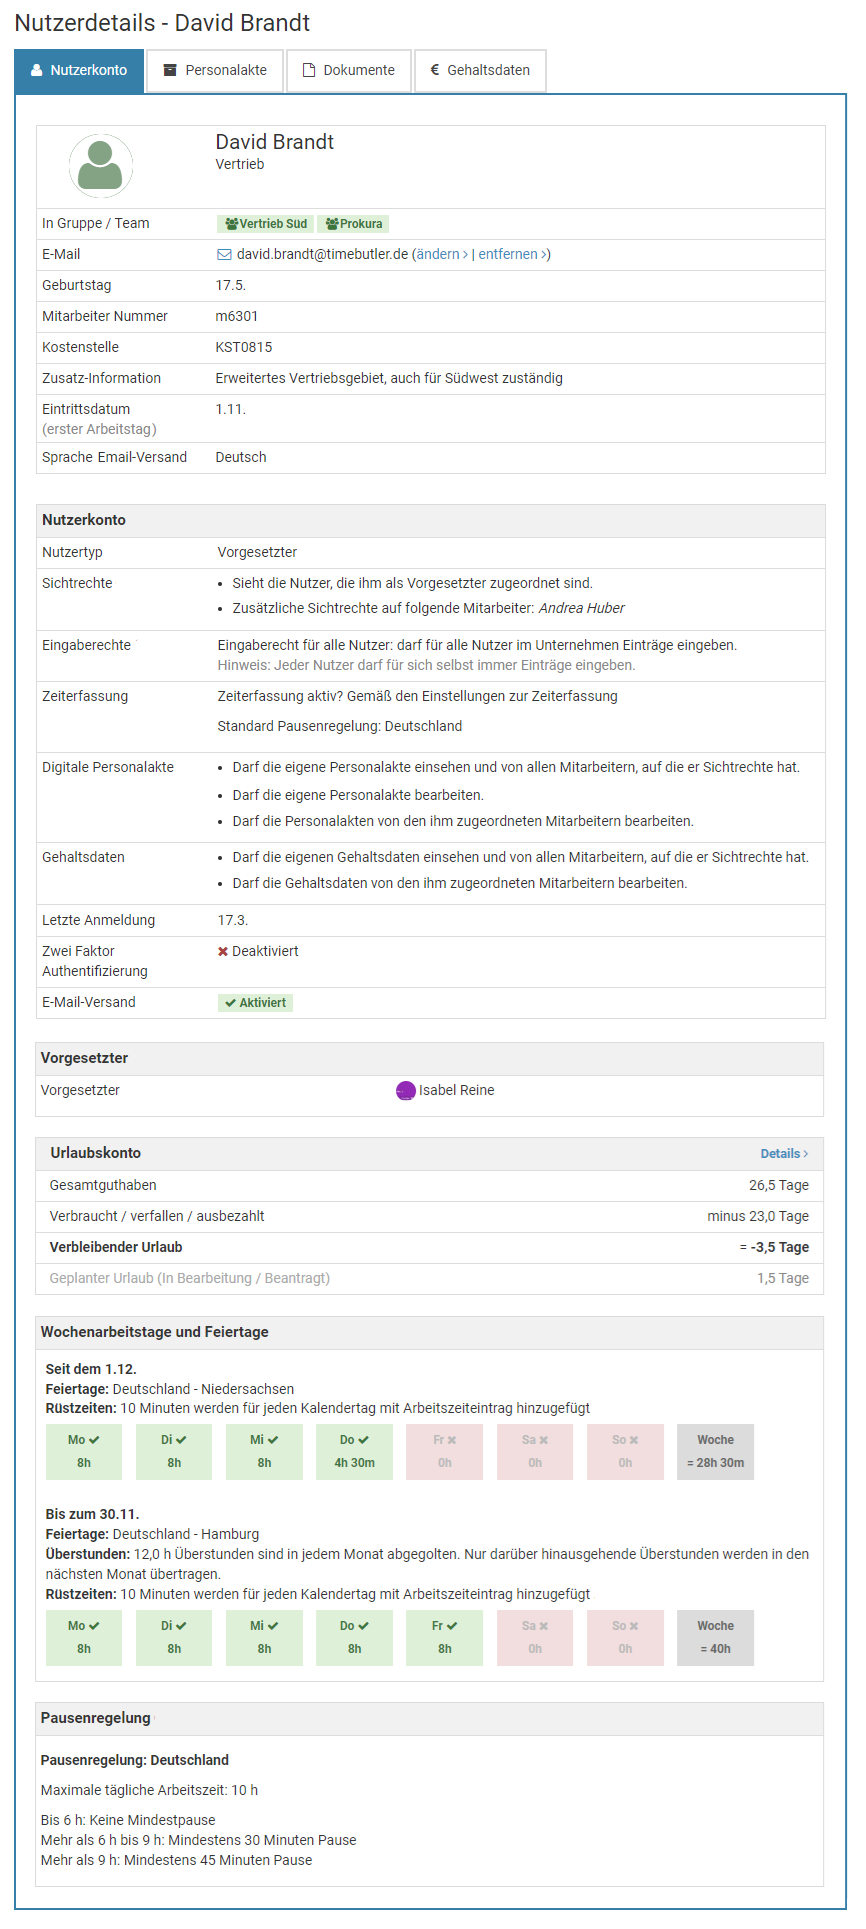
Sichtrechte
Die Nutzertypen haben folgende Sichtrechte:
| | Mitarbeiter | Vorgesetzter | Administrator |
|---|
| Eigene Einträge |
| | Alle eigenen Daten (Abwesenheiten, Arbeitszeiten, Urlaubskonten, usw.) | | | |
| Daten von Mitarbeitern aus dem Team (gleicher Vorgesetzter) |
| | Abwesenheitseinträge - Kalenderansicht | 1 | | |
| | Abwesenheitseinträge - Listenansicht | | | |
| | Abwesenheitseinträge - Detailansicht | | | |
| | Urlaubskonten | | | |
| | Arbeitszeiteinträge und Arbeitszeitkonten | | | |
| | Überstundenkonten | | | |
| | Stammdaten der Nutzerkonten | | | |
| Daten von Mitarbeitern anderer Vorgesetzter |
| | Abwesenheitseinträge - Kalenderansicht | / 1, 2 | / 2 | |
| | Abwesenheitseinträge - Listenansicht | | / 2 | |
| | Abwesenheitseinträge - Detailansicht | | / 2 | |
| | Urlaubskonten | | / 2, 3 | |
| | Arbeitszeiteinträge und Arbeitszeitkonten | | / 2, 4 | |
| | Überstundenkonten | | / 2 | |
| | Stammdaten der Nutzerkonten | | / 2 | |
Legende
| Sichtrechte |
| Keine Sichtrechte |
| / | Per Standard keine Sichtrechte / Sichtrechte können freigeschaltet werden |
1
1 | Ein Admin kann die Sichtrechte für Mitarbeiter erweitern oder einschränken: |
| 2 | Ein Admin kann die Sichtrechte für Vorgesetzte und Mitarbeiter erweitern: |
| 3 | Ein Admin kann die Sichtrechte auf Urlaubskonten von Mitarbeitern anderer Vorgesetzter deaktivieren (Option "Sichtrechte für Vorgesetzte auf Urlaubsanspruch der erweiterten Sichtrechte" in den Globalen Einstellungen) |
| 4 | Ein Admin kann die Sichtrechte auf Arbeitszeitn von Mitarbeitern anderer Vorgesetzter deaktivieren (Option "Sichtrechte für Vorgesetzte auf Arbeitszitn der erweiterten Sichtrechte" in den Globalen Einstellungen) |
Eingaberechte und Bearbeitungsrechte
Die Nutzertypen haben folgende Eingaberechte:
| | Mitarbeiter | Vorgesetzter | Administrator |
|---|
| Einträge für sich selbst eingeben und bearbeiten |
| | Urlaub, Abwesenheiten, Überstunden, Überstundenabbau | | | |
| | Arbeitszeiteinträge | 1 | 1 | |
| | Stempeluhr (falls aktiviert) | 2 | 2 | 2 |
| | Zeiterfassungsterminal (falls aktiviert) | | | |
| Daten von Mitarbeiter aus dem Team (gleicher Vorgesetzter) |
| | Urlaub, Abwesenheiten, Überstunden, Überstundenabbau | / 3 | / 4 | |
| | Arbeitszeiteinträge | | / 4 | |
| | Stempeluhr (falls aktiviert) | | | |
| | Zeiterfassungsterminal (falls aktiviert) | | | |
| Daten von Mitarbeitern anderer Vorgesetzter |
| | Urlaub, Abwesenheiten, Überstunden, Überstundenabbau | / 3 | / 4 | |
| | Arbeitszeiteinträge | | / 4 | |
| | Stempeluhr (falls aktiviert) | | | |
| | Zeiterfassungsterminal (falls aktiviert) | | | |
| Nutzerkonten und Einstellungen |
| | Nutzerkonten erstellen oder ändern | | / 5 | |
| | Einstellungen vornehmen (Urlaubsanspruch, Feiertage, Zeiterfassung, …) | | | |
Legende
| Eingaberechte |
| Keine Eingaberechte |
| / | Per Standard Eingaberechte / Eingaberechte können eingeschränkt werden |
| / | Per Standard keine Eingaberechte / Eingaberechte können freigeschaltet werden |
| 1 | Ein Admin kann die Eingaberechte für Mitarbeiter und Vorgesetzte verbieten oder einschränken: |
| 2 | Ein Admin kann einstellen, dass bestimmte Nutzer die Stempeluhr nicht nutzen dürfen und nur im Zeiterfassungsterminal stempeln dürfen. |
| 3 | Ein Admin kann einzelnen Mitarbeitern die Eingaberechte erweitern, damit diese auch für andere Mitarbeiter Abwesenheiten, Urlaubsanträgen, Überstunden und Überstundenabbau eingeben können. |
| 4 | Ein Admin kann einstellen, dass Vorgesetzte keine Einträge für andere Nutzer eingeben dürfen (Option "Vorgesetzter darf Abwesenheiten für andere Nutzer eintragen" in den Globalen Einstellungen) |
| 5 | Ein Admin kann einstellen, dass Vorgesetzte keine Nutzerkonten erstellen oder Stammdaten ändern dürfen (Option "Nutzerrechte für Vorgesetzte und Admins" in den Globalen Einstellungen) |
Recht auf Genehmigung von Anträgen
Die Nutzertypen haben folgende Recht zur Genehmigung von Anträgen:
| | Mitarbeiter | Vorgesetzter | Administrator |
|---|
| Eigene Anträge |
| | Urlaubsanträge | | | |
| | Abwesenheitsanträge, Überstunden und Überstundenabbau | | | |
| | Änderungsanträge für Arbeitszeiteinträge | | | |
| Anträge der eigenen Mitarbeiter |
| | Urlaubsanträge | | / 1 | |
| | Abwesenheitsanträge, Überstunden und Überstundenabbau | | / 1 | |
| | Änderungsanträge für Arbeitszeiteinträge | | / 1 | |
| Anträge von Mitarbeitern anderer Vorgesetzter |
| | Urlaubsanträge | | | |
| | Abwesenheitsanträge, Überstunden und Überstundenabbau | | | |
| | Änderungsanträge für Arbeitszeiteinträge | | | |
| Anträge in Vertretung während Abwesenheit des Vorgesetzten |
| | Urlaubsanträge | | / 2 | |
| | Abwesenheitsanträge, Überstunden und Überstundenabbau | | / 2 | |
| | Änderungsanträge für Arbeitszeiteinträge | | | |
Legende
| Genehmigungsrechte |
| Keine Genehmigungsrechte |
| / | Per Standard Genehmigungsrechte / Genehmigungsrechte können eingeschränkt werden |
| 1 | Ein Admin kann die Genehmigung von Anträgen durch Vorgesetzte einschränken:- Vorgesetzten kann die Genehmigung von Anträgen verboten werden (Option "Vorgesetzte dürfen Anträge genehmigen" in den Globalen Einstellungen).
- Zeitliche Einschränkung zum Löschen von Urlaubsanträgen (Option "Vorgesetzter darf vergangene Urlaubsanträge löschen / stornieren" und "Vorgesetzter darf zuküftige Urlaubsanträge löschen / stornieren" in den Globalen Einstellungen).
|
| 2 | Ein Admin kann die Genehmigung von Anträgen durch einen Vertreter deaktivieren (Option "Vertreter dürfen Anträge genehmigen" in den Globalen Einstellungen) |
Sichtrechte auf Attest-Informationen
Zu jedem Krankheitseintrag kann mit Hilfe des
Attest Status im Timebutler gespeichert werden, ob das ärztliche Attest beim Arbeitgeber eingegangen ist. Ein Admin kann die Sichtrechte auf den Attest-Status festlegen.
Sichtrechte auf Krankheitseinträge einschränken
Es ist möglich, die Sichtrechte auf fremde Krankheitseinträge für Mitarbeiter-Nutzer teilweise oder ganz einzuschränken. In diesem Fall haben die Mitareiter-Nutzer keine Sichtrechte auf die Attest-Informationen. Lesen Sie hier, wie Sie für Mitarbeiter-Nutzer die
Sichtrechte auf Krankheitseinträge einschränken.
Sichtrechte auf Attest-Status einstellen
Melden Sie sich als Admin am Timebutler an und klicken links unten auf "
Einstellungen > Weitere..", dann rechts auf "
Globale Einstellungen". Prüfen/ändern Sie die Option "
Anzeige der Attest-Information bei Krankheit".
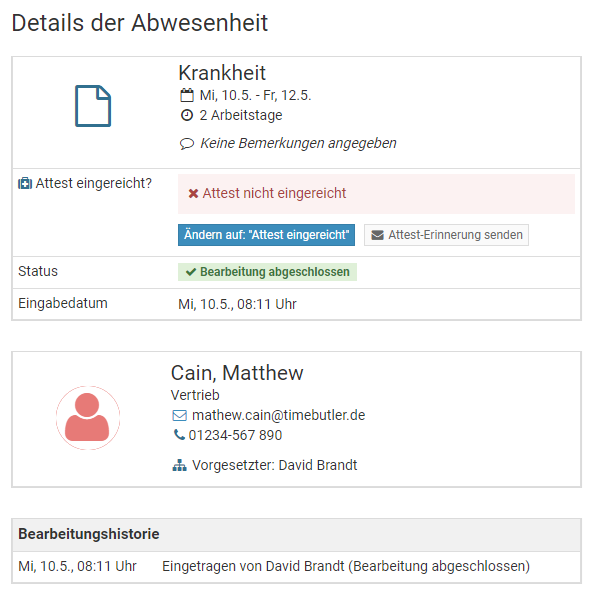
Sichtrechte auf Krankheitseinträge einschränken
Ein Admin kann die Sichtrechte auf Krankheitseinträge einschränken, insbesondere für Mitarbeiter Nutzer.
Lesen Sie hier, wie Sie die
Sichtrechte auf Krankheitseinträge einschränken.
Sichtrechte erweitern
Jeder Mitarbeiter hat je nach Nutzertyp unterschiedliche
Sichtrechte. Ein Admin kann die Sichtrechte erweitern, wie folgt:
Sichtrechte auf Abteilungen, Mitarbeiter oder Nutzergruppen erweitern
Admins haben Sichtrechte auf alle Nutzer und alle Abwesenheiten und Einträge. Vorgesetzte und Mitarbeiter haben hingegen Sichtrechte nur auf die Mitarbeiter mit dem gleichen Vorgesetzten. Sie können die Sichtrechte für jeden Vorgesetzten und Mitarbeiter individuell erweitern.
Melden Sie sich dazu als Admin am Timebutler an und klicken links unten auf "
Einstellungen > Sichtrechte". Hier können Sie für jeden Nutzer erweiterte Sichtrechte auf Abteilungen, einzelne Mitarbeiter oder auch
Nutzergruppen freischalten.
Sichtrechte für Mitarbeiter: nach Abteilung oder Vorgesetztem
Ein Admin kann einstellen, ob die Mitarbeiter-Nutzer die Kollegen mit dem gleichen Vorgesetzten oder dem gleichen Abteilungsnamen sehen dürfen. Melden Sie sich dazu als Admin am Timebutler an und klicken links unten auf "
Einstellungen > Weitere..", dann rechts auf "
Globale Einstellungen". Prüfen/ändern Sie nun die Option "
Mitarbeiter sehen Kollegen mit dem gleichen Vorgesetzten oder Abteilung" (unten auf der Seite).
Sichtrechte am Nutzerkonto individuell einstellen
Die Sichtrechte können auch für einzelne Mitarbeiter-Nutzer individuell geändert werden, am Nutzerkonto des Mitarbeiters. Folgende Optionen stehen zur Verfügung:
- Standardeinstellung: darf die Kollegen gemäß der Auswahl in den "Globalen Einstellungen" sehen (gleicher Vorgesetzter oder gleiche Abteilung)
- Darf die Kollegen sehen, die den gleichen Vorgesetzten haben, unabhängig vom Abteilungsnamen.
- Darf die Kollegen sehen, die den gleichen Abteilungsnamen haben, unabhängig vom Vorgesetzten.
- Darf keine anderen Kollegen sehen.
Um die Einstellung am Nutzerkonto zu ändern, melden Sie sich mit einem Admin am Timebutler an, klicken links oben auf "
Mitarbeiter > Mitarbeiter > Übersicht", dann bei dem gewünschten Mitarbeiter auf das grüne Symbol mit dem Bleistift (=Bearbeiten). Ändern Sie die Option "
Sichtrechte".
Sichtrechte für alle Mitarbeiter auf alle Mitarbeiter freischalten
In kleinen Unternehmen kommt oftmals der Wunsch auf, allen Mitarbeitern Sichtrechte auf alle Kollegen freizuschalten. Das können Sie mit wenigen Mausklicks erledigen. Melden Sie sich dazu als Admin am Timebutler an und klicken links unten auf "
Einstellungen > Weitere..", dann rechts auf "
Globale Einstellungen". Prüfen/ändern Sie nun die Option "
Sichtbarkeit auf alle Nutzer" (unten auf der Seite).
Screenshot: Erweiterte Sichtrechte einstellen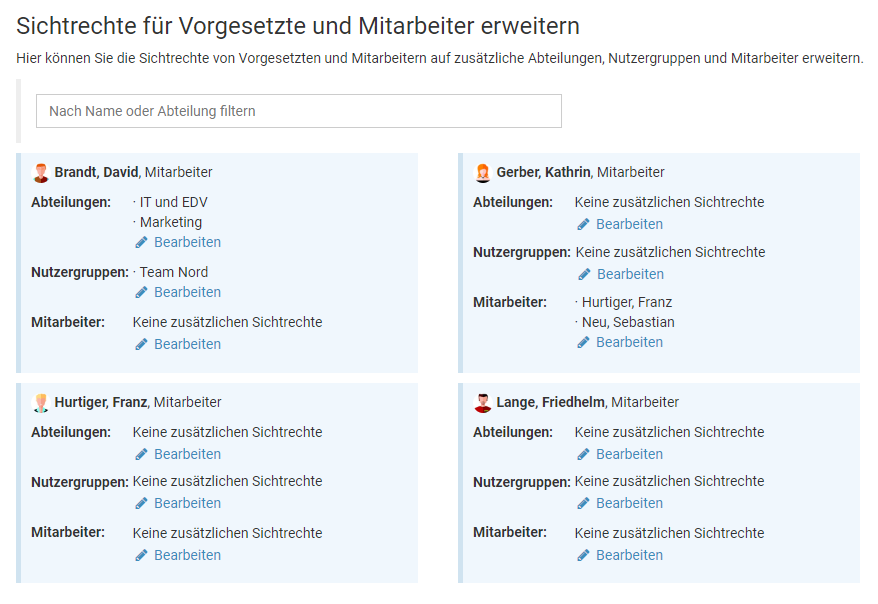
Eingaberechte erweitern
Jeder Mitarbeiter hat je nach Nutzertyp unterschiedliche
Eingabe- und Bearbeitungsrechte.
Eingaberechte für Mitarbeiter-Nutzer erweitern
Mitarbeiter-Nutzer dürfen nur für sich selbst Urlaub und Abwesenheiten eingeben. Ein Admin kann für einzelne Mitarbeiter das Recht auf Eingabe von Urlaub und Abwesenheiten auch für andere Mitarbeiter freischalten.
Um die Einstellung am Nutzerkonto zu ändern, melden Sie sich mit einem Admin am Timebutler an, klicken links oben auf "
Mitarbeiter > Mitarbeiter > Übersicht", dann bei dem gewünschten Mitarbeiter auf das grüne Symbol mit dem Bleistift. Ändern Sie die Einstellung bei "
Eingaberecht".
Folgende Optionen stehen zur Verfügung:
- Standard für Mitarbeiter-Nutzer: darf für keine anderen Nutzer Einträge eingeben.
- Darf für alle Nutzer Einträge eingeben, auf die er Sichtrechte hat (inkl. Sichtrechte aus den "Erweiterten Sichtrechten").
- Eingaberecht für alle Nutzer: darf für alle Nutzer im Unternehmen Einträge eingeben.
- Kein Eingaberecht: darf für keinen anderen Nutzer Einträge eingeben.
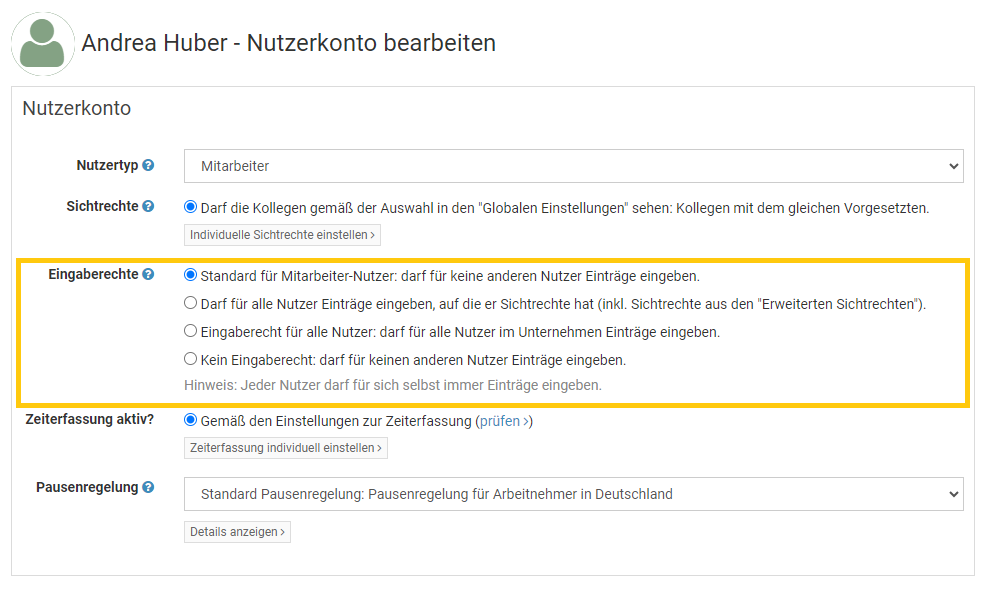
Eingaberechte nach Abwesenheitstyp festlegen
Admins können immer jeden Abwesenheitstyp eingeben. Für jeden Abwesenheitstyp kann festgelegt werden, ob auch Mitarbeiter-Nutzer oder Vorgesetzte diese eingeben dürfen.
Melden Sie sich als Admin am Timebutler an, klicken links unten auf "
Einstellungen > Weitere.." und dann rechts auf "
Abwesenheitstypen". Sie sehen in der Übersicht die Einstellungen für jeden Abwesenheitstyp. Um einen Abwesenheitstyp zu bearbeiten, klicken Sie in der Zeile des gewünschten Abwesenheitstyps auf den grünen Button "
Bearbeiten". Sie können nun Änderungen an den Einstellungen vornehmen und die Änderungen speichern.
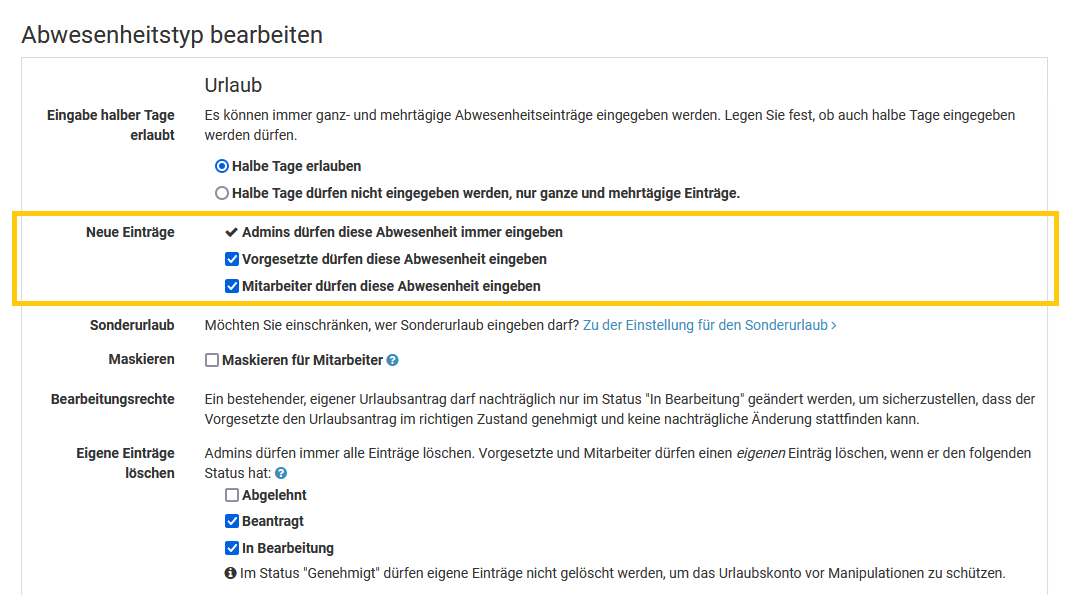
Maskierung von Abwesenheiten
Ein Admin kann einstellen, dass Mitarbeiter-Nutzer fremde Abwesenheitseinträge zwar im Kalender angezeigt bekommen, im Kalender jedoch nur ein neutrales "
Abwesend" angezeigt wird ohne Hinweis auf den Abwesenheitstyp.
Die Maskierung kann für jeden Abwesenheitstyp individuell aktiviert werden. Lesen Sie hier, wie Sie die
Maskierung aktivieren.
Vorgesetzte zuordnen
Sie können für jeden Nutzer im Timebutler einen Vorgesetzten zuordnen, oder auch
mehrere Vorgesetzte. Vorgesetzte erhalten dadurch Sichtrechte, Bearbeitungsrechte und das Recht zur Genehmigung von Anträgen der Mitarbeiter. Wenn ein Mitarbeiter einen Urlaubsantrag oder einen anderen
genehmigungspflichtigen Abwesenheitseintrag eingibt, dann startet automatisch der Genehmigungsworkflow. Der oder die Vorgesetzte(n) werden per Email über den neuen Antrag benachtrichtigt und können den Antrag genehmigen oder ablehnen.
Vorgesetzten-Zuordnung bearbeiten
Um die Zuordnung der Mitarbeiter zu Vorgesetzten einzusehen oder zu bearbeiten, melden Sie sich als Admin am Timebutler an und klicken links unten auf "
Einstellungen > Vorgesetzte".
Geschäftsführer / Eigene Vorgesetzte
Jedem Mitarbeiter muss immer mindestens ein Vorgesetzte zugeordnet werden. Manche Mitarbeiter haben keinen Vorgesetzten, beispielsweise die Geschäftsführung. In diesem Fall legen Sie als den Vorgesetzten des Geschäftsführers einfach den Geschäftsführer selbst fest. Wenn der Geschäftsführer einen Urlaubsantrag für sich eingibt, dann erkennt Timebutler, dass der Geschäftsführer sein eigener Vorgesetzter ist. Es startet dann nicht der Genehmigungsworkflow, sondern der Urlaubsantrag wird sofort auf "
Genehmigt" gesetzt.
Screenshot: Vorgesetzte zuordnen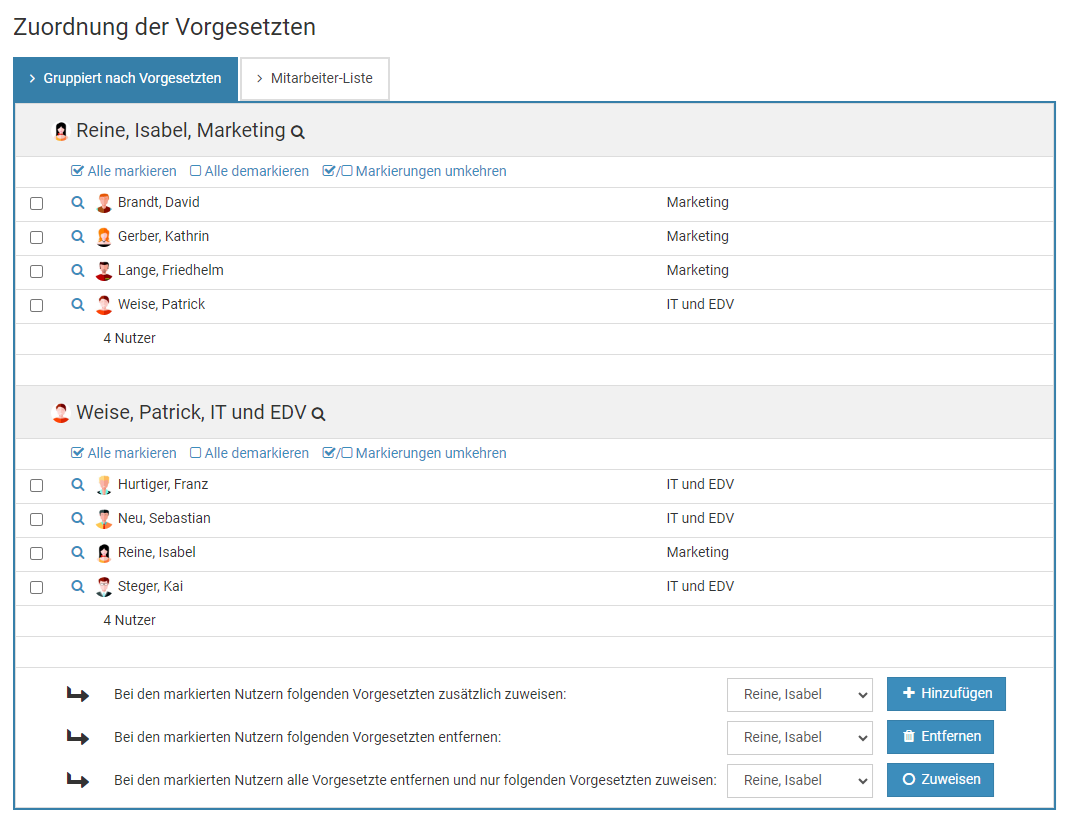
Screenshot: Mehrere Vorgesetzte zuordnen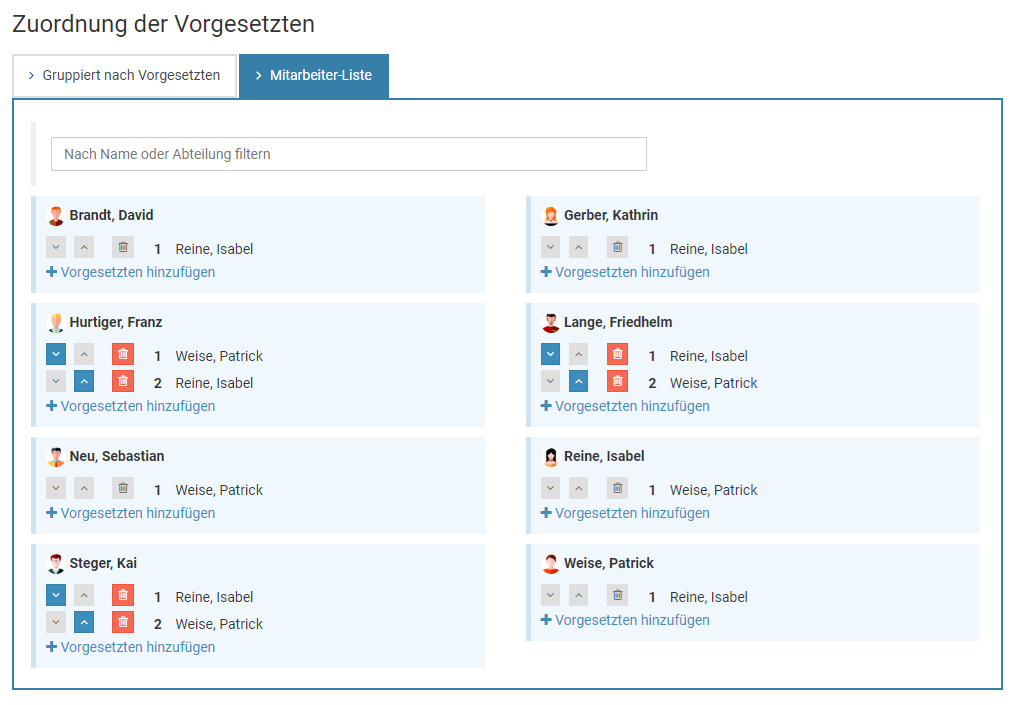
Mehrere Vorgesetzte
Sie können jedem Nutzer einen oder auch mehrere Vorgesetzte zuordnen.
Lesen Sie hier, wie Sie den
Mitarbeitern mehrere Vorgesetzte zuordnen.
Zweck und Nutzen der Nutzergruppen
Sie können beliebige Nutzer in Nutzergruppen zusammenfassen. Die Nutzergruppen haben folgenden Zweck:
Filtermöglichkeit
Timebutler bietet in vielen Ansichten eine Filtermöglichkeit, beispielsweise in der Kalenderansicht oder der Listenansicht der Abwesenheiten und Arbeitszeiteinträge. Sobald Sie mindestens eine Gruppe erstellt haben, bekommen Sie im Filter auch die Option der Nutzergruppen angezeigt. Damit können Sie die Ansicht auf eine Nutzergruppe filtern.
Da in einer Nutzergruppe beliebige Mitarbeiter aus verschiedensten Abteilungen oder Standorten zusammengefasst werden können, haben Sie auf diese Weise die Möglichkeit, die Ansichten auf eine ganz individuelle Mitarbeitergruppe zu filtern. Sie können beispielsweise eine Nutzergruppe "Planungsteam Sommerfest" mit Mitarbeitern aus verschiedensten Abteilungen und Standorten erstellen und dann die Kalenderansicht auf diese Mitarbeiter filtern.
Zur Erweiterung von Sichtrechten
Sie können die Sichtrechte von Mitarbeitern und Vorgesetzten auf weiter Abteilungen, einzelne Mitarbeiter oder auch Nutzergruppen erweitern. Sobald Sie also mindestens eine Nutzergruppe erstellt haben, können Sie bei den Einstellungen für die
Erweiterten Sichtrechten auch Nutzergruppen freischalten.
Keine automatischen Sichtrechte
Wenn Sie eine Nutzergruppe erstellen, dann erhalten die Mitarbeiter aus der Nutzergruppe nicht automatisch auch Sichtrechte aufeinander.
Beispiel: Mitarbeiter Schmitt hat Sichtrechte auf Meier und Müller. Sie erstellen nun eine Nutzergruppe mit den Mitarbeitern Schmitt, Huber und Hoffmann. Damit erhält Mitarbeiter Schmitt nicht Sichtrechte auf Huber und Hoffmann, sondern hat weiterhin nur Sichtrechte auf Meier und Müller.
Verwendung bei vielen Einstellungen
Viele Einstellungen können auf bestimmte Nutzergruppen eingeschränkt werden, beispielsweise die
Begrenzungen und Mindestverfügbarkeit von Mitarbeitern, bei der
Übertragung von Resturlaub, im
Downloadcenter, zur Einschränkung von Mitarbeitern die
nur am Zeiterfassungsterminal die Stempeluhr starten dürfen und vieles mehr. Bei diesen Einstellungen werden jedoch nur gemeinsame Nutzergruppen angeboten, nicht persönliche Nutzergruppen.
Erfassung von Arbeitszeit nur im Zeiterfassungsterminal
Sie können festlegen, dass bestimmte Mitarbeiter
nur am Zeiterfassungsterminal die Stempeluhr starten dürfen (und wenn gewünscht auch nur dort stoppen dürfen). Dazu benötigen Sie eine Nutzergruppe.
Nutzergruppen erstellen und bearbeiten
Jeder Nutzer kann
Nutzergruppen erstellen und bearbeiten. Dazu meldet sich der Nutzer an seinem Nutzerkonto am Timebutler an und klickt links unten auf "
Einstellungen > Nutzergruppen".
Administratoren können gemeinsame oder persönliche Nutzergruppen erstellen. Vorgesetzte und Mitarbeiter-Nutzer können nur persönliche Nutzergruppen erstellen.
Gemeinsame Nutzergruppe
Gemeinsame Nutzergruppen sind Nutzergruppen, die auch jeder andere Nutzer angezeigt bekommt und auswählen kann.
Viele Einstellungen können auf bestimmte Nutzergruppen eingeschränkt werden, beispielsweise die
Begrenzungen und Mindestverfügbarkeit von Mitarbeitern, bei der
Übertragung von Resturlaub, im
Downloadcenter, zur Einschränkung von Mitarbeitern die
nur am Zeiterfassungsterminal die Stempeluhr starten dürfen und vieles mehr. Bei diesen Einstellungen werden jedoch nur gemeinsame Nutzergruppen angeboten, nicht persönliche Nutzergruppen.
Persönliche Nutzergruppe
Persönliche Nutzergruppen sind Nutzergruppen, die nur der Ersteller der Nutzergruppe sieht und verwenden kann, kein anderer Nutzer.
Corporate Design und Firmenlogo bearbeiten
Mit dem Corporate Design Manager können Sie Timebutler an die Farben Ihres Unternehmens anpassen und auch Ihr Unternehmens-Logo einbinden.
Um das Corporate Design zu bearbeiten, melden Sie sich als Admin am Timebutler an, klicken links unten auf "
Einstellungen > Weitere..", dann rechts auf "
Corporate Design", anschließend auf den Button "
Corporate Design bearbeiten".
Corporate Design dauerhaft aktivieren
Sie können festlegen, ob die Mitarbeiter direkt nach der Anmeldung Timebutler in Ihrem
Corporate Design angezeigt bekommen sollen oder im Standarddesign.
Melden Sie sich dazu als Admin am Timebutler an, klicken links unten auf "
Einstellungen > Weitere..", dann rechts auf "
Corporate Design". In dem Kasten "
Designvorgabe nach Login" können Sie die gewünschte Einstellung vornehmen.
Auswahl der Anzeigesprache
Jeder Nutzer kann selbst entscheiden, in welcher Sprache er Timebutler verwendet. Um die gewünschte Sprache auszuwählen, gibt es folgende Möglichkeiten:
Sprachauswahl, wenn im Nutzerkonto angemeldet
Wenn der Nutzer an seinem Nutzerkonto im Timebutler angemeldet ist, dann kann er auf einer beliebigen Seite im Timebutler oben rechts auf das Symbol mit der Weltkugel klicken und dort die Sprache wählen. Ebenso gibt es im Footer-Bereich (unten auf der Seite) auf allen Seiten im Timebutler die Links für die Sprachen ("Deutsch | English (UK) | English (US)").
Sprachauswahl, wenn nicht im Nutzerkonto angemeldet
Wenn der Nutzer nicht an seinem Nutzerkonto im Timebutler angemeldet ist, dann kann er auf einer beliebigen Seite im Timebutler oben rechts auf das Symbol mit der Weltkugel klicken und dort die Sprache wählen.
Timebutler kann in einer der folgenden Sprachen verwendet werden:
- Deutsch
- Englisch UK: britisches Englisch und Datumsformat dd/mm/yyyy
- Englisch US: US-Englisch und Datumsformat mm/dd/yyyy
Hinweis:Bei jedem Nutzerkonto kann auch eine
Sprache ausgewählt werden. Mit dieser Auswahl wird jedoch nur festgelegt, in welcher Sprache Timebutler an den Nutzer Emails versendet und hat keinen Einfluss darauf, für welche Sprache sich der Nutzer bei der Verwendung von Timebutler entscheidet.
Screenshot: Auswahl der Anzeigesprache im Nutzerkonto
Screenshot: Auswahl der Anzeigesprache im Footer
Spracheinstellung im Nutzerkonto für die Emails
Bei jedem Nutzerkonto kann eine Sprache eingestellt werden. Mit dieser Auswahl wird festgelegt, in welcher Sprache Timebutler an den Nutzer Emails versendet.
Sprache für den Versand der Emails prüfen
In der
Detailansicht zu jedem Nutzerkonto finden Sie die Information, welche Sprache für den Email-Versand eingestellt ist.
Sprache für den Versand der Emails ändern
Um die Sprache zu ändern, melden Sie sich mit einem Admin am Timebutler an, klicken links oben auf "
Mitarbeiter", dann unterhalb des kleinen "
Mitarbeiter" auf "
Übersicht". Klicken Sie bei dem gewünschten Nutzer auf das grüne Symbol mit dem Bleistift (=Bearbeiten). Ändern Sie die Auswahl bei "
Sprache" und speichern die Änderung per Klick unten auf den blauen Button "
Speichern".
HinweisDiese Einstellung zur Sprache im Nutzerkonto hat keinen Einfluss darauf, in welcher Sprache der Nutzer Timebutler verwendet. Der Nutzer kann die
Sprache für die Anzeige stattdessen jederzeit selbst wählen.
Fehlerhafte Darstellung von Texten und Sprache
Manche Nutzer berichten von einem Darstellungsproblem im Timebutler. Einzelne Begriffe sind vermeintlich ins Englische übersetzt oder es werden unpassende Formulierungen und Begriffe verwendet. Das Problem kann sowohl beim Aufruf von Timebutler über das Smartphone auftreten, als auch beim Aufruf über einen Laptop/PC oder ein Tablet. Oftmals tritt das Problem nur auf einem der Geräte auf, nicht auf den anderen Geräten.
Das Problem hatte immer folgende Ursache:
Der Nutzer hat im Timebutler die Sprachauswahl (versehentlich) auf Englisch umgestellt und auf dem Gerät ist im Browser eine automatische Übersetzung von englischen Webseiten ins Deutsche aktiviert. Damit liefert Timebutler dann die korrekten englischen Begriffe und Formulierungen aus, der Browser versucht die Webseite jedoch zu übersetzen. Oftmals gelingt das nicht und es kommt zu dem beschriebenen Problem, dass im Timebutler unpassende Formulierungen und Begriffe verwendet werden.
Die fehlerhafte Anzeige kann einfach wie folgt behoben werden:
1) Sprache auf Deutsch ändernRufen Sie Timebutler auf und ändern Sie die Sprache auf Deutsch. Lesen Sie hier, wie Sie die
Sprachauswahl auf Deutsch ändern.
2) Automatische Übersetzung deaktivierenIn den Einstellungen des Browsers sollten Sie die automatische Übersetzung von Webseiten deaktivieren - oder zumindest für Timebutler deaktivieren. Damit wird verhindert, dass das Problem nochmal auftritt, wenn Sie die Sprache versehentlich wieder auf Englisch stellen.
Screenshot: Beispiel einer fehlerhaft übersetzten AnsichtDer englische Begriff "Calendar view" wurde zu "Kalender Sicht" übersetzt, der Button für den Monat "May" wurde als "Dürfen" übersetzt ("may" bedeutet im Englischen sowohl "Mai" als auch "dürfen") und "Today" wurde zu "Am Tag" übersetzt).
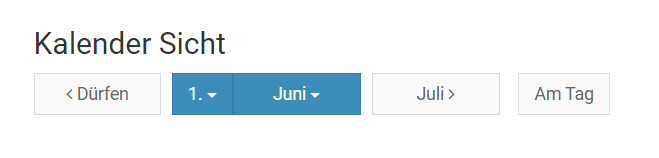
Globale Einstellungen bearbeiten
Die Globalen Einstellungen bieten vielfältige Möglichkeiten, um Timebutler an die Bedürfnisse Ihres Unternehmens anzupassen.
Bei der ersten Anmeldung am Timebutler sind die Optionen in den Globalen Einstellungen so gesetzt, dass sie für die meisten Unternehmen richtig sind. Es ist dennoch sinnvoll, die Optionen zu Beginn durchzugehen und möglicherweise bei manchen Optionen eine andere Einstellung zu wählen. In der Regel müssen die Globalen Einstellungen nur einmalig zu Beginn geprüft und eingestellt werden und danach ist keine Änderung mehr notwendig.
Um die Globalen Einstellungen zu ändern, melden Sie sich mit einem Admin Nutzer am Timebutler an, klicken links unten auf "Einstellungen > Weitere..", dann rechts auf "Globale Einstellungen".
Feiertage an Mitarbeiter zuordnen
Feiertage beim Erstellen eines Nutzerkontos
Wenn Sie ein einzelnes Nutzerkonto erstellen, dann gibt es eine Option "
Feiertagsregelung", bei der Sie die gewünschte Feiertagsregelung auswählen können.
Feiertage beim Massenimport von Nutzerkonten
Beim Massenimport von Nutzerkonten können Sie in der Excel-Datei zwischen den verschiedenen Feiertagsregelungen wählen, die im Timebutler voreingestellt sind.
In der Excel-Datei werden jedoch die von
Ihnen erstellen Feiertagsregelungen für weitere Länder nicht zur Auswahl angeboten. Sie können dann aber wie folgt vorgehen:
1. Standard-Feiertagsregelung festlegenIn den
Standard-Einstellungen für neue Nutzer stellen Sie die gewünschte Feiertagsregelung ein.
2. Auswahl in der Excel-VorlageIn der Excel-Datei für den Massenimport der Nutzerkonten wählen Sie in der Spalte "
Feiertagsregelung" die Option "
- Standard Feiertagsregelung -" aus.
Feiertage an einem bestehenden Nutzerkonto ändern
Melden Sie sich als Admin am Timebutler an und klicken links unten auf "
Einstellungen", dann darunter auf "
Arbeitstage". Bei dem gewünschten Mitarbeiter klicken Sie auf den blauen Button "
Bearbeiten". Nun können Sie bei der Option "
Feiertagsregelung" die gewünschte Feiertagsregelung für den Nutzer einstellen.
Feiertage bei mehreren, bestehenden Nutzerkonten ändern
Melden Sie sich als Admin am Timebutler an und klicken links unten auf "
Einstellungen", dann darunter auf "
Weitere..". Klicken Sie nun auf der Seite auf "
Feiertagsregelung" (nicht auf "Feiertage"). Bei der Feiertagsregelung, die Sie den Mitarbeitern zuweisen möchten, klicken Sie auf den orangen Button "
Zuordnung zu Nutzern", anschließend auf "
Mehreren Nutzern zuweisen". Folgen Sie nun den Erläuterungen auf der Webseite, um die Feiertagsregelung den gewünschten Mitarbeitern zuzuweisen.
Wechsel der Feiertage zu einem bestimmten Datum
Wenn sich die Feiertage für einen Mitarbeiter zu einem bestimmten Datum ändern, beispielsweise weil er den Standort wechselt, dann können Sie das im Timebutler problemlos einstellen, mit Hilfe
mehrerer Zeiträume für das Arbeitszeitmodel.
Beachten Sie auch die
Standard-Einstellungen für neue Nutzer. Darin können Sie festlegen, welche Feiertagsregelung beim Erstellen neuer Nutzerkonten automatisch vorausgewählt sein soll. Insbesondere wenn Sie eine abweichende Feiertagsregelung als Standard einsetzen, sollten Sie diese bei den Standard-Einstellungen festlegen, damit beim Erstellen der Nutzerkonten nicht versehentlich eine falsche Feiertagsregelung ausgewählt wird.
Feiertage hinzufügen
Sie können beliebige,
neue Feiertagsregelungen für weitere Länder erstellen und dann auch beliebige Feiertage hinzufügen.
Melden Sie sich mit einem Admin am Timebutler an und klicken links unten auf "
Einstellungen", dann darunter auf "
Weitere..", dann rechts auf "
Feiertage" (nicht auf Feiertagsregelung). Sie sehen eine Liste an Feiertagen, die von Timebutler bereitgestellt werden und automatisch berechnet werden. Insbesondere die variablen Feiertage wie Ostermontag, Karfreitag, usw. werden von Timebutler automatisch für jedes Jahr berechnet.
Die meisten Feiertage, die Sie benötigen, sind in dieser Liste sicherlich bereits vorhanden. Es gibt aber oftmals noch einzelne Feiertage, die in der Liste nicht aufgeführt sind, wie beispielsweise spezielle Nationalfeiertage bestimmter Länder.
Klicken Sie auf der Seite auf den Button "
Neuer Feiertag" und erstellen den gewünschten Feiertag. Dabei können Sie wählen
- der Feiertag gilt nur in einem bestimmten Jahr
- der Feiertag gilt jedes Jahr am gleichen Datum
- der Feiertag gilt jedes Jahr am gleichen Datum jedoch nur ab einem bestimmten Jahr
Neue Feiertage haben zunächst keine Auswirkung auf Ihre Mitarbeiter. Den Mitarbeiter werden die Feiertage nicht direkt zugeordnet, sondern stattdessen werden den Mitarbeitern Feiertagsregelungen zugeordnet. Eine Feiertagsregelung ist die Zusammenfassung bestimmter Feiertage zu einer Gruppe.
Damit also ein Feiertag für einen oder mehrere Mitarbeiter gilt, müssen Sie diesen Feiertag in einer neuen Feiertagsregelung zusammen mit allen anderen Feiertagen, die für den Mitarbeiter gelten sollen, hinzufügen und dann die Feiertagsregelung den Mitarbeitern zuordnen. Lesen Sie hier, wie Sie
einen oder mehrere Feiertage hinzufügen.
Es ist auch möglich, die neuen Feiertag zu einer bestehenden Feiertagsregelung hinzuzufügen.
Heilig Abend, Silvester, Altweiber, und weitere hinzufügen
Sie können für jeden Mitarbeiter die gültigen Feiertage festlegen.
Ebenso können Sie beliebige Feiertage zuordnen, beispielsweise Heilig Abend, Silvester, Rosenmontag, Altweiber und andere. Diese Feiertage sind keine gesetzlichen Feiertage, deswegen sind sie nicht Bestandteil der Feiertagsregelungen, die im Timebutler bereits hinterlegt sind.
Um Heilig Abend, Silvester, Altweiber oder weitere Feiertage hinzuzufügen, gehen Sie wie folgt vor:
1.
Melden Sie sich mit einem Admin am Timebutler an und klicken links unten auf "
Einstellungen", dann darunter auf "
Weitere..", dann rechts auf "
Feiertagsregelung".
2.
Klicken Sie auf den Button "
Neue Feiertagsregelung erstellen". Geben Sie einen Namen für die Feiertagsregelung ein, zum Beispiel "Feiertage XY GmbH".
3.
Nun müssen alle gewünschten Feiertage aktiviert werden, die für das Land gelten. Das geschieht in zwei Schritten:
Schritt 1: Bei der Option "
Zugehörige Feiertage" können Sie eine der vorhandenen Feiertagsregelungen auswählen, die Ihren gewünschten Feiertagen am nächsten kommt. Wenn Ihr Firmenstandort beispielsweise in Frankfurt liegt, dann wählen Sie "Deutschland - Hessen" aus. Alle Feiertage, die in dem gewählten Bundesland gelten, werden nun für Sie vorausgewählt. Das erspart Ihnen die mühselige Auswahl der Feiertage.
Schritt 2: Nun setzen Sie auch die Häkchen bei den Feiertagen, die zusätzlich gelten sollen, also beispielsweise bei "Heilig Abend" (halber Tag oder ganzer Tag) oder "Silvester" (halber Tag oder ganzer Tag). Klicken Sie dazu in der Liste die gewünschten Feiertage an, um diese zu markieren.
4.
Klicken Sie anschließend unten auf den Button "
Speichern". Die Feiertagsregelung wird nun gespeichert.
5.
Timebutler bietet Ihnen als nächstes an, die neue Feiertagsregelung bestimmten Nutzern zuzuordnen. Sie können die neue Feiertagsregelung also schon den passenden Nutzern zuordnen. Sie können den Punkt aber auch überspringen und erst später die
Feiertagsregelung den Nutzerkonten zuordnen.
Sobald die Feiertagsregelung überarbeitet wurde, berechnet Timebutler alle Urlaubsanträge und alle Urlaubskonten der Mitarbeiter unter Berücksichtigung der neuen Feiertage neu.
Wenn die Feiertagsregelung als Standard auch für zukünftige Nutzerkonten gelten soll, dann ist es sinnvoll, die Feiertagsregelung bei den
Standard-Einstellungen für neue Nutzer zu hinterlegen.
Feiertagsregelungen für weitere Länder
Sie können im Timebutler problemlos beliebige Feiertage festlegen und diese zu einer Feiertagsregelung zusammenfassen. Für die deutschen Bundesländer, Österreich, Schweiz, UK und USA stehen bereits fertige Feiertagsregelungen zur Auswahl.
Wenn Sie für weitere Länder Feiertagsregelungen benötigen, erstellen Sie einfach je Land eine Feiertagsregelung, wie folgt am Beispiel für Spanien:
1.
Ermitteln Sie zunächst, welche Feiertage in dem von Ihnen gewünschten Land gelten, in dem Beispiel wäre das also Spanien. Sie können sich im Internet informieren oder die Kollegen im Unternehmensstandort des Landes teilen Ihnen die Feiertage mit.
2.
Melden Sie sich mit einem Admin am Timebutler an und klicken links unten auf "
Einstellungen", dann darunter auf "
Weitere..", dann rechts auf "
Feiertage" (nicht auf Feiertagsregelung).
3.
Sie sehen eine Liste an Feiertagen, die von Timebutler bereitgestellt werden und automatisch berechnet werden. Insbesondere die variablen Feiertage wie Ostermontag, Karfreitag, usw. werden von Timebutler automatisch für jedes Jahr berechnet.
Die meisten Feiertage, die Sie benötigen, sind in dieser Liste sicherlich bereits vorhanden. So ist es auch für Spanien. Es gibt aber oftmals noch einzelne Feiertage, die in der Liste nicht aufgeführt sind, wie beispielsweise spezielle Nationalfeiertage in dem Land.
In Spanien gilt beispielsweise der Nationalfeiertag am 12. Oktober. Klicken Sie auf der Seite auf den Button "
Neuer Feiertag" und erstellen einen Feiertag "Fiesta nacional de España", der jedes Jahr am 12.10. stattfinden soll.
4.
Wiederholen Sie Schritt 3 für alle Feiertage, die Sie benötigen und die in der Liste der Feiertage noch nicht aufgeführt sind.
5.
Klicken Sie nun links unten auf "
Einstellungen", dann darunter auf "
Weitere..", dann rechts auf "
Feiertagsregelung".
6.
Klicken Sie auf den Button "
Neue Feiertagsregelung erstellen". Geben Sie einen Namen für die Feiertagsregelung ein, zum Beispiel "Feiertage Spanien".
7.
Nun müssen alle gewünschten Feiertage aktiviert werden, die für das Land gelten. Klicken Sie dazu die gewünschten Feiertage an, um diese zu markieren.
8.
Klicken Sie anschließend unten auf den Button "
Speichern". Die Feiertagsregelung wird nun gespeichert.
9.
Timebutler bietet Ihnen an, die neue Feiertagsregelung bestimmten Nutzern zuzuordnen. Sie können die neue Feiertagsregelung also schon den passenden Nutzern zuordnen. Sie können den Punkt aber auch überspringen und erst später die
Feiertagsregelung den Nutzerkonten zuordnen.
Wenn Sie für weitere Länder Feiertagsregelungen benötigen, dann wiederholen Sie die oben genannten Schritte für jedes Land, für das Sie eine Feiertagsregelung benötigen.
Regeln zur Berechnung des Urlaubsanspruchs
Wenn ein Mitarbeiter unterjährig in das Unternehmen eintritt oder unterjährig das Unternehmen verlässt, dann hat er für das Kalenderjahr weniger Urlaubsanspruch. Ebenso ändert sich der Urlaubsanspruch bei einer Anpassung der Wochenarbeitstage beispielsweise wenn ein Mitarbeiter die Wochenarbeitstage von Montag bis Freitag auf Montag + Mittwoch + Donnerstag reduziert.
Timebutler wird in diesen Fällen den
Urlaubsanspruch automatisch neu berechnen. Die Regeln für die Berechnung des neuen Urlaubsanspruchs können Sie individuell einstellen:
Melden Sie sich als Admin am Timebutler an, klicken links unten auf "
Einstellungen > Weitere..", dann rechts auf "
Berechnung des Urlaubsanspruchs" und nehmen die Einstellungen vor.
Screenshot: Einstellungen zur Berechnung des Urlaubsanspruchs
Mehrstufiger Genehmigungsworkflow
Sie können jedem Nutzer einen oder auch mehrere Vorgesetzte zuordnen und damit einen mehrstufigen Genehmigungsworkflow einstellen.
Lesen Sie hier, wie Sie den
Mitarbeitern mehrere Vorgesetzte zuordnen.
Standard-Einstellungen für neue Nutzer
Sie können festlegen, welche Einstellungen vorausgewählt sein sollen, wenn Sie neue Nutzerkonten erstellen. Insbesondere beim Massenimport von Nutzerkonten sind diese Standardeinstellungen wichtig, da Sie auf diese Weise bequem
Nutzer mit verschiedenen Arbeitszeitmodellen importieren können.
Die Standard-Einstellungen können Sie bearbeiten, indem Sie sich mit einem Admin am Timebutler anmelden, dann links unten auf "
Einstellungen > Weitere.." klicken, dann auf der Seite auf "
Standard-Einstellungen für neue Nutzer".
Sie haben hier verschiedene Optionen für die Feiertagsregelung, den Jahresurlaub und die Wochenarbeitstage.
Falls das Zeiterfassungsfeature aktiviert ist, können Sie auch die Standard Einstellungen für das
Kappen von Überstunden, für
Runden von Arbeitszeiten und für die
Rüstzeiten einstellen.
Screenshot: Einstellungen für neue Nutzerkonten
Email Kopien an die Personalabteilung oder weitere Personen
Timebutler verschickt bei verschiedenen Gelegenheiten der Abwesenheitsverwaltung Email Benachrichtigungen an die Vorgesetzten und Mitarbeiter. Beispielsweise wird der Vorgesetzte informiert, wenn ein Mitarbeiter einen Urlaubsantrag oder einen genehmigungspflichtigen Abwesenheitseintrag eingegeben hat.
Sie können einstellen, dass zusätzlich auch die Personalabteilung oder sonstige Email-Empfänger benachrichtigt werden.
Melden Sie sich dazu als Admin am Timebutler an, klicken links unten auf "
Einstellungen > Weitere..", dann rechts auf "
Kopien der Informations-Emails". Tragen Sie hier die gewünschten Empfänger-Email-Adressen ein. Sie können den Empfang der Benachrichtigung auch auf Mitarbeiter nur bestimmter Abteilungen oder Standorte eingrenzen und auch festlegen, dass nur Kopien bei bestimmten Abwesenheitstypen verschickt werden sollen, beispielsweise nur bei Urlaub und Krankheit.
Der Empfänger erhält dann zunächst eine Email mit einem Link zur Bestätigung, dass er die Benachrichtigungs-Emails erhalten möchte. Erst nach der Bestätigung ist der Versand der Benachrichtigungs-Emails aktiviert.
HinweisDa nur bei genehmigungspflichtigen Anträgen Emails verschickt werden, ist es nicht möglich, dass die Emfänger auch bei nicht-genehmigungspflichtigen Abwesenheiten benachrichtigt werden.
Dabei gibt es eine Ausnahme: Sie können die
Benachrichtigung bei Krankheitseinträgen aktivieren.
Screenshot: Einstellung zu den Kopien der Informations-Emails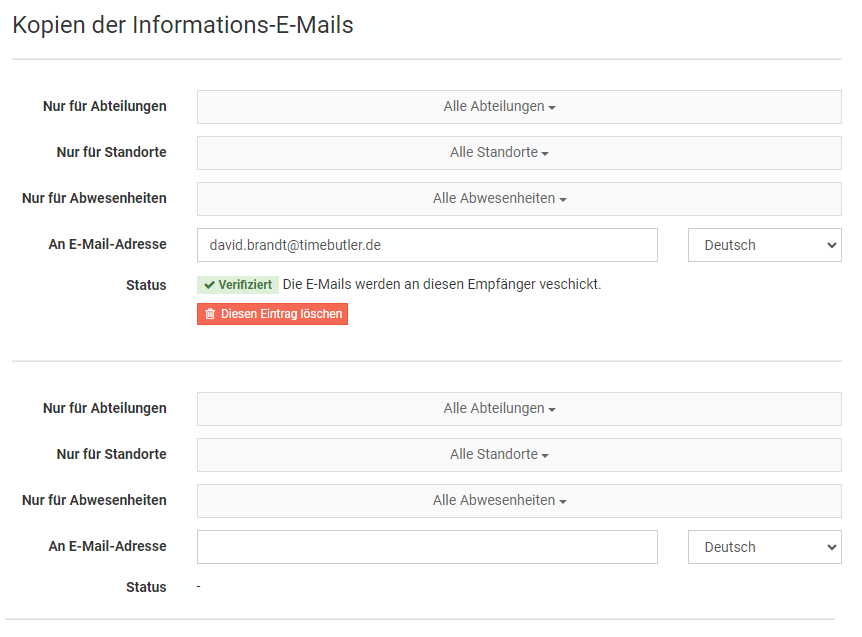
Automatisches Löschen von Daten
Die Datenschutz-Grundverordnung legt unter anderem fest, dass persönliche Daten nicht länger aufbewahrt und verarbeitet werden sollen, als notwendig. Timebutler hilft Ihnen dabei, diese Vorgabe zu erfüllen: Sie können im Timebutler einstellen, dass die Mitarbeiterdaten nach einer bestimmten Zeit automatisch gelöscht werden. Darüber hinaus können Sie für die Dokumente, die Sie in der
digitalen Personalakte hochladen , ein eigenes Löschdatum einstellen.
Einstellungen für das automatische Löschen
Sie können festlegen, wie lange die persönlichen Daten aufbewahrt werden und wann sie automatisch gelöscht werden sollen. Melden Sie sich als Admin am Timebutler an, klicken links unten auf "
Einstellungen > Weitere..", dann rechts auf "
Automatisches Löschen von Daten".
Hier können Sie die Aufbewahrungsdauer für die Mitarbeiterdaten einstellen sowie getrennt davon die Aufbewahrungsdauer für die Dokumente der Personalakte.
Protokoll über automatische Löschvorgänge
Auf der Seite erhalten Sie unter "
Protokoll über automatische Löschvorgänge" auch den Einblick, welche Löschvorgänge durchgeführt wurden und wer die Einstellung zu welchem Zeitpunkt geändert hat.
Welche Mitarbeiterdaten werden gelöscht?
Es werden lediglich die Bewegungsdaten der Mitarbeiter gelöscht, die älter als der eingestellte Zeitraum sind:
- Abwesenheitseinträge
- Arbeitszeiteinträge
- Überstundeneinträge und Überstundenabbau-Anträge
- Urlaubsanspruchswerte
- Urlaubssperren
- Änderungsanträge für Arbeitszeiten
Die Nutzerkonten werden
nicht gelöscht.
Welche Mitarbeiterdaten werden nicht gelöscht?
Es werden nur die Daten gelöscht, wie oben beschrieben. Weitere Daten werden
nicht gelöscht, beispielsweise:
- Nutzerkonten
- Einstellungen
- Feiertage, Feiertagsregelungen
- Nutzergruppen
- Personalakte
- usw.
Welche Dokumente der Personalakte werden gelöscht?
Es werden alle Dokumente gelöscht, bei denen das Datum, an dem das Dokument zu Timebutler hochgeladen wurde, älter ist als der eingestellte Zeitraum.
Dokumente werden nach Einstelldatum gelöscht
Die Dokumente in der Personalakte werden auf Basis des Datums gelöscht, an dem sie im Timebutler hochgeladen wurden. Es wird also nicht des Erstellungsdatum des Dokuments oder ein anderes Datum verwendet.
Welche Daten in der Personalakte werden nicht gelöscht?
In der Personalakte werden nur die Dokumente gelöscht, siehe oben. Alle anderen Daten in der Personalakte werden nicht gelöscht.
Wann werden die Daten gelöscht?
- Wenn Sie die Einstellungen zum Aufbewahren/Löschen der Daten ändern, dann werden innerhalb der folgenden 48 Stunden die betroffenen Daten gelöscht.
- Weiterhin wird regelmäßig und automatisch eine Löschroutine ausgeführt, die alte Daten ermittelt und automatisch löscht, gemäß Ihren Einstellungen.
Wie können die nicht gelöschten Daten dennoch gelöscht werden?
Wenn Sie das Nutzerkonto und die Daten nicht mehr benötigen, dann
löschen Sie das Nutzerkonto. Damit werden alle Daten des Nutzers unwiderruflich gelöscht, inklusive aller Daten und den Dokumenten der Personalakte.
Können gelöschte Daten wiederhergestellt werden?
Die gesetzliche Vorgabe fordert, dass die Daten endgültig und unwiderruflich gelöscht werden. Aus datenschutzrechtlichen Gründen ist das Löschen also ein endgültiger und unwiderruflicher Vorgang. Die Daten können nicht wiederhergestellt werden.
Die Daten werden gemäß Vorgaben aus dem Datenschutz unwiderruflich gelöscht. Die gelöschten Daten können also nicht wiederhergestellt werden. Stellen Sie sicher, dass Sie nicht einen zu kurzen Zeitraum einstellen.
Screenshot: Einstellung zum automatischen Löschen der Daten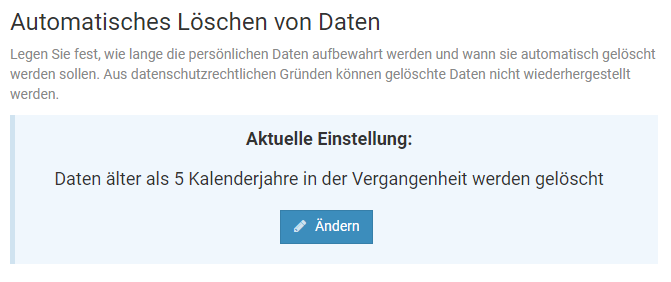
Mitteilung erstellen
Mit Hilfe der Mitteilungszentrale kann ein Vorgesetzter eine Mitteilung an sein Team senden oder ein Admin aus der Personalabteilung eine Mitteilung an bestimmte Mitarbeiter oder an alle Mitarbeiter im Unternehmen senden.
Um die Mitteilungszentrale zu öffnen, melden Sie sich am Timebutler an und klicken rechts oben auf das Symbol mit dem Briefumschlag.
Die Empfänger der Mitteilung bekommen dann auf allen Seiten im Timebutler rechts oben bei dem Symbol mit dem Briefumschlag einen Hinweis auf ungelesene Nachrichten angezeigt. Mit Klick darauf können die Mitarbeiter die offenen Mitteilungen einsehen und lesen.
Um sicherzustellen, dass die Mitarbeiter die Mitteilung lesen, besteht die Möglichkeit, beim Erstellen der Mitteilung eine
Benachrichtigungs-E-Mail an alle Empfänger senden zu lassen.
Screenshot: Neue Mitteilung erstellen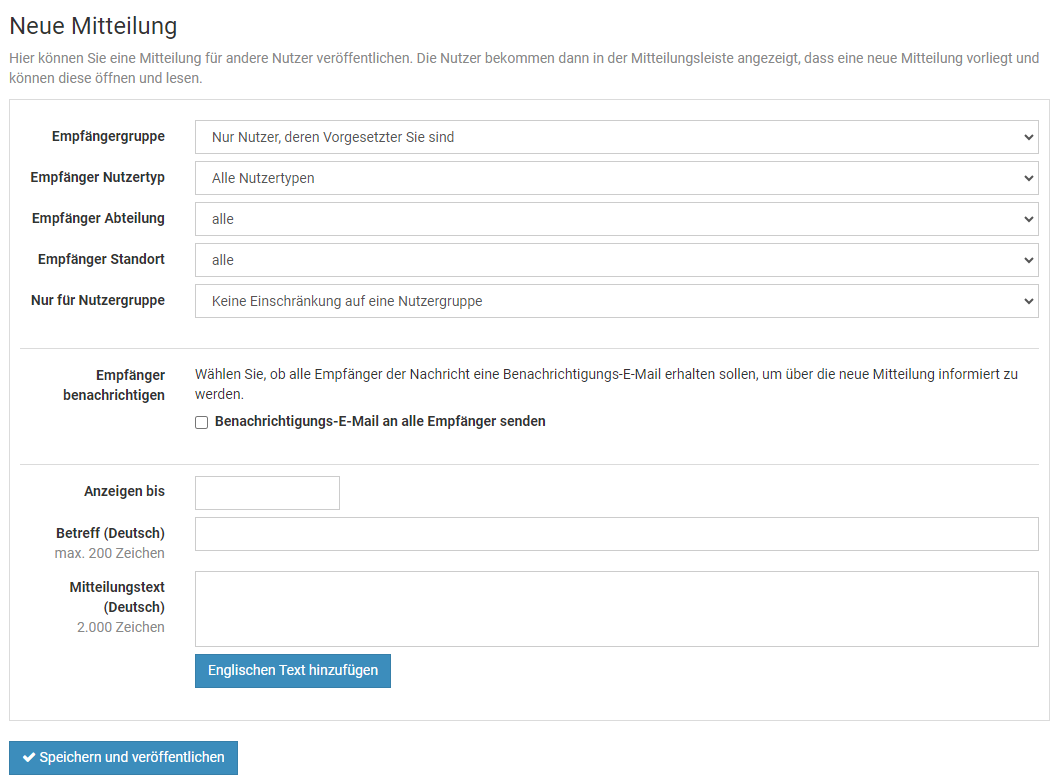
Mitarbeiter über neue Mitteilungen informieren
Wenn ein Admin oder ein Vorgesetzter eine Mitteilung in der
Mitteilungszentrale erstellt, dann werden die Empfänger der Mitteilung bei der nächsten Anmeldung im Timebutler rechts oben bei dem Symbol mit dem Briefumschlag einen Hinweis auf ungelesene Nachrichten angezeigt bekommen.
Um sicher zu stellen, dass die Empfänger die Mitteilung lesen, kann bei Erstellen der Mitteilung die Option "
Benachrichtigungs-E-Mail an alle Empfänger senden" aktiviert werden. Timebutler wird dann Benachrichtigungs-E-Mail an alle Empfänger senden mit einem Link, der direkt zur Mitteilungszentrale und somit zur ungelesenen Nachricht führt.
Geburtstage und Firmenjubiläen bearbeiten
Für jeden Mitarbeiter kann das Geburtsdatum im Timebutler hinterlegt werden sowie das Eintrittsdatum im Unternehmen. Anhand des Eintrittsdatums berechnet Timebutler die Firmenjubiläen des Mitarbeiters.
Geburtstag und Eintrittsdatum bei neuen Nutzerkonten eintragen
Beim Erstellen eines neuen Nutzerkontos gibt es das Feld "
Geburtstag" sowie "
Eintrittsdatum", in dem Sie die Informationen eintragen können.
Ebenso gibt es in der Excel-Datei für den Massenimport von Nutzerkonten zwei Spalten "
Geburtstag" sowie "
Eintrittsdatum".
Geburtstag und Eintrittsdatum bei einem bestehenden Nutzerkonten ändern
Um das Geburtsdatum oder das Eintrittsdatum bei einem bestehenden Nutzerkonto zu ändern, melden Sie sich als Admin am Timebutler an klicken links oben auf "
Mitarbeiter", dann unterhalb des kleinen "
Mitarbeiter" auf "
Übersicht". Klicken Sie nun bei dem gewünschten Nutzerkonto auf das grüne Symbol mit dem Bleistift (=Bearbeiten). In der Bearbeitungsmaske für das Nutzerkonto gibt es nun die zwei Felder "
Geburtstag" sowie "
Eintrittsdatum", in dem Sie die Änderungen vornehmen können. Klicken Sie anschließend unten auf den blauen Button "
Speichern".
Anzeige von Geburtstagen und Firmenjubiläen
Lesen Sie hier, wo die
Geburtstage und Firmenjubiläen angezeigt werden.
Anzeige von Geburtstagen und Firmenjubiläen
Für jeden Mitarbeiter kann der Geburtstag und das Eintrittsdatum eingetragen werden. Timebutler berechnet daraus automatisch die Geburtstagtermine und Firmenjubiläen und informiert über bevorstehende Termine.
Lesen Sie hier, wie Sie die
Geburtstage und das Eintrittsdaten eingeben. Die Geburtstage und Firmenjubiläen werden im Timebutler wie folgt angezeigt:
Dashboard
Im Dashboard (Startseite nach der Anmeldung im Timebutler) erhalten Admins und Vorgesetzte die anstehenden Geburtstage und Firmenjubiläen der Mitarbeiter angezeigt, auf die sie Sichtrechte haben.
Mitarbeiter-Nutzern werden die Geburtstage und Firmenjubiläen im Dashboard nicht angezeigt.
In dem Kasten für die Geburtstage und Firmenjubiläen wird rechs oben ein Symbol mit einem Zahnrad angezeigt. Mit einem Klick darauf kann eingestellt werden, wie viele Tage in die Zukunft/Vergangenheit anstehende Geburtstage und Firmenjubiläen auf dem Dashboard angezeigt werden sollen.
Kalender
Für Admins und Vorgesetzte werden im Kalender die Geburtstage und Firmenjubiläen durch ein Geschenk-Symbol / Trophäen-Symbol angezeigt. Wenn die Maus über den Kalendertag geführt wird, erscheint, dann werden zusätzliche Informationen in einem kleinen Fenster angezeigt.
Ein Admin kann festlegen, ob auch Mitarbeiter-Nutzer die Geburtstage und Firmenjubiläen im Kalender angezeigt bekommen. Die Geburtstage werden dann jedoch ohne Jahreszahl ausgegeben (beispielsweise "Geburtstag am 5.3."), da viel Mitarbeiter nicht wünschen, dass die Jahreszahl und somit das Alter bekannt gegeben werden. Für diese Einstellung gibt es die Option "
Mitarbeiter sehen Geburtstage und Firmenjubiläen der Kollegen" in den
Globalen Einstellungen.
Screenshot: Geburtstage und Firmenjubiläen auf dem Dashboard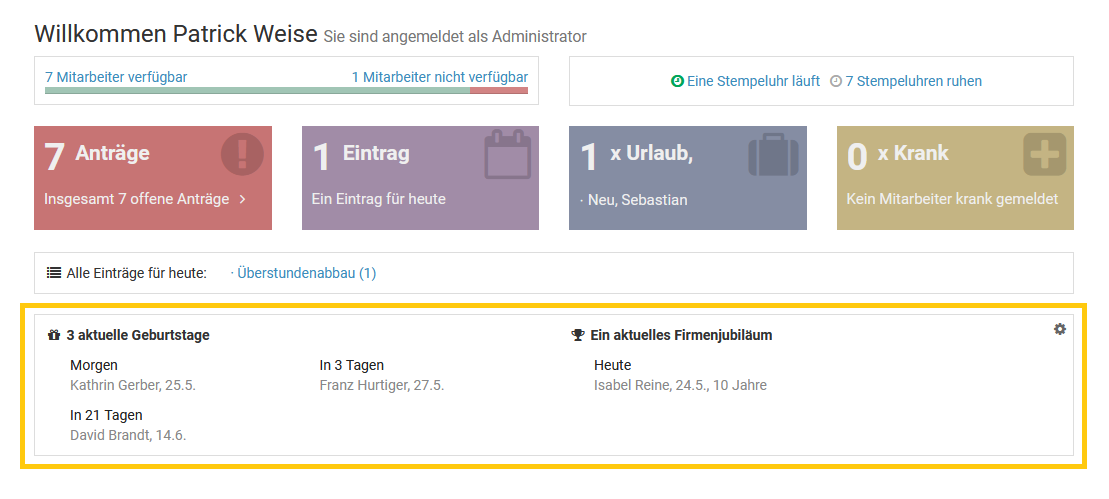
Listenansicht und Herunterladen der Daten
Es ist auch möglich, die
Geburtstage und Firmenjubiläen als Liste herunterzuladen.
Alle Jubiläen und Geburstage werden angezeigt
Timebutler zeigt die Jubiläen und Geburtstage wie oben beschrieben für alle Jahre an.
In Drittkalendern abonnieren
Sie können den
Timebutler-Kalender in einem Drittkalender abonnieren, damit die Abwesenheitseinträge automatisch in den Drittkalender übertragen und dort angezeigt werden.
Wenn Sie den Timebutler-Kalender im Drittkalender abonnieren, dann können Sie auswählen, ob auch die Geburtstage und die Firmenjubiläen übertragen werden sollen. Im Drittkalender werden die Informationen dann wie folgt angezeigt:
Geburtstage: Jährlicher Serieneintrag an dem Tag und Monat des Geburtstags. Der Serieneintrag beginnt immer 10 Jahre in der Vergangenheit und aus Datenschutzgründen nicht im Geburtsjahr des Mitarbeiters, damit die Information über das Alter des Mitarbeiters nicht in Drittsysteme gelangt.
Firmenjubiläen: Jährlicher Serieneintrag an dem Tag und Monat des ersten Tages im Unternehmen, startend ab dem Jahr, an dem der Mitarbeiter in das Unternehmen eingetreten ist.
Nur bei Team-Kalendern
Die Auswahl zur Übertragung der Geburtstage und Firmenjubiläen wird nur angeboten, wenn Sie als Vorgesetzter die Einträge Ihres Teams synchronisieren möchten oder wenn Sie als Admin die Einträge Ihres Teams oder aller Mitarbeiter synchronisieren möchten. Wenn Sie nur den eigenen Kalender abonnieren, dann wird Ihr Geburtstag und Firmenjubiläum nicht übertragen.
Geburtstage und Firmenjubiläen herunterladen
Im Timebutler können die Geburtstagstermine und die Eintrittstermine der Mitarbeiter hinterlegt werden. Aus den Eintrittsterminen kann Timebutler die Firmenjubiläen berechnen.
Die Geburtstage und Firmenjubiläen werden
im Dashboard und im Kalender angezeigt.
Um eine Liste der Geburtstage und Firmenjubiläen (genauer: der Eintrittstermine) der Mitarbeiter herunterzuladen, melden Sie sich als Admin oder als Vorgesetzter am Timebutler an, klicken links oben auf "
Mitarbeiter", dann unterhalb des kleinen "
Mitarbeiter" auf "
Übersicht". Klicken Sie auf den Button "
Herunterladen" und laden die Daten als Excel-Datei herunter. In der Excel-Datei finden Sie dann zwei Spalten "
Geburtstag" und "
Eintrittsdatum".
Preismodell
Für die Nutzung von Timebutler gilt ein einfaches und günstiges Preismodell.
Hier gelangen Sie
zum Preismodell.
Hier gelangen Sie
zu den häufigen Fragen zum Preismodell.
Flatrate
Für die Nutzung von Timebutler gilt eine einfach zu verstehende Flatrate: Sie erhalten Timebutler in der Flatrate und alle Features sind uneingeschränkt freigeschaltet. Es gibt
keine Zusatzkosten zur Freischaltung bestimmter Features, zur Einrichtung von Timebutler oder sonstige Kosten. Mit der Flatrate sind alle Leistungen abgedeckt und Sie haben vollständige Planungssicherheit.
Hier gelangen Sie
zum Preismodell.
Hier gelangen Sie
zu den häufigen Fragen zum Preismodell.
Nutzungszeitraum
Wenn Sie sich am Timebutler neu anmelden, dann erhalten Sie 6 Wochen
kostenlosen Nutzungszeitraum freigeschaltet. Um Timebutler darüber hinaus zu verwenden, bestellen Sie einfach online eine Nutzungsverlängerung.
Das Ende Ihres aktuellen Nutzungszeitraum können Sie jederzeit einsehen, indem Sie sich als Admin am Timebutler anmelden und links unten auf "
Kontostand > Kontostand" klicken. Timebutler wird die Admins rechtzeitig vor dem Ende des Nutzungszeitraums benachrichtigen, um eine
Nutzungsverlängerung zu bestellen.
Sie können jederzeit eine Verlängerung bestellen, unabhängig davon, wie lange Ihr Nutzungszeitraum noch gilt. Der neue Nutzungszeitraum startet immer mit dem letzten Folgetag des aktuellen Nutzungszeitraums, so dass die Zeit bis zum Ende des aktuellen Nutzungszeitraum immer erhalten bleibt.
Hinweise:- Wenn Sie die SEPA Lastschrift aktiviert haben, dann wird der Nutzungszeitraum automatisch verlängert. Sie bekommen dann den aktuellen Abrechnungszeitraum angezeigt.
- Wenn Sie eine andere Zahlungsart gewählt haben, dann haben Sie eine bestimmte Anzahl Monat erworben und Sie bekommen das Ende des aktuellen Nutzungszeitraums angezeigt.
Sie können jederzeit online bequem eine Nutzungsverlängerung bestellen.
Wenn Sie die SEPA Lastschrift aktivieren, dann wird der Nutzungszeitraum automatisch verlängert und die Beträge automatisch abgebucht. Sie arbeiten dann unterbrechungsfrei mit Timebutler.
Wenn Sie eine andere Zahlungsart wählen, dann erwerben Sie eine bestimmte Anzahl Monate, um die Ihr Nutzungszeitraum verlängert wird. In diesem Fall müssen Sie stets vor Ablauf des aktuellen Nutzungszeitraums eine Verlängerung bestellen.
Um eine Nutzungsverlängerung zu bestellen, gehen Sie wie folgt vor:
1)
Melden Sie sich als Admin am Timebutler an, klicken links unten auf "Kontostand > Kontostand" und dann auf der Seite auf den Button "Jetzt eine Verlängerung bestellen" (nur Admins haben die Berechtigung, Bestellungen einzugeben).
2)
Im nächsten Schritt wählen Sie die gewünschte Nutzungszeit (1, 3, 6 oder 12 Monate) aus und klicken entsprechend auf "Weiter".
3)
Nun bekommen Sie die verschiedenen Zahlungsarten zur Auswahl angeboten. Wählen Sie die für Sie passende Zahlungsart. Bitte beachten Sie, dass die Zahlungsart "Banküberweisung", also "Zahlung auf Rechnung", nur für 6 und 12 Monate möglich ist.
4)
Folgen Sie den Erläuterungen auf der Webseite, um die Bestellung abzuschließen.
Wenn Sie eine Rechnungsanschrift außerhalb Deutschlands haben, dann besteht in den meisten Fällen die Möglichkeit, dass die Umsatzsteuer (=Mehrwertsteuer) auf der Rechnung mit 0% ausgewiesen wird.
Damit auf der Rechnung die Umsatzsteuer mit 0% ausgewiesen wird, ist es notwendig, dass Sie bei der Bestellung Ihre Umsatzsteuer-ID angeben.
Sie können einstellen, dass neue Rechnungen automatisch per Email an Ihre Wunsch-Email-Adresse verschickt wird.
Die Email-Adresse können Sie während der Bestellung angeben.
Um die bestehende Email-Adresse einzusehen, nachträglich einzutragen oder zu ändern, gehen Sie wie folgt vor:
1)
Melden Sie sich als Admin am Timebutler an - nur Admins haben die Berechtigung, diese Änderung vorzunehmen. Falls Sie keinen Admin-Nutzer im Timebutler haben, können Sie einen Admin darum bitten.
2)
Klicken Sie links unten auf "Kontostand > Kontostand".
3)
Auf der Seite bekommen Sie im Kasten rechts oben mit der Überschrift "Deine Rechnungsadresse" auch die Email-Adresse angezeigt, an die neue Rechnungen verschickt werden. Um die Email-Adresse zu ändern, klicken Sie auf den Button "Details bearbeiten".
4)
Unter "Präferenzen für den Rechnungsempfang:" legen Sie fest, ob Sie die Rechnung direkt per Email erhalten möchten, ein Link für den Download der Rechnung in einer Email geschickt werden soll oder ob Sie keine Email bei Rechnungserstellung wünschen.
Die Timebutler Server werden im Rechenzentrum eines Marktführers für Hosting Leistungen unter entsprechenden Sicherheitsvorkehrungen betrieben. Das Rechenzentrum befindet sich bei Frankfurt am Main, Deutschland. Ihre Daten bleiben somit immer innerhalb der EU und werden nicht in Drittstaaten verarbeitet. Damit erfüllen Sie die Vorgaben der Datenschutz-Grundverordnung zur Verarbeitung der Daten innerhalb der EU.
Die Kommunikation des Internet-Browsers mit den Timebutler Servern erfolgt ausschließlich über eine geschützte Verbindung (per SSL / https). Die Timebutler Server lehnen jeden unverschlüsselten Verbindungsaufbau ab und verweisen auf die sichere Kommunikationsmöglichkeit. Auf diese Weise werden bei einem nicht sicheren Verbindungsaufbau niemals persönliche Daten übertragen.
Auf jeder Seite besteht die Möglichkeit, die Seite auszudrucken. Um eine Seite auszudrucken, können Sie die Druckfunktion Ihres Browsers benutzen oder Sie klicken auf das Symbol mit dem Drucker oben auf allen Seiten im Timebutler.
Durch die intelligente Druckfunktion werden automatisch stets nur die relevanten Bereiche der Seite ausgedruckt. So werden beispielsweise nicht die linke oder obere Navigationsleiste ausgedruckt, ebenso nicht viele der angezeigten Navigationselemente oder Buttons.
Kalender mit Farben ausdrucken
Wenn Sie eine Kalenderansicht ausdrucken, werden die farblichen Markierungen der Abwesenheiten in der Regel zunächst nicht ausgedruckt. Der Grund dafür ist, dass die farbliche Markierung eine Hintergrundeigenschaft ist und Hintergründe beim Ausdruck in der Regel nicht mit ausgedruckt werden.
Damit die Farben auch mit ausgedruckt werden, aktivieren Sie in den Optionen Ihres Internetbrowsers das Drucken von Hintergrundfarben. Je nach Internetbrowser gehen Sie wie folgt vor:
Chrome Browser
Rufen Sie die Funktion zum Drucken der Seite auf. Sie bekommen eine Vorschau des Ausdrucks angezeigt und können beispielsweise den Drucker wählen. Im linken unteren Bereich gibt es eine Option "Hintergrundfarben Drucken". Aktivieren Sie diese Option vor dem Ausdruck.
Firefox
Klicken Sie rechts oben auf das Menü-Symbol, dann auf "Drucken..". Es erscheint die Druckvorschau und in der rechten Leiste finden Sie die Optionen für das Drucken. Falls bei diesen Optionen die Überschrift "Mehr Einstellungen" angezeigt wird, klicken Sie darauf, um die zusätzlichen Einstellungen einzublenden. Sie finden nun darunter die Option "Einstellungen > Hintergrund drucken", die Sie bitte aktivieren.
Firefox Browser (ältere Versionen)
Gehen Sie auf das Menü "Datei > Seite einrichten", anschließend auf den Reiter "Format & Optionen". Dort aktivieren Sie die Option "Hintergrund drucken (Farben und Bilder)".
Internet Explorer
Gehen Sie auf das Menü "Datei > Druckvorschau...". Anschließend klicken Sie in dem Fenster mit der Druckvorschau oben in der Menüleiste auf das Symbol mit dem Zahnrad. Es öffnet sich ein kleines Fenster mit Titel "Seite einrichten". Aktivieren Sie hier die Option "Hintergrundfarben und -bilder drucken".
Edge Browser
Der Edge Browser unterstützt das Drucken der Hintergrundfarben leider nicht. Bitte nutzen Sie für den Ausdruck einen anderen Browser.
Andere Browser
Bei jedem Browser gibt es in den Optionen oder im Druckmenü eine Option, um auch Hintergrundfarben auszudrucken. Suchen und aktivieren Sie diese Option vor dem Ausdruck.
Das Single Sign On (SSO), also die automatische Anmeldung, können Sie im Timebutler wie folgt aktivieren:
Jeder Nutzer kann sein Timebutler Konto mit einem Google- / Microsoft- / Slack-Konto verknüpfen. Das hat dann den Vorteil, dass Sie sich am Timebutler-Konto nicht mehr durch Eingabe von Nutzername und Passwort anmelden müssen. Stattdessen können Sie dann zukünftig auf der Anmeldeseite von Timebutler auf den Login-Button per Google / Microsoft / Slack klicken und werden automatisiert angemeldet (Single Sign On).
Single Sign On aktivieren
Um die automatische Anmeldung per Google- / Microsoft- / Slack-Konto zu aktivieren, melden Sie sich am Timebutler an und klicken links unten auf "Einstellungen > Integration".
Sollten Sie hier nicht die Option für die automatische Anmeldung angezeigt bekommen, dann hat ein Administrator dieses Feature deaktiviert. Der Administrator kann das Feature aktivieren, indem er sich am Timebutler anmeldet, dann links unten auf "Einstellungen > Weitere.." klickt, dann rechts auf "Globale Einstellungen" und dann die Optionen "SSO (Single Sign On) über Google / Microsoft / Slack" aktiviert.
Wenn Ihr Unternehmen in mehrere Gesellschaften oder Standorte unterteilt ist, dann haben Sie die Mitarbeiter der verschiedenen Gesellschaften / Standorte im Timebutler möglicherweise in getrennten Nutzerkreisen angelegt. Wenn Sie zwei oder mehr Nutzerkreise zusammenführen möchten, sodass die Mitarbeiter der verschiedenen Nutzerkreise in einem gemeinsamen Nutzerkreis sind, dann gibt es folgende Möglichkeit:
Erstellen Sie in dem Ziel-Nutzerkreis die Nutzerkonten neu, die von dem "alten" Nutzerkreis in den "neuen" (Ziel-)Nutzerkreis umziehen sollen. Diese Nutzer verwenden ab einem von Ihnen festgelegten Zeitpunkt nur noch den neuen Nutzerkreis, nicht mehr den Alten. Die alten Einträge bis zu diesem Zeitpunkt sind weiterhin im alten Nutzerkreis gespeichert und können dort abgerufen werden.
Da Emailadressen nicht doppelt verwendet werden können, haben Sie zwei Möglichkeiten:
1) Sie erstellen die neuen Nutzerkonten jetzt bereits und geben keine Email-Adressen ein. Später entfernen Sie die Email-Adressen aus den alten Nutzerkonten und sperren diese Konten anschließend. Diese Emailadressen sind nun also wieder "frei" und können in den neuen Nutzerkonten hinterlegt werden.
2) Sie erstellen die neuen Nutzerkonten erst zu dem von Ihnen festgelegten Zeitpunkt der Zusammenlegung, entfernen direkt die Emailadressen in den alten Nutzerkonten, sperren diese und erstellen die neuen Nutzerkonten mit der Emailadresse im Ziel-Nutzerkreis.
Wenn Ihr Unternehmen Timebutler bereits im Einsatz hat und ein Teil des Unternehmens verkauft wird oder in verschiedene Gesellschaften unterteilt wird, dann ist es oftmals erforderlich, dass die Mitarbeiterdaten getrennt werden. Die Mitarbeiter des bestehenden Unternehmens sollen dann weiterhin in einem Nutzerkreis bleiben, die Mitarbeiter der austretenden Gesellschaft bzw. des verkauften Unternehmensanteils sollen hingegen in einen eigenen, vollkommen getrennten Nutzerkreis überführt werden.
Erstellen Sie für die Mitarbeiter, die aus dem "alten" Nutzerkreis austreten, in dem neuen Ziel-Nutzerkreis die Nutzerkonten neu. Diese Nutzer verwenden ab einem von Ihnen festgelegten Zeitpunkt nur noch den neuen Nutzerkreis, nicht mehr den Alten. Die alten Einträge bis zu diesem Zeitpunkt sind weiterhin im alten Nutzerkreis gespeichert und können dort abgerufen werden.
Da Emailadressen nicht doppelt verwendet werden können, haben Sie zwei Möglichkeiten:
1) Sie erstellen die neuen Nutzerkonten jetzt bereits und geben keine Email-Adressen ein. Später entfernen Sie die Email-Adressen aus den alten Nutzerkonten und sperren diese Konten anschließend. Diese Emailadressen sind nun also wieder "frei" und können in den neuen Nutzerkonten hinterlegt werden.
2) Sie erstellen die neuen Nutzerkonten erst zu dem von Ihnen festgelegten Zeitpunkt, entfernen direkt die Emailadressen in den alten Nutzerkonten, sperren diese und erstellen die neuen Nutzerkonten mit der Emailadresse im Ziel-Nutzerkreis.
Timebutler ermittelt die Liste der Abteilungen und Standorte automatisch aus den Angaben, die Sie in den Feldern "Abteilung" und "Standort" in den Nutzerkonten eingeben. Es gibt also keine zentrale Stelle, um die Liste er Abteilungen und Standorte zu verwalten.
Um eine Abteilung oder einen Standort zu löschen, entfernen Sie die Abteilung / den Standort aus den Feldern "Abteilung" und "Standort" in allen Nutzerkonten, bei denen die Abteilung oder der Standort eingetragen ist. Dazu gehen Sie wie folgt vor:
1) Nutzerkonten mit zu löschender Abteilung oder Standort ermitteln
Melden Sie sich als Admin am Timebutler an und klicken links oben auf "Mitarbeiter", dann unterhalb der kleinen Überschrift "Mitarbeiter" auf "Übersicht". Sie sehen die Liste aller Nutzerkonten. Klicken Sie rechts oben auf den grünen Button "Filter anzeigen".
Stellen Sie im Filter die gewünschte Abteilung oder den Standort ein und klicken auf den Button "Filter anwenden".
Sie sehen nun die Liste der Nutzerkonten, bei denen die zu löschende Abteilung oder der Standort eingetragen ist. Diese Nutzerkonten müssen bearbeitet werden und die Angabe zur Abteilung bzw. zum Standort entfernt werden.2) Entfernen der Angaben zur Abteilung oder dem Standort
Es gibt zwei Möglichkeiten, die Angaben in den Feldern Abteilung und Standort zu ändern:
Abteilung / Standort bei einem Nutzerkonto ändern oder entfernen
Bei dem Nutzerkonto klicken Sie auf den grünen Button mit dem Bleistift (=Bearbeiten). Ändern oder entfernen Sie nun die Angabe im Feld "Abteilung" oder "Standort".
Wiederholen Sie den Vorgang, bis die zu löschende Abteilung bzw. der Standort in keinem Nutzerkonto mehr eingetragen ist.
Änderung von Abteilung / Standort bei einer Vielzahl an Nutzerkonten
Falls Sie die Abteilung / Standort bei einer Vielzahl an Nutzerkonten ändern möchten, wäre es sehr umständlich, viele Nutzerkonten einzeln bearbeiten zu müssen. Stattdessen gibt es eine Möglichkeit zur Massenänderung.
Melden Sie sich als Admin am Timebutler an und klicken links unten auf "Einstellungen", dann darunter auf "Weitere..", dann rechts auf "Nutzerkonten Massenänderung". Klicken Sie nun auf einen der zwei Links "Eine Abteilung umbenennen" oder "Abteilung für bestimmte Nutzer ändern" und folgenden den Erläuterungen auf der Seite, um die Abteilung umzubenennen.
Bei der Eingabe einer Abwesenheit kann auch ein Vertreter ausgewählt werden. Es ist hier nicht möglich, mehrere Vertreter auszuwählen, sondern es kann nur ein Vertreter gewählt werden.
Der Grund dafür ist, dass zum einen nur sehr wenige Unternehmen eine solche Mehrfachauswahl bei den Vertretern benötigen. Zum anderen würde Timebutler durch eine Auswahl mehrerer Vertreter stark verkompliziert werden: es gibt viele Einstellungsmöglichkeiten im Zusammenhang mit Vertretern, beispielsweise Zusage durch Vertreter, Genehmigung durch Vorgesetzten erst nach Vertreterzusage und andere. Bei mehreren Vertretern würden beispielsweise die Genehmigungsworkflows verkompliziert. Auch könnten einzelne Vertreter die Genehmigung bewusst oder unbewusst verzögern oder unmöglich machen und hätten somit indirekt Weisungsbefugnis erlangt.
Ein weiteres Problem wäre die Anzeige in verschiedensten Ansichten. Beispielsweise in der Listenansicht wird auch der Vertreter und der Status der Vertretungszusage angezeigt. Bei einer Mehrfachauswahl würden die Listenansichten unübersichtlich werden und auseinandergerissen.
Sie haben aber stattdessen folgende Möglichkeit:
Wenn Sie eine Abwesenheit eingeben, dann wählen Sie den Hauptvertreter im dafür vorgesehenen Feld aus. Den zweiten oder auch weitere Vertreter tragen Sie einfach als Anmerkung im Feld "Bemerkungen" ein. Wenn sich die Kollegen dann über die Abwesenheit informieren, ist ersichtlich, wer die weiteren Vertreter sind.
Darüber hinaus hilft oft auch das Feature der Begrenzungen weiter:
Sie können einstellen, dass in bestimmten Abteilungen oder Nutzergruppen (oder im gesamten Unternehmen) eine bestimmte Anzahl Mitarbeiter immer anwesend sein muss. Timebutler stellt dann sicher, dass nicht zu viele Mitarbeiter gleichzeitig Urlaub nehmen. So können Sie beispielsweise festlegen, dass immer mindestens zwei Mitarbeiter aus der Abteilung "Vertrieb" anwesend sein müssen.
Die Begrenzungen können Sie einstellen, indem Sie sich als Admin am Timebutler anmelden und dann links unten auf "Einstellungen > Begrenzungen" klicken.
Wenn Sie für einen Mitarbeiter ein Nutzerkonto im Timebutler haben, der Mitarbeiter das Unternehmen verlässt und nach einiger Zeit wieder zurück ins Unternehmen kommt, dann gehen Sie wie folgt vor:
1) Altes Nutzerkonto sperren
Das bestehende Nutzerkonto sollten Sie sperren (falls nicht schon geschehen). Melden Sie sich dazu als Admin am Timebutler an, klicken links oben auf "Mitarbeiter", dann unterhalb des kleinen "Mitarbeiter" auf "Übersicht". Klicken Sie bei dem gewünschten Nutzerkonto auf das Symbol mit dem Vorhängeschloss und sperren das Nutzerkonto.
2) Email-Adresse entfernen
Nun entfernen Sie bei dem Nutzerkonto die Email-Adresse. Als Admin klicken Sie dazu links oben auf "Mitarbeiter", dann unterhalb des kleinen "Mitarbeiter" auf "Übersicht". Klicken Sie bei dem gewünschten Nutzerkonto auf das Symbol mit der Lupe (=Detailansicht). Auf der Seite bekommen Sie unter anderem die Email-Adresse des Nutzers angezeigt und daneben finden Sie den Link "entfernen". Klicken Sie auf den Link und folgen den Erläuterungen auf der Webseite, um die Email-Adresse zu entfernen. Das Nutzerkonto und alle Daten des Nutzerkontos bleiben dabei erhalten.
3) Neues Nutzerkonto erstellen
Danach erstellen Sie ein neues Nutzerkonto für den Kollegen mit der gleichen Email-Adresse. Es gibt dann also zwei Nutzerkonten für den einen Mitarbeiter. Ein Nutzerkonto ohne Email-Adresse, bei dem die alten Abwesenheitseinträge und Daten alle weiterhin gespeichert sind und abrufbar sind. Und ein neues Nutzerkonto, an dem sich der Mitarbeiter anmelden kann.
Wenn Sie beim Erstellen eines Nutzerkontos oder beim Ändern einer Email-Adresse die Fehlermeldung angezeigt bekommen, dass es bereits ein Nutzerkonto mit der angegebenen Email-Adresse gibt, dann kann das Nutzerkonto nicht erstellt werden.
Wenn Sie in der Übersicht der Mitarbeiter kein Nutzerkonto für die Email-Adresse finden, dann liegt es daran, dass der Mitarbeiter sich zuvor selbst ein Nutzerkonto erstellt hat. Dieses Nutzerkonto ist vollkommen getrennt von Ihrem Nutzerkreis und deswegen sehen Sie das Nutzerkonto nicht.
Damit Sie also ein neues Nutzerkonto mit der gewünschten Email-Adresse erstellen können, ist es notwendig, dass das bestehende Nutzerkonto zunächst gelöscht wird. Dazu geht der Besitzer des Nutzerkontos wie folgt vor:
1. Der Nutzer geht auf timebutler.de und meldet sich an (falls nicht automatisch angemeldet). Sollte der Nutzer das Passwort nicht mehr wissen, dann kann er auf der Seite für die Anmeldung auf den Link "Passwort vergessen" klicken.
2. Nun klickt der Nutzer links unten auf "Einstellungen > Ihr Nutzerkonto".
3. Auf der folgenden Seite klickt der Nutzer auf den Button "Nutzerkonto löschen" und folgt den Erläuterungen auf der Seite, um das Nutzerkonto zu löschen. Beachten Sie jedoch: das Nutzerkonto und alle zugehörigen Daten werden unwiderruflich gelöscht.
Sobald das Nutzerkonto gelöscht wurde, können Sie sich am Timebutler anmelden und ein neues Nutzerkonto mit der gewünschten Email-Adresse erstellen.